Category: Articles

  • Blusher vs Panther Cap: Amanita rubescens vs Amanita pantherina

    Blusher vs Panther Cap: Amanita rubescens vs Amanita pantherina

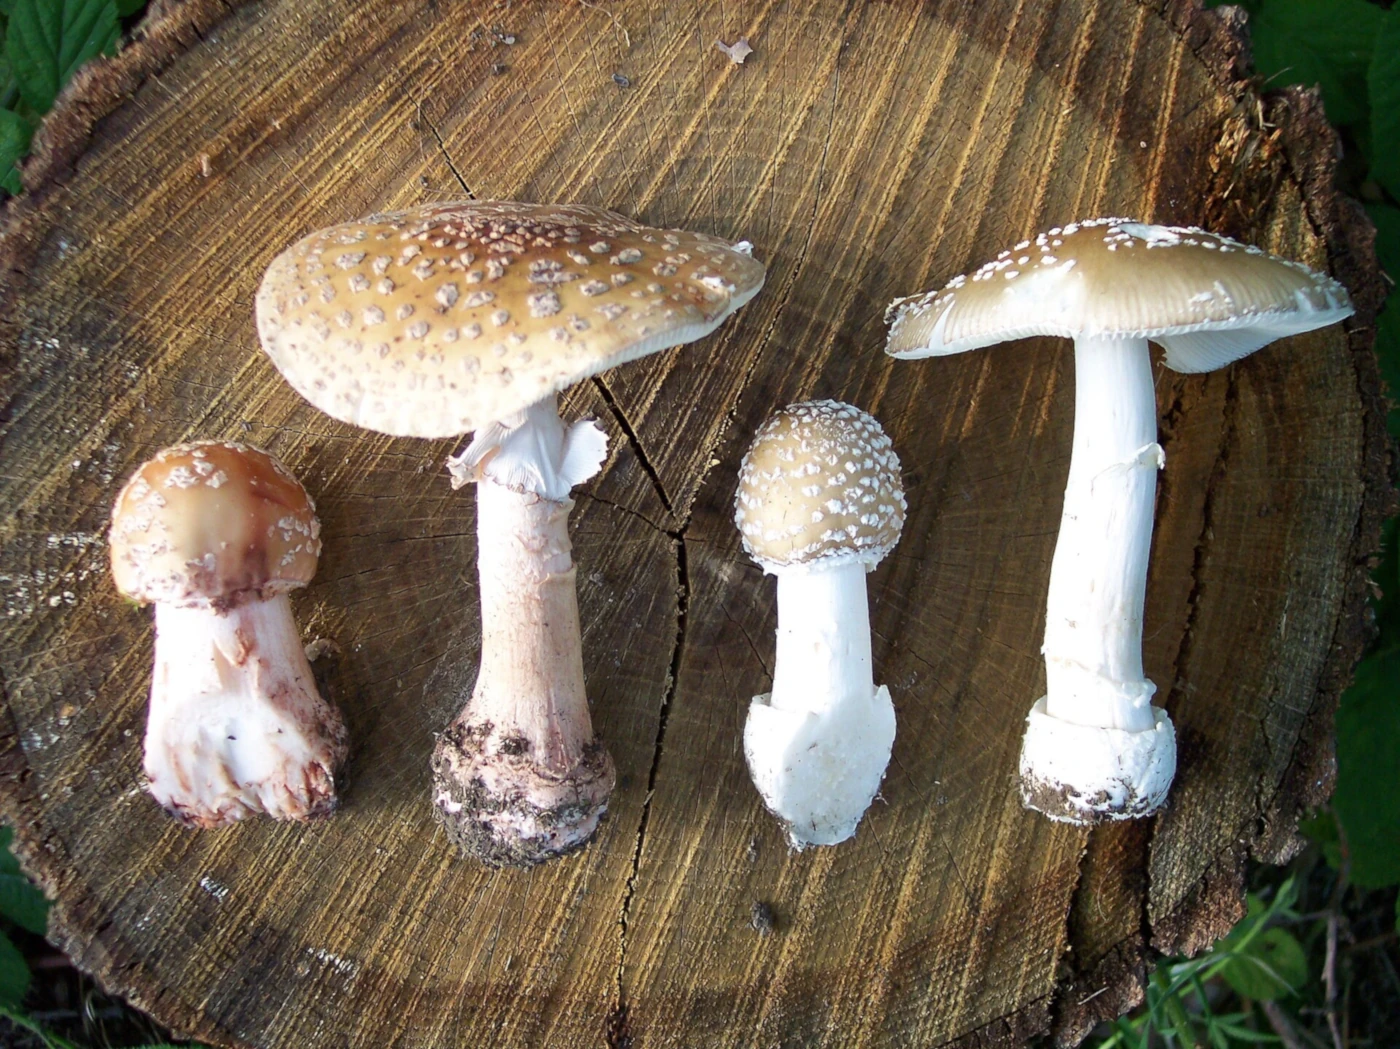
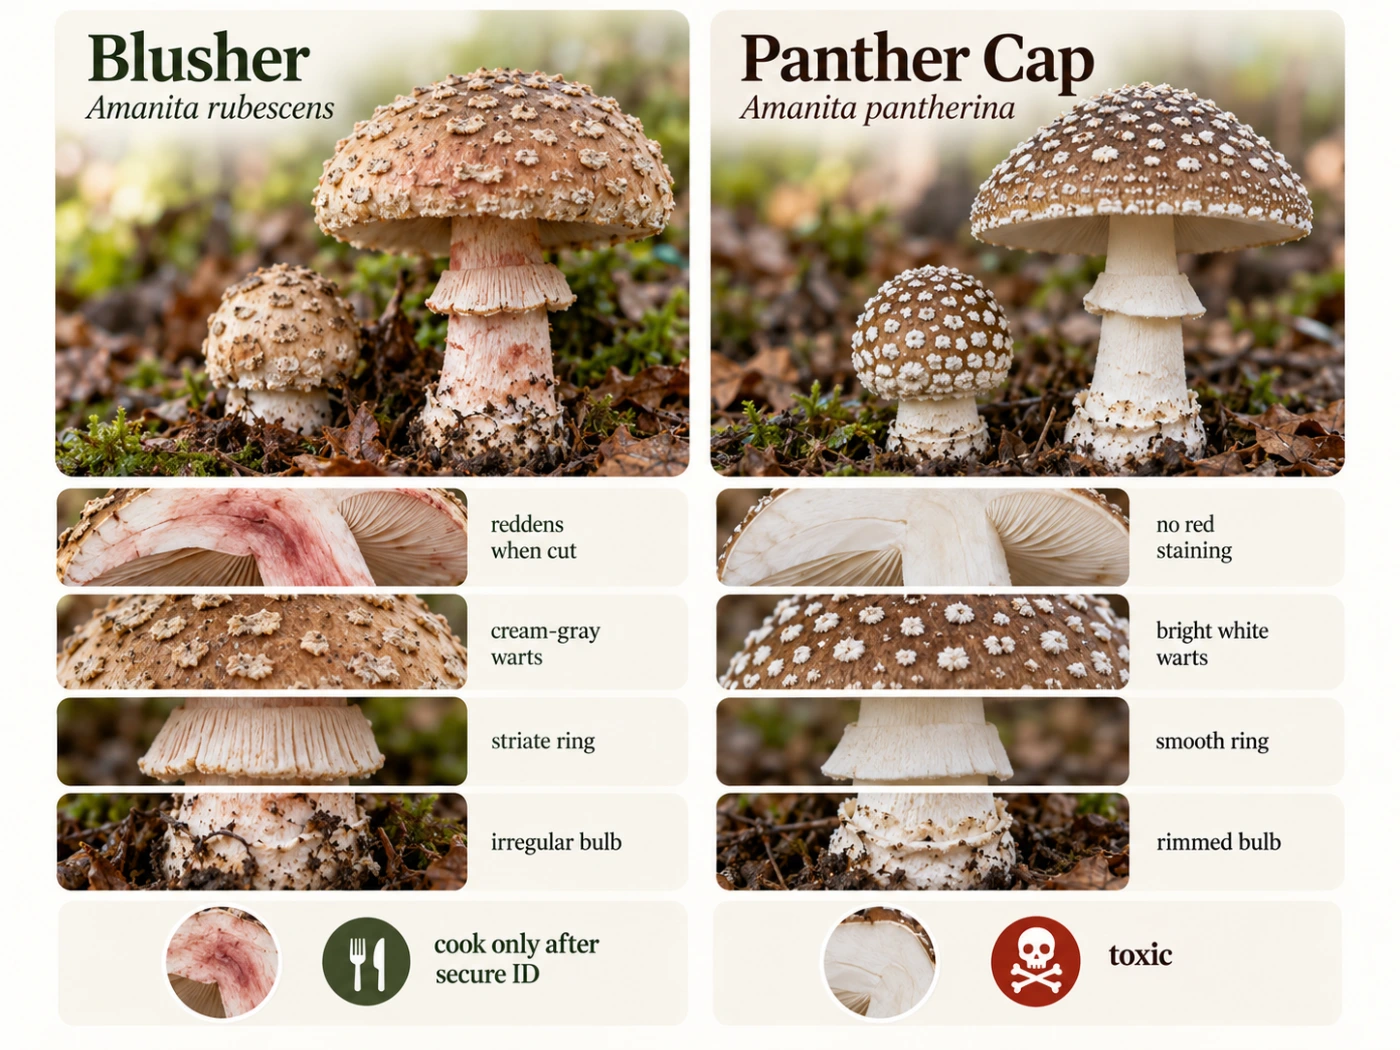
    Blusher (Amanita rubescens) and Panther Cap (Amanita pantherina) are two brown, white-gilled Amanitas that can look surprisingly similar in European woodland. Both may have pale veil remnants on the cap, a ring on the stem, and a swollen base, so identifying them from a top-down photograph is unreliable.

    The most useful difference is the reaction to damage. Blusher develops pink, reddish, or wine-colored staining in its flesh, while Panther Cap normally remains pale and does not show this characteristic reddening. The structure of the stem base provides an equally important second check.

    ⚠️ Important: Panther Cap is toxic and contains ibotenic acid and muscimol. Blusher is traditionally considered edible only after secure identification and thorough cooking, but the risk of confusing these Amanitas makes it unsuitable for casual identification based on photographs alone.

    Quick Comparison

    Feature Blusher Panther Cap
    Scientific name Amanita rubescens Amanita pantherina
    Cap Brown, gray-brown, pinkish brown Brown to gray-brown
    Veil remnants Cream, grayish, dirty white, sometimes pinkish Usually bright white
    Gills White to cream White
    Bruising Pink to wine-red No characteristic red staining
    Flesh after cutting Gradually reddens Remains mostly white
    Ring Usually striate on upper surface Usually smooth or weakly striate
    Stem base Bulbous, fragmented veil remnants Bulbous with distinct rim and volval zones
    Free sac-like volva Absent Absent
    Spore print White White
    Habitat Broadleaf, mixed and conifer woodland Mainly woodland
    Edibility Only after secure ID and thorough cooking Toxic
    Best clue Reddish staining Rimmed, zoned stem base

    The Fastest Way to Tell Them Apart

    Look first for fresh damage. In the Blusher, insect tunnels, bruised gills, cuts, and damaged stem tissue often develop pink to wine-red discoloration.

    Panther Cap does not normally produce this reddish reaction. Its flesh and gills generally remain white or cream even after damage.

    The next place to inspect is the bottom of the stem. Panther Cap typically has a more clearly structured basal bulb with a distinct collar-like rim and concentric zones of universal veil tissue.

    Blusher — Amanita rubescens
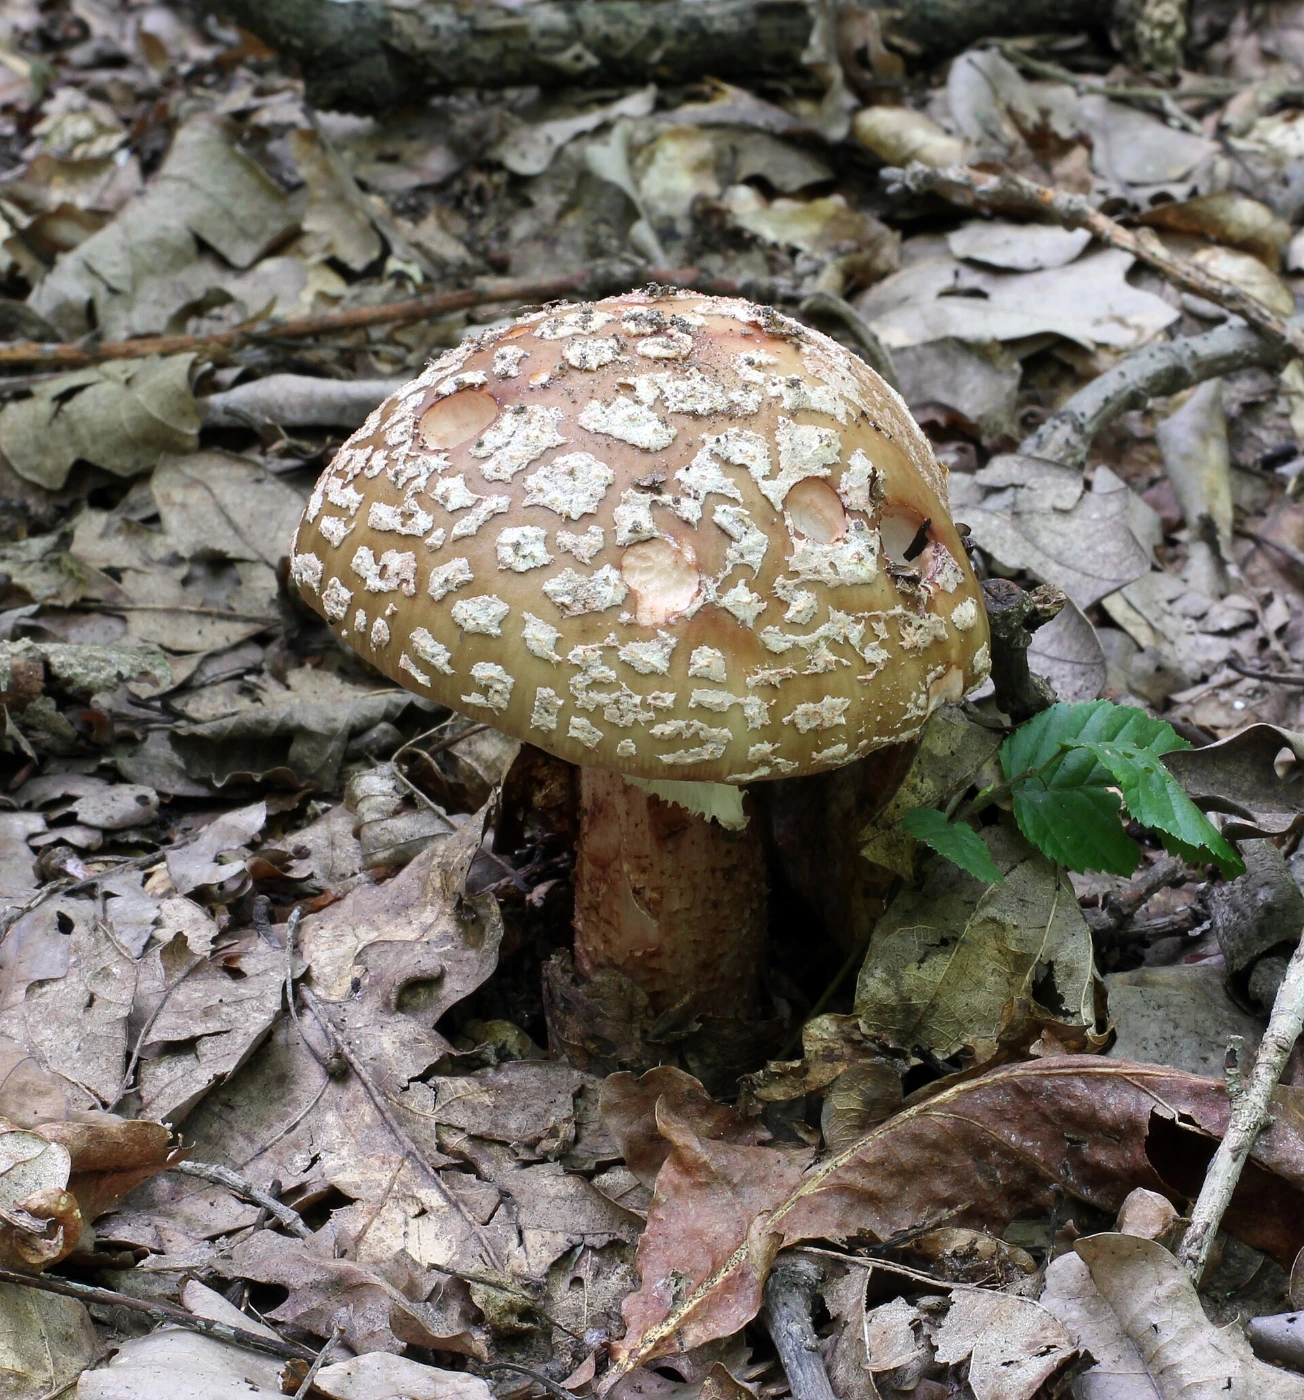
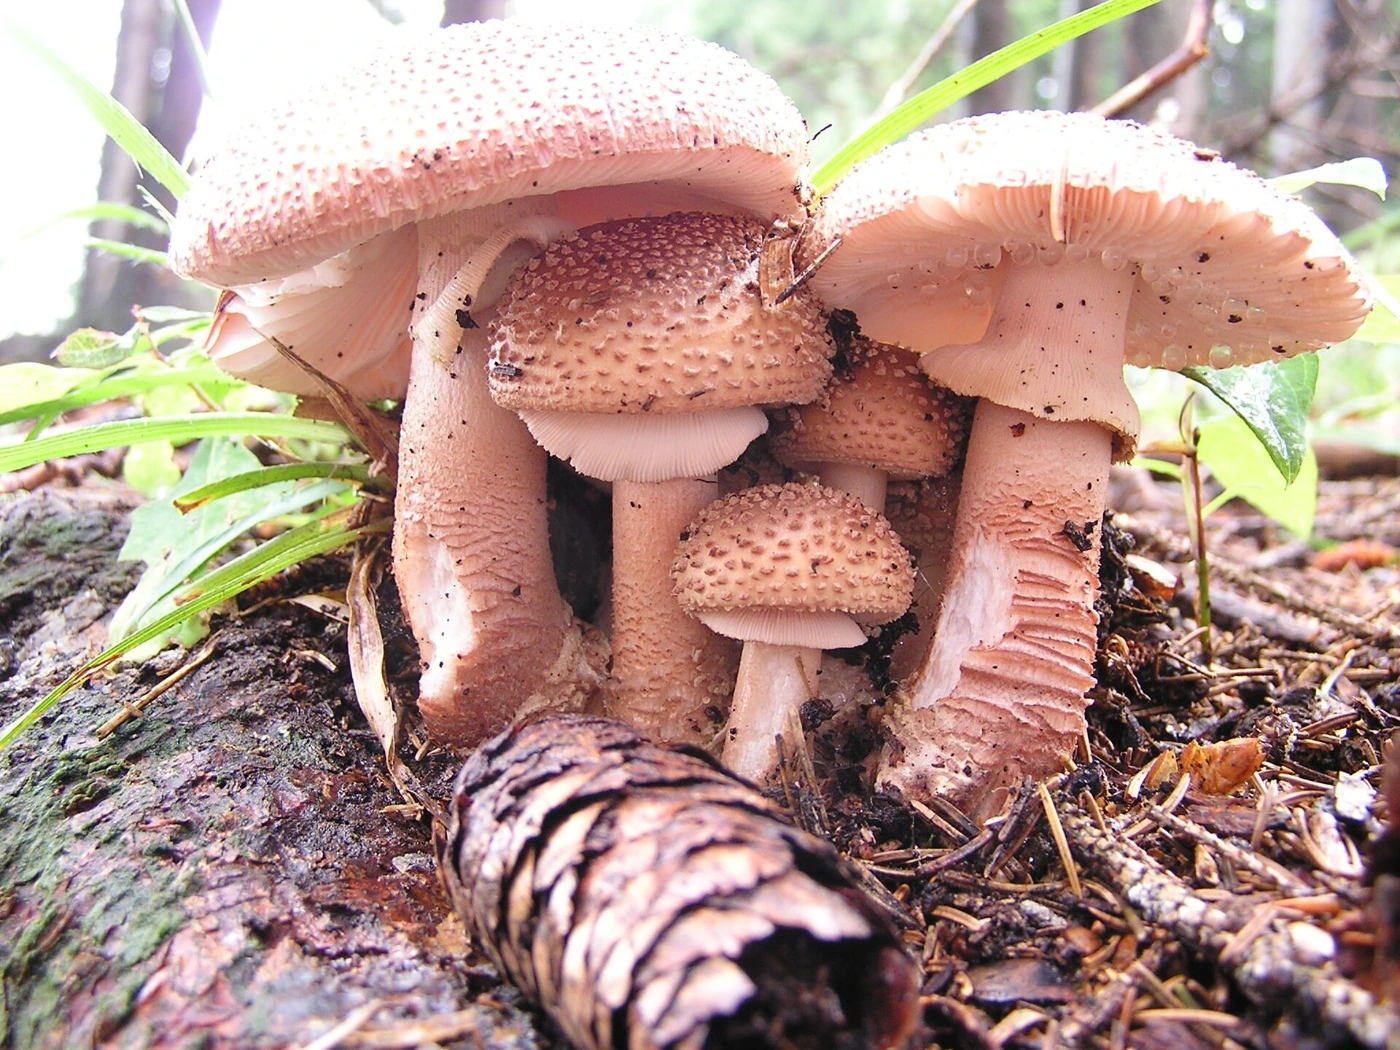
    Amanita rubescens is a variable brown Amanita found widely in European forests. The cap can range from pale gray-brown through warm brown to distinctly reddish or pinkish brown.

    Its common name refers to the characteristic color change after damage. This blushing reaction can appear on the stem, gills, flesh, cap injuries, and particularly around insect tunnels.

    Panther Cap — Amanita pantherina
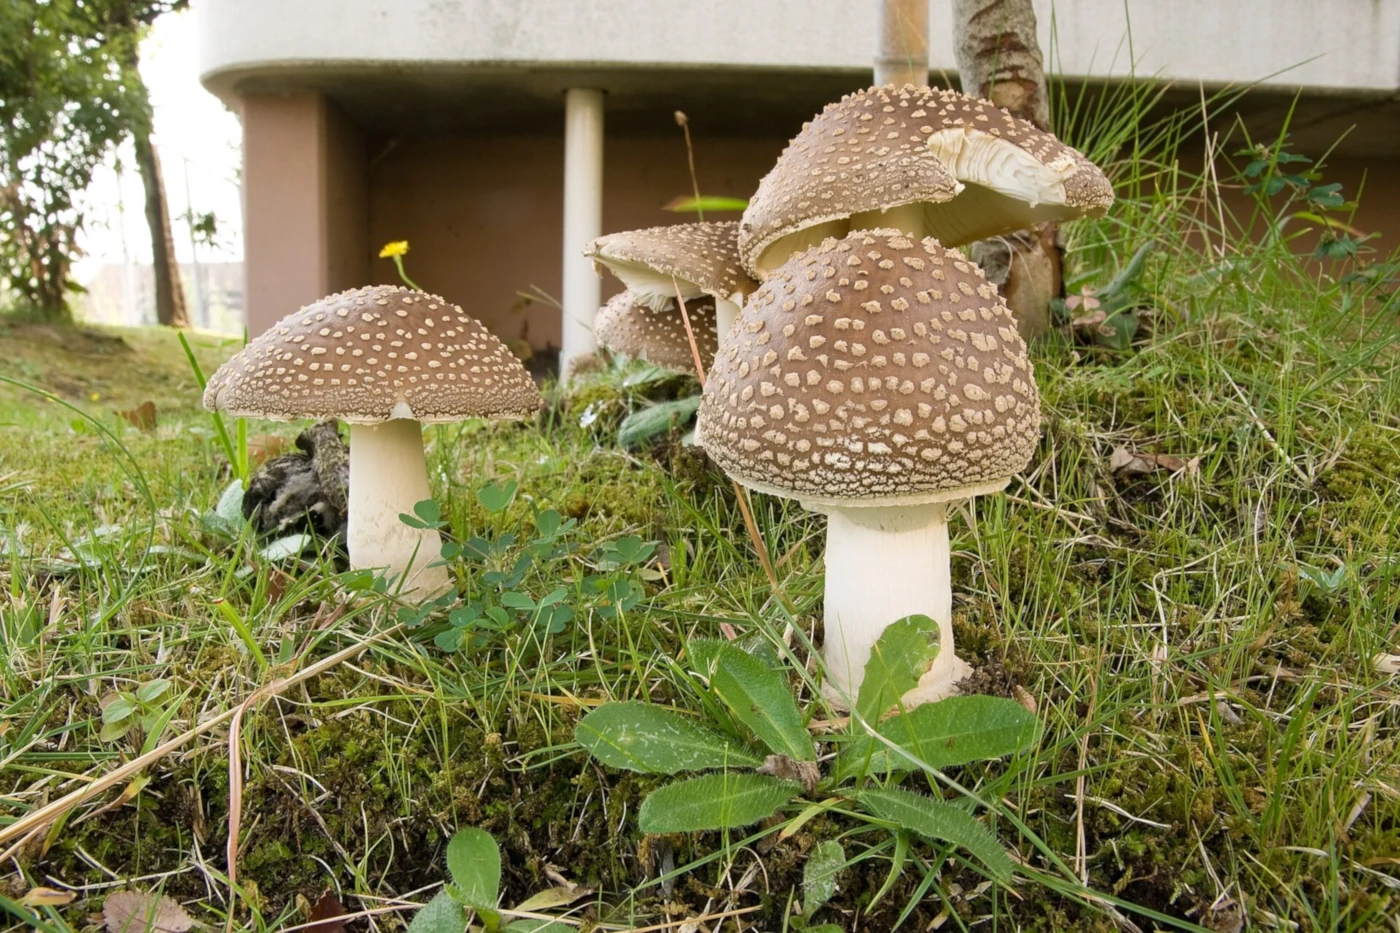
    Amanita pantherina usually has a brown to gray-brown cap decorated with contrasting white veil remnants. It also has white gills, a ring, and a bulbous stem base.

    Its appearance can overlap strongly with darker Blushers. The absence of red staining and the more structured basal volva are therefore much more useful than cap color alone.

    Cap Color

    Cap color is one of the weakest features for separating these two mushrooms. Both species can occur in overlapping shades of brown and gray-brown.

    A Blusher may look strongly reddish in one specimen and almost gray in another. Panther Cap can similarly range from warm brown to dark gray-brown depending on age, moisture, and lighting.

    Blusher Cap

    The Blusher often has pinkish, reddish, or wine-brown tones mixed with the brown background. Some specimens, however, show very little obvious red before they are damaged.

    This variability explains why the mushroom should not be identified simply by looking for a “reddish cap.” The blushing reaction inside the tissue is much more important.

    Panther Cap

    Panther Cap is commonly medium to dark brown, although paler specimens occur. The contrast between the brown background and white veil remnants can sometimes be striking.

    Rain and age can remove veil remnants, however. An old Panther Cap may therefore have a relatively plain brown cap.

    Cap Warts and Veil Remnants

    Both species can carry fragments of the universal veil on their caps. The color and appearance of these remnants can provide useful supporting evidence.

    In Blusher, the patches are often cream, grayish, dirty white, or slightly pinkish. In Panther Cap they are more typically clear white and contrast strongly with the brown cap.

    Why Warts Are Not Enough

    Veil remnants are easily damaged. Heavy rain can wash them away, while contact with vegetation or animals can remove individual patches.

    Their color can also become dirty or discolored with age. They should therefore support an identification rather than determine it.

    The Blushing Reaction

    The reddish color change is the defining field character of Amanita rubescens. Fresh white flesh gradually develops pink, reddish-brown, or wine-colored areas after being cut, bruised, or eaten by insects.

    The reaction may not be instant. Looking at the same damaged area after several minutes can reveal a much stronger color than immediately after cutting.

    Where to Look for Red Staining

    The lower stem and bulb often show particularly obvious reddish staining. Gill edges can also become pinkish after handling or insect damage.

    Cutting the mushroom lengthwise can reveal reddish areas around larval tunnels. These internal stains can sometimes be much clearer than bruising on the outer surface.

    Panther Cap Does Not Blush Red

    Fresh Amanita pantherina flesh normally remains white or pale after damage. It may become dirty, brownish, or weathered with age, but it does not produce the characteristic pink-to-wine reaction of the Blusher.

    This distinction is strongest when fresh healthy tissue is tested. Old brown damage should not be mistaken for genuine blushing.

    Gills

    Both species have white to cream gills that are free or nearly free from the stem. Gill color alone therefore does little to separate them.

    Damage provides additional information. Blusher gills may develop reddish marks, whereas Panther Cap gills generally remain pale.

    Ring

    Both mushrooms usually possess a ring on the upper portion of the stem. Close examination of its upper surface can provide another useful distinction.

    The Blusher ring is commonly grooved or striate, reflecting impressions made by the gills while the partial veil was still attached. Panther Cap typically has a smoother ring surface, although this feature is not absolute enough to use by itself.

    Damaged Rings

    Older fruit bodies may have torn or incomplete rings. In some specimens, weather or handling can make the surface texture difficult to see.

    Ring characters are therefore most useful in fresh mushrooms. A missing or damaged ring should increase uncertainty rather than force another identification.

    Stem

    The stems of both mushrooms are pale and can be rather robust. Both may also end in a conspicuously swollen bulb.

    In Blusher, damaged parts of the stem commonly develop reddish discoloration. Panther Cap usually stays pale and often looks cleaner and whiter.

    Stem Base: One of the Best Differences

    The entire stem base should always be excavated rather than cut off. This is where one of the strongest structural differences between the species can be seen.

    Blusher generally has a bulbous base with irregular or weak remnants of the universal veil. Panther Cap typically has a more organized basal structure with a distinct rim and one or more concentric zones above the bulb.

    Blusher Stem Base

    The base of Amanita rubescens is swollen but usually lacks the sharply defined collar characteristic of Panther Cap. Veil material tends to appear fragmented, irregular, or poorly defined.

    Reddish staining around the bulb is common, particularly after handling or insect damage. The combination of a relatively unstructured bulb and blushing tissue is particularly useful.

    Panther Cap Stem Base

    The Panther Cap bulb often has a distinct upper rim that can resemble a low collar. Above it, one or more additional bands of universal veil material may form concentric zones.

    This basal structure is frequently more diagnostic than the white spots on the cap. Even when rain has removed the cap warts, the bulb can retain valuable identification information.

    Blusher vs Panther Cap Stem Base

    Feature Blusher Panther Cap
    Basic shape Swollen bulb Swollen bulb
    Sharp basal rim Usually absent Often distinct
    Concentric volval zones Weak or irregular Often obvious
    Red staining Common Absent
    Free sac No No
    Identification value High Very high

    A clean side photograph of the complete base can therefore be more useful than another photograph of the cap.

    Flesh

    Blusher flesh begins white or pale but gradually changes color after injury. The reaction can range from subtle pink to much deeper wine-red.

    Panther Cap flesh remains predominantly white. This difference is especially obvious when fresh specimens of similar age are compared side by side.

    Smell

    Neither species has a smell that is sufficiently distinctive to serve as the primary identification feature. Odor can vary with age, moisture, and individual perception.

    Structural characters are much more useful in this comparison. Bruising and the stem base should receive much greater weight.

    Spore Print

    Both species produce a white spore print. Spore color therefore confirms that the mushrooms fit a white-spored group but does not separate them.

    This is a good example of why one laboratory-style feature is not always more useful than simple field morphology. The basal bulb and staining reaction provide far more information here.

    Where Does the Blusher Grow?

    Amanita rubescens is mycorrhizal and occurs with a wide range of trees. It can be found in broadleaf, mixed, and coniferous forests.

    Beech, oak, birch, spruce, and pine can all occur in suitable habitats. The broad ecological range means that the host tree usually cannot identify the species by itself.

    Where Does Panther Cap Grow?

    Panther Cap is also a mycorrhizal woodland mushroom and can occur with both broadleaf and coniferous trees. Its habitats can therefore overlap substantially with those of the Blusher.

    Finding a brown Amanita under the “right” tree does not solve the comparison. Structural features remain essential.

    Can They Grow in the Same Forest?

    Yes. Both species may occur in the same general woodland and during similar parts of the season.

    This makes assumptions based on location particularly risky. Even mushrooms only a short distance apart may belong to different Amanita species.

    When Do They Grow?

    Both species primarily fruit from summer into autumn, with local timing depending on climate and rainfall. Their seasons overlap enough that date is not useful for reliably separating them.

    Fresh fruit bodies often appear after periods of suitable warmth and moisture. Year-to-year abundance can vary dramatically.

    Distribution and Regional Taxonomy

    Amanita rubescens and true Amanita pantherina are primarily Eurasian taxa, with both being familiar in Europe. Similar mushrooms elsewhere should not automatically be assigned these European names.

    Panther-like Amanitas occur in North America and other regions, but regional taxonomy can be complex. Geography should therefore always be included when making a species-level identification.

    Is the Blusher Edible?

    Amanita rubescens is traditionally considered edible after correct identification and thorough cooking. Raw or insufficiently cooked specimens contain heat-sensitive compounds and should not be consumed.

    The larger practical concern is confusion with toxic Amanitas. Because Panther Cap can resemble a Blusher, edibility should never be decided from reddish-brown cap color or a single photograph.

    Is Panther Cap Poisonous?

    Yes. Amanita pantherina is toxic and contains the psychoactive neurotoxins ibotenic acid and muscimol.

    Poisoning can cause neurological symptoms including confusion, agitation, altered perception, poor coordination, drowsiness, and other effects. This is a different poisoning syndrome from the amatoxin liver toxicity associated with Death Cap.

    Blusher vs Panther Cap vs Death Cap

    Death Cap (Amanita phalloides) belongs to a different identification problem but is worth distinguishing because all three are Amanitas. Death Cap typically has a loose sac-like volva surrounding the stem base and does not show the reddish bruising of Blusher.

    Panther Cap has a rimmed bulb rather than the deep free sac typical of Death Cap. Recognizing different types of universal veil remnants is therefore central to Amanita identification.

    Feature-by-Feature Comparison

    Feature Amanita rubescens Amanita pantherina
    Cap color Brown, gray-brown, reddish brown Brown, gray-brown
    Veil remnants Grayish, cream, dirty white Usually bright white
    Gills White, may redden when damaged White
    Flesh Blushes pink to wine-red Stays pale
    Ring Usually striate above Usually smoother
    Base Bulbous, irregular veil remnants Rimmed bulb with zones
    Spore print White White
    Ecology Mycorrhizal Mycorrhizal
    Safety Requires secure ID and cooking Toxic
    Strongest clue Red staining Basal collar and no staining

    The most reliable identification uses several of these features at the same time.

    How to Identify Blusher vs Panther Cap Step by Step

    Do not begin by deciding which shade of brown the cap resembles. Start with the dynamic and structural characters that are harder for the two species to share.

    A complete specimen with fresh tissue provides much more information than an old mushroom photographed only from above.

    Step 1: Look for Existing Damage

    Inspect insect holes, broken gills, scratches, and bruised stem areas. Pink or wine-red staining strongly supports Blusher.

    Freshly damaged Panther Cap should not show this characteristic reaction.

    Step 2: Make a Fresh Cut

    If appropriate for identification, cut through an already collected specimen and observe the flesh. Check it immediately and again after several minutes.

    Increasing reddish staining supports Amanita rubescens. Flesh that remains white makes A. pantherina or another Amanita more plausible.

    Step 3: Examine the Ring

    Look closely at the upper surface of the ring. Fine grooves or striations support the Blusher.

    A smoother ring supports Panther Cap, but this should be used only together with stronger features.

    Step 4: Expose the Entire Base

    Carefully loosen the soil around the stem and remove the complete bulb. Do not simply cut the stem at ground level.

    Look for a sharp rim or collar and concentric volval zones. These strongly support Panther Cap.

    Step 5: Compare the Cap Remnants

    Dirty cream, grayish, or pink-tinged remnants fit Blusher better, while crisp white warts fit Panther Cap.

    Treat this as confirmation rather than the deciding test because weather can alter them dramatically.

    What if the Mushroom Does Not Blush?

    Absence of obvious red staining should make a Blusher identification less secure. However, dry, old, or minimally damaged specimens can sometimes show weaker reactions than expected.

    Test fresh internal tissue and inspect insect damage before deciding. If a brown Amanita still fails to redden and has a rimmed zoned bulb, Panther Cap becomes a much stronger possibility.

    What if the Stem Base Is Missing?

    A missing base removes one of the most important identification features. This is especially serious when distinguishing toxic Amanitas.

    The safest conclusion may then be that the species cannot be reliably determined. A confident edible identification should not be reconstructed from the cap and ring alone.

    How to Photograph Blusher and Panther Cap

    Start with an image of the whole mushroom in its natural position. Then carefully expose the complete stem base and photograph it directly from the side.

    Take separate close-ups of the ring, cap veil remnants, and gills. Finally, photograph fresh damaged tissue immediately and again after the color has had time to develop.

    The Two Most Useful Photos

    For this specific comparison, the best pair is a close-up of damaged flesh and a clear photograph of the complete stem bulb. Together they show the two strongest separating features.

    A top-down photograph of the cap is useful but much less decisive.

    Can AI Tell Blusher From Panther Cap?

    AI can often recognize a typical Blusher when visible red staining is combined with a complete basal photograph. Typical Panther Caps can also be recognizable when their white cap remnants and rimmed bulbs are clearly shown.

    Confidence drops sharply when only the cap is visible. Since both species can have very similar brown coloration, a responsible identification should remain uncertain when bruising and the stem base are missing.

    For a detailed guide to the Blusher itself, see the species page for Amanita rubescens. The broader guide to [mushrooms with a bulbous stem base](/mushrooms-with-a-bulbous-stem-base/) also explains why the bottom of the stem is so valuable in Amanita identification.

    Common Identification Mistakes

    One of the most common mistakes is assuming that a reddish-brown cap automatically means Blusher. Some Blushers are barely reddish before damage, while Panther Caps can occur in warm shades of brown.

    Another mistake is interpreting any brown discoloration as “blushing.” Genuine Blusher staining develops pink, reddish, or wine-colored tones in damaged tissue rather than simply looking old or dirty.

    The most serious mistake is leaving the bulb underground. Without the basal rim and volval zones, one of the best Panther Cap characters has been discarded before identification even begins.

    Interesting Facts About Blusher and Panther Cap

    The common name Blusher and the scientific name rubescens both refer to the same remarkable feature: the mushroom becomes reddish after damage. Insect larvae can unintentionally make this feature easier to observe by producing red-stained tunnels through the flesh.

    Panther Cap gets its common name from the contrast between its brown cap and pale spots, which can suggest a spotted animal pattern. Those spots are pieces of the universal veil rather than pigmentation within the cap itself.

    The two species also demonstrate how the same developmental structures can take different forms. Universal veil tissue becomes relatively irregular around the Blusher bulb but produces much more organized rims and zones in Panther Cap.

    Their toxicity profiles are very different despite their visual similarity. Blusher has a history of culinary use after proper preparation, whereas Panther Cap contains ibotenic acid and muscimol and can cause significant neurological poisoning.

    Frequently Asked Questions

    Can a Panther Cap ever have reddish marks?

    Old damage can produce dirty brown or other discoloration, but the species does not characteristically develop the progressive pink-to-wine staining of Blusher. Fresh tissue is the best place to test the distinction.

    Can Blusher have very white cap warts?

    Yes, veil remnants can sometimes appear quite pale. Their color is variable enough that bruising and basal structure remain more useful.

    Why are some Blushers heavily red before they are touched?

    Insects, soil pressure, weather, and earlier physical damage may already have triggered the staining reaction. This can make older specimens look much redder than fresh untouched mushrooms.

    Can the Panther Cap basal rim be hidden underground?

    Yes. Much of the bulb and its volval structure can remain below the soil or leaf litter. This is why the base must be excavated carefully.

    Can both mushrooms lose their rings?

    Yes. Weather, insects, and physical damage can tear the partial veil remnants. A missing ring in an old specimen makes identification harder rather than proving another species.

    Why can young specimens be particularly difficult?

    Young fruit bodies may have incompletely developed rings and much of the base can still be buried. Their caps may also remain partly covered by veil material.

    Can Blusher staining become brown after some time?

    Yes. The initial pink or reddish tones can darken toward reddish brown or wine-brown as the tissue ages.

    Is lack of red staining enough to identify Panther Cap?

    No. Many other Amanitas also fail to blush. Panther Cap requires the complete combination of cap, ring, basal volva, habitat, and geography.

    Final Identification Notes

    The safest way to separate Amanita rubescens from Amanita pantherina is to focus on damage response and the stem base rather than cap color.

    Blusher develops pink to wine-red staining, commonly has a striate ring, and usually has a bulb with relatively irregular veil remnants. Panther Cap normally does not redden and typically has a distinct rimmed bulb with concentric volval zones.

    The simplest field rule is therefore: red staining + less structured bulb = Blusher candidate; no red staining + rimmed zoned bulb = Panther Cap candidate. Because Panther Cap is toxic, incomplete specimens should never be forced into a confident edible identification.
  • Mushrooms With Orange Latex: How to Identify Saffron Milk Caps

    Mushrooms With Orange Latex: How to Identify Saffron Milk Caps

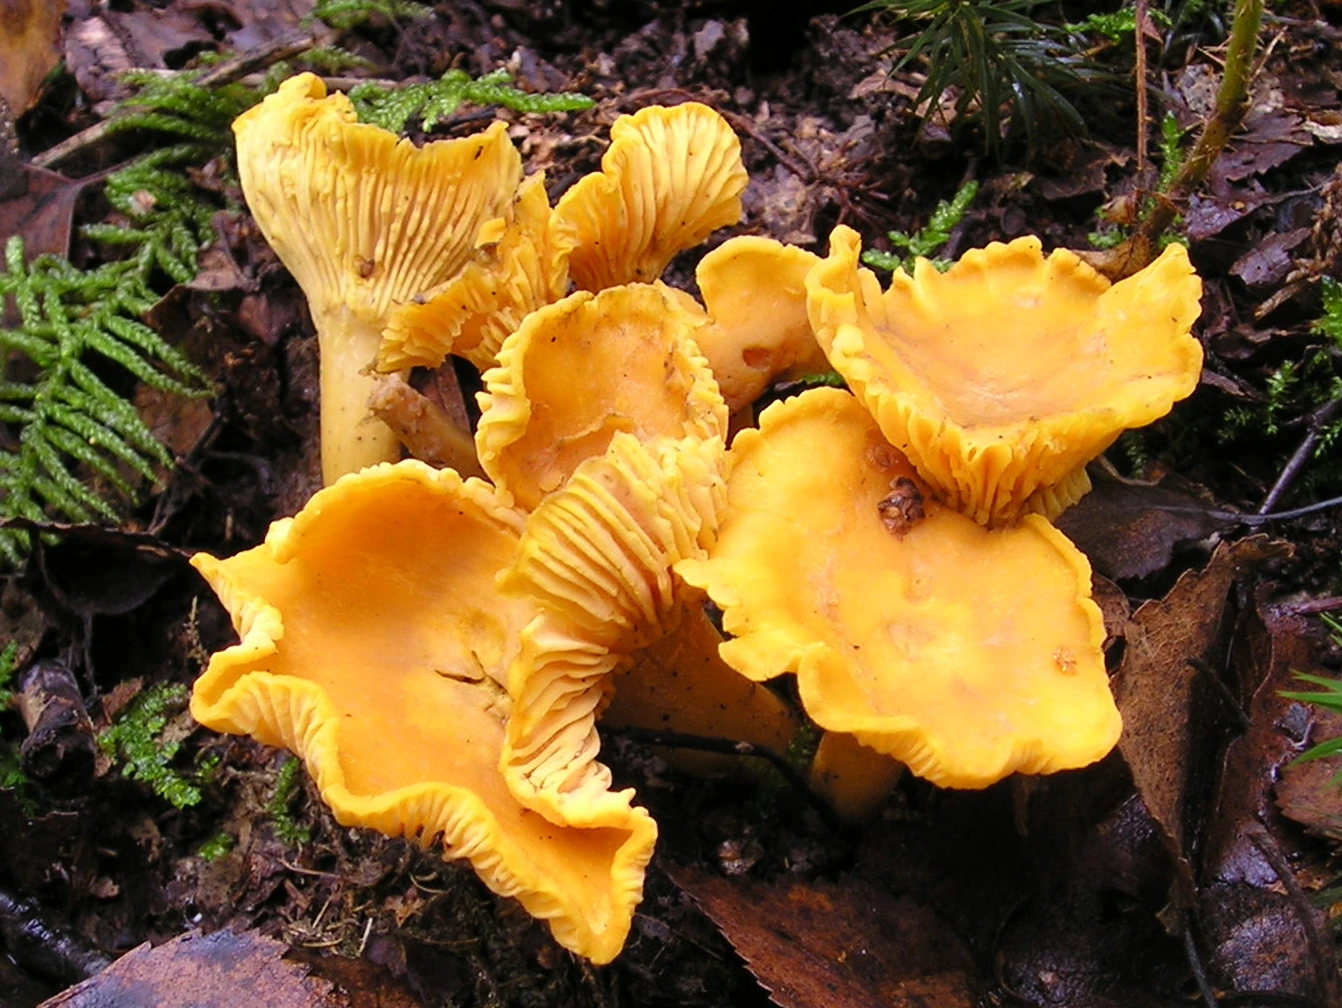
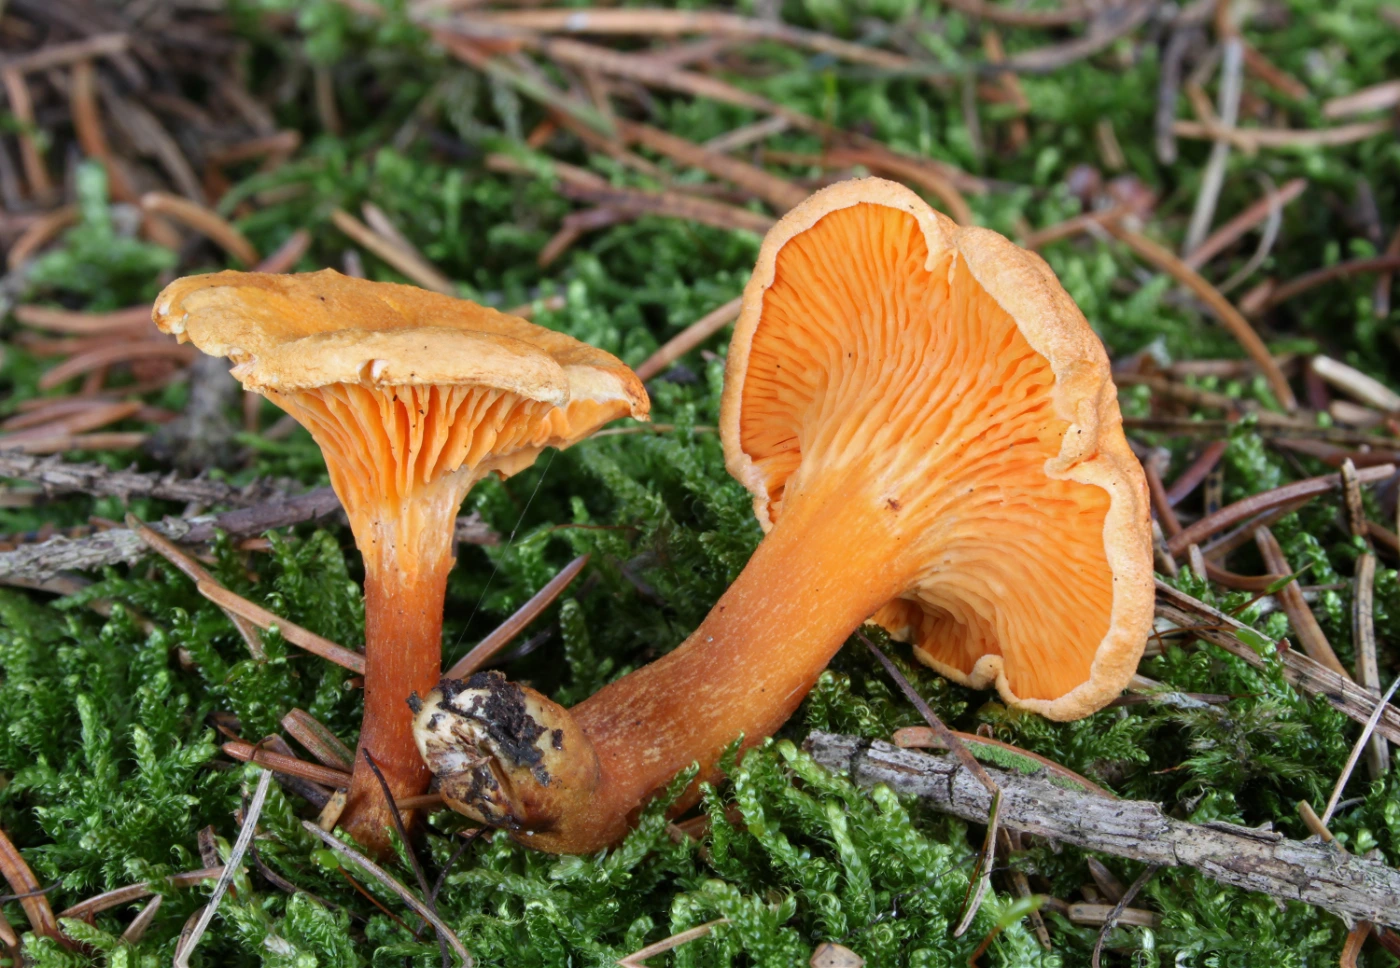
    Mushrooms that release orange, carrot-colored, reddish-orange, or wine-red latex when their gills are damaged belong to one of the most recognizable milkcap groups. Many are commonly called saffron milk caps, but several closely related species can look very similar while associating with different trees and occurring in different regions.

    The most useful identification method is to combine latex color, how the latex changes after exposure, green staining, cap zoning, stem markings, host tree, and geography. Calling every orange milkcap Lactarius deliciosus is one of the most common mistakes in this group.

    ⚠️ Important: Several saffron milk caps are considered edible when correctly identified and properly prepared, but exact species identification can be difficult. Never use orange latex alone as proof that a wild mushroom is safe to eat.

    Quick Identification

    Feature Typical Saffron Milk Cap
    Main genus Lactarius
    Key feature Orange to reddish latex
    Cap color Orange, carrot-orange, salmon, reddish-orange
    Cap pattern Often concentrically zoned
    Gills Orange to salmon, usually decurrent
    Damage reaction Often green or blue-green staining
    Stem Orange to pale orange, sometimes spotted or pitted
    Ring Absent
    Volva Absent
    Flesh Pale orange to carrot-colored
    Spore print Cream to pale ochre
    Ecology Mycorrhizal
    Important hosts Pine, spruce, fir and other conifers
    Season Summer to autumn
    Main clue Orange latex + conifer host + staining pattern
    Edibility Varies by species; several are edible when correctly identified

    What Are Saffron Milk Caps?

    Saffron milk caps are a group of closely related Lactarius mushrooms known for colored latex and orange-toned fruit bodies. They typically grow in association with conifers and often develop green stains after bruising, aging, or weather damage.

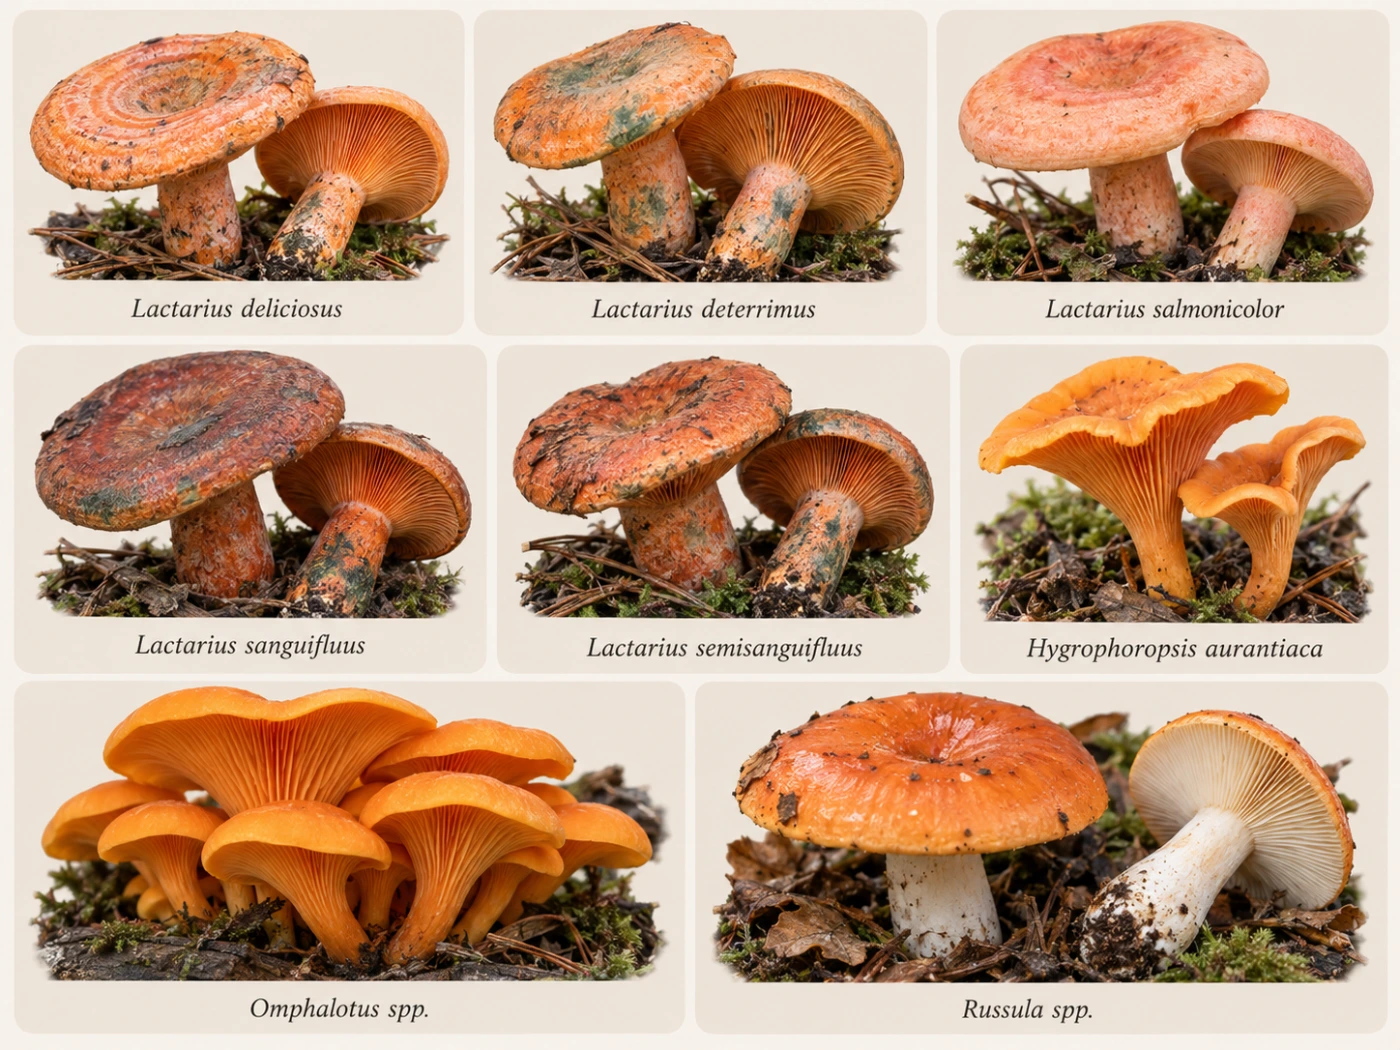
    The group includes several species rather than one universal “saffron milk cap.” In Europe, familiar names include Lactarius deliciosus, L. deterrimus, L. salmonicolor, L. sanguifluus, and related taxa.

    Why Orange Latex Is So Useful

    Latex is one of the strongest clues available for milkcap identification. When fresh gills are scratched or cut, droplets may appear almost immediately.

    In saffron milk caps, the latex can begin carrot-orange, deep orange, reddish, or wine-colored. What happens during the next few minutes can be just as important as the initial color.

    How to Test the Latex

    Use a fresh mushroom and gently cut several gills near the edge of the cap. Watch both the exposed latex and the damaged gill tissue.

    Take note of the color immediately and then check again after several minutes. Some reactions intensify or shift only after exposure to air.

    Use Fresh Specimens

    Old or dry milkcaps may release very little liquid. A mushroom that normally produces abundant latex can seem almost dry after prolonged hot weather.

    If the first scratch gives no result, try fresher tissue closer to the cap center. Do not assume the mushroom is not a milkcap until healthy tissue has been checked.

    Orange Latex

    Carrot-orange latex is typical of several members of the Lactarius deliciosus group. It often matches the orange or salmon tones of the gills and flesh.

    The latex may remain orange for a while or gradually change. The timing and direction of the change can help separate similar species.

    Red or Wine-Colored Latex

    Some related milkcaps produce darker latex that appears reddish, blood-red, or wine-colored rather than bright carrot-orange.

    This feature is particularly important in species such as Lactarius sanguifluus. Dark red latex should not automatically be treated as normal variation within L. deliciosus.

    Green Staining

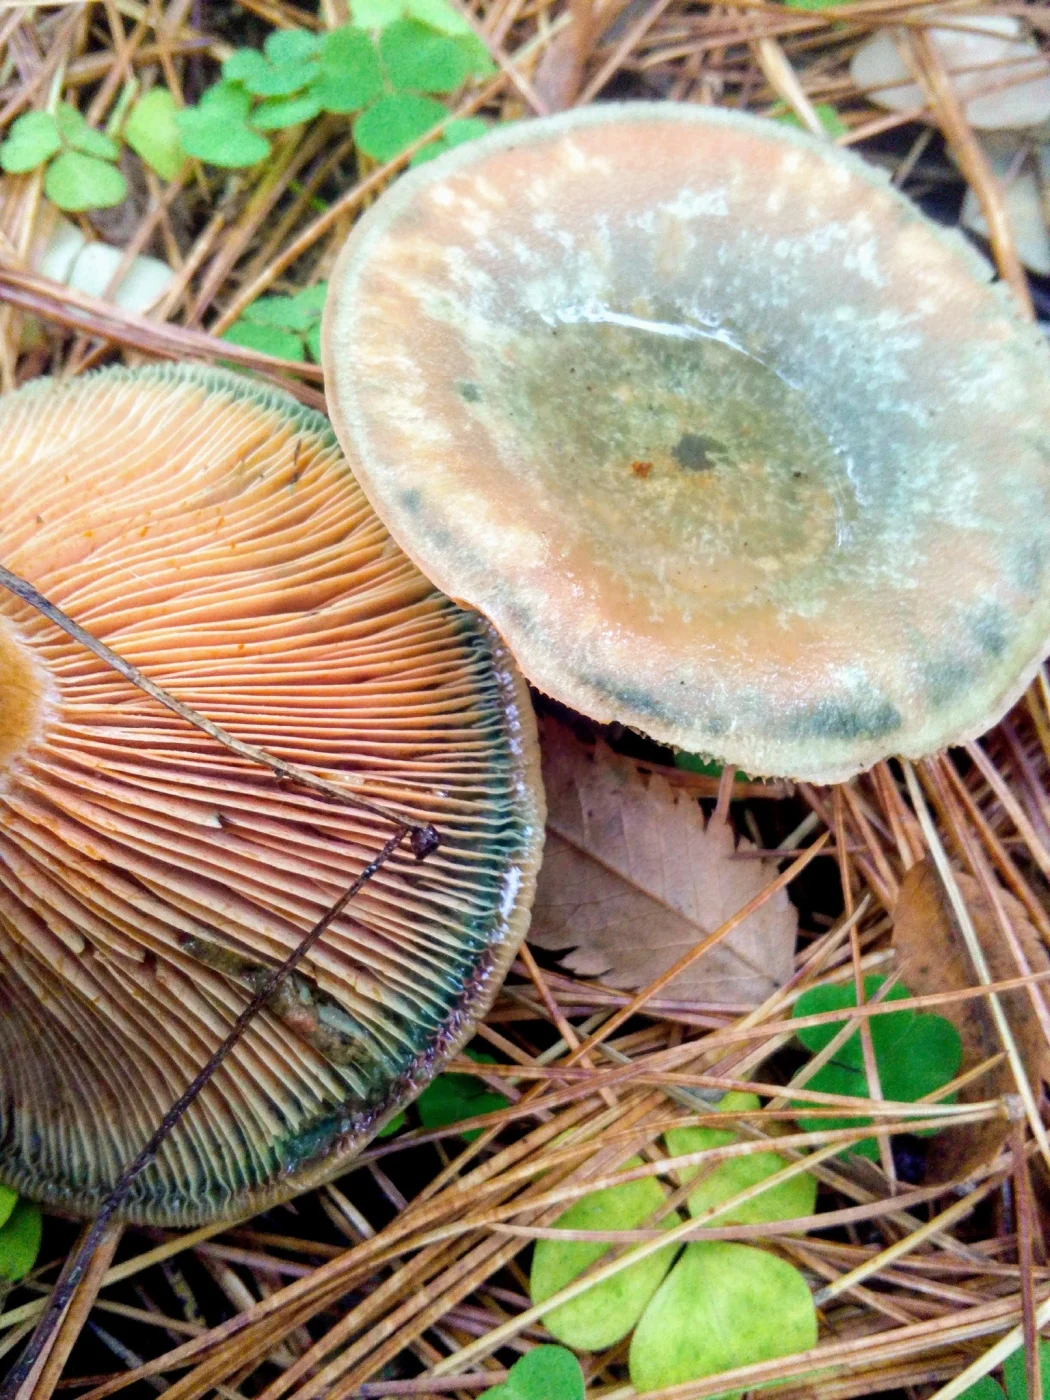
    Many saffron milk caps develop green or blue-green stains after damage. These can appear on the gills, cap, stem, or cut flesh.

    Green staining is useful, but it is not unique to one species. The amount and speed of the reaction need to be interpreted together with host tree and latex color.

    Why Do Orange Milkcaps Turn Green?

    The green color is caused by chemical changes in pigments after the tissue is damaged or ages. It is not mold and does not automatically mean the mushroom is rotten.

    Older fruit bodies may develop extensive green patches naturally. Fresh bruising can also turn green in a much more localized pattern.

    Cap

    Saffron milk caps usually have orange to salmon-colored caps, often with darker concentric bands. The center frequently becomes depressed as the mushroom matures.

    Young caps can be convex with rolled margins. Older specimens often become broadly funnel-shaped and much more irregular.

    Concentric Zones

    Dark and pale orange rings across the cap are common in many species. These zones can be sharply defined or almost absent depending on species, age, and moisture.

    Strong zoning supports a saffron milk cap identification but does not establish one exact species. Some close relatives are much less obviously zoned.

    Gills

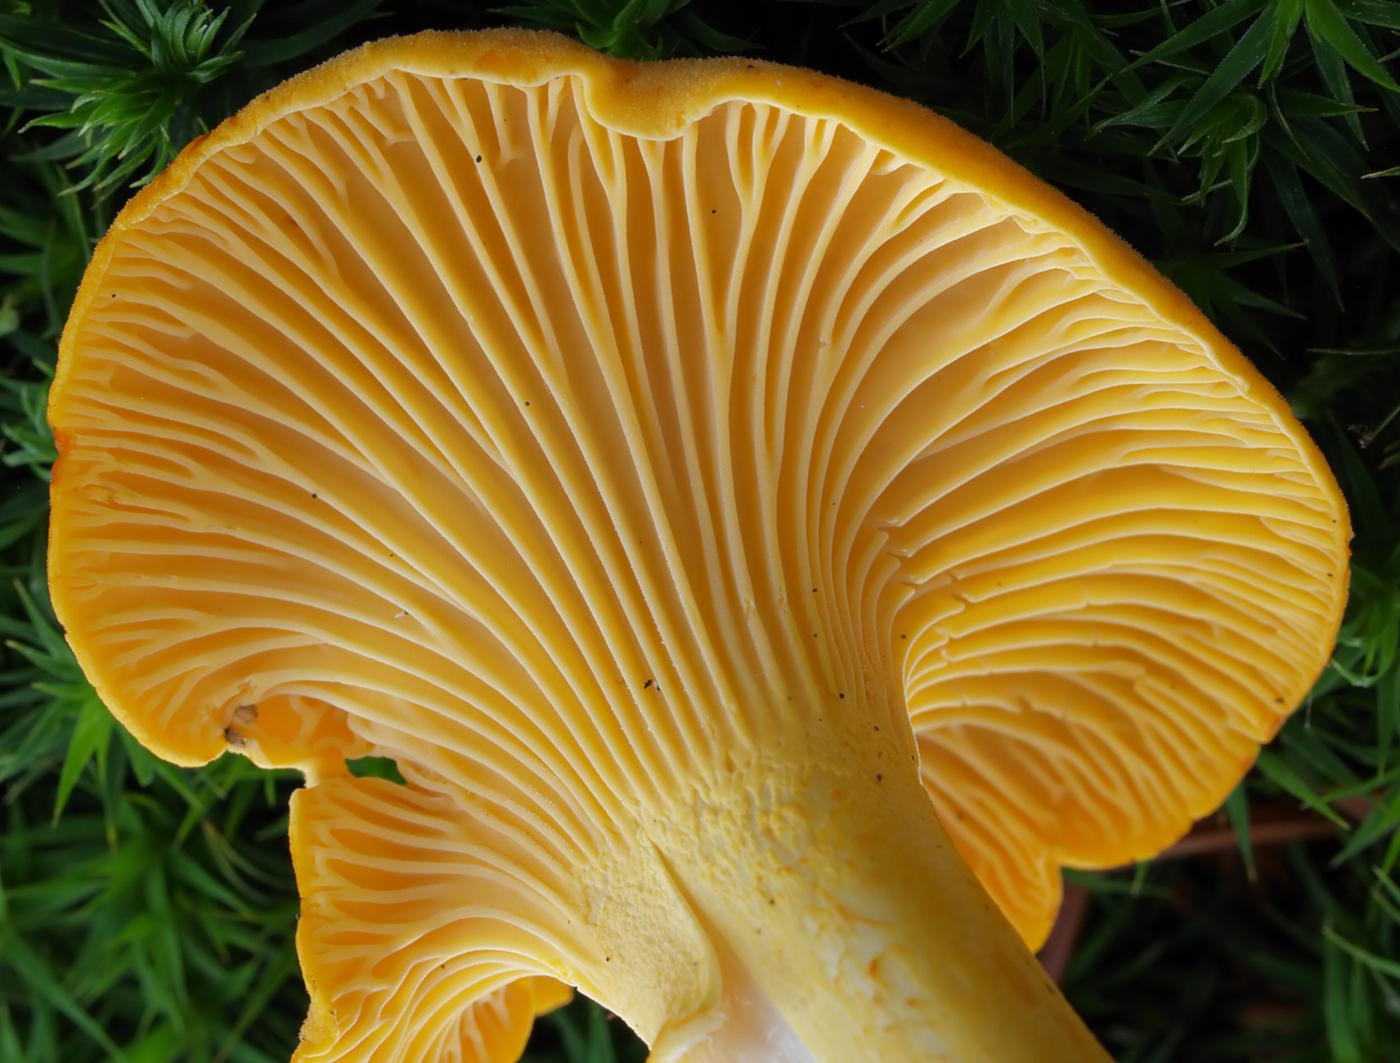
    The gills are usually orange, salmon, or pale carrot-colored and run down the stem to some degree. When damaged, they often release colored latex and later stain green.

    Mature gills may also develop green patches naturally. A photograph of the underside is therefore far more informative than a top-only image.

    Stem

    The stem is usually orange to pale salmon and lacks a ring. Depending on species, it may show darker pits, spots, or shallow depressions called scrobicules.

    These stem markings can be extremely useful. Their presence, absence, size, and color help separate otherwise similar orange milkcaps.

    Flesh

    The flesh is usually pale cream to orange and relatively brittle. Cutting through the cap and stem may expose both latex and staining reactions.

    Fresh internal tissue gives better information than old surface damage. A cross-section can also reveal whether green discoloration develops inside the mushroom.

    Smell

    Most saffron milk caps have a mild or somewhat fruity mushroom odor. Smell is usually less important than latex color and tree association.

    Strongly unusual odors should encourage comparison with other milkcaps. As always, odor remains subjective and should not be a primary identification feature.

    Spore Print

    The spore print is usually pale cream to ochre. This is consistent with many Lactarius species and confirms the broader milkcap group.

    Spore print color is not especially useful for separating the closely related orange-latex species. Host tree and latex behavior are usually much more valuable.

    Host Tree Is One of the Most Important Clues

    Most saffron milk caps form mycorrhizal relationships with conifers. This means the nearby tree can be one of the strongest identification characters.

    A mushroom under pine may belong to a different species from a nearly identical mushroom under spruce or fir. This ecological distinction is crucial.

    Saffron Milk Caps Under Pine

    Pine-associated orange milkcaps include Lactarius deliciosus sensu stricto and several related taxa depending on region. Typical specimens may have zoned orange caps, orange latex, and green staining.

    The exact species depends on geography. A North American orange milkcap under pine should not automatically receive a European name.

    Saffron Milk Caps Under Spruce

    Spruce is strongly associated with species such as Lactarius deterrimus in Europe. These mushrooms can look extremely similar to pine-associated saffron milk caps.

    Host identification often solves a problem that cap color cannot. If spruce is clearly the mycorrhizal partner, L. deterrimus becomes much more plausible.

    Saffron Milk Caps Under Fir

    Fir-associated species include Lactarius salmonicolor in Europe. These can have smoother salmon-orange coloration and may show less dramatic green staining than some relatives.

    The association with fir is particularly important. Without the host tree, the species can be difficult to distinguish visually.

    Lactarius deliciosus — Saffron Milk Cap

    Identification

    Lactarius deliciosus typically has an orange to carrot-colored cap with visible concentric zoning. The gills and latex are orange, and damaged areas may develop green staining.

    The stem may show darker orange pits or spots. In the European sense, the species is strongly associated with pine.

    Main Identification Clue

    The best combination is pine host + orange latex + zoned orange cap + green staining. Even this combination should be interpreted geographically because related taxa occur outside Europe.

    Lactarius deterrimus — False Saffron Milk Cap

    Identification

    Lactarius deterrimus is very similar to L. deliciosus but is associated especially with spruce. The cap is orange and often develops extensive green discoloration.

    The latex begins orange and can change after exposure. Mature specimens may become heavily green-stained, sometimes much more than classic L. deliciosus.

    Main Identification Clue

    The strongest practical clue is the host tree. An orange saffron milk cap growing with spruce in Europe fits Lactarius deterrimus much better than L. deliciosus sensu stricto.

    Lactarius salmonicolor — Salmon Milk Cap

    Identification

    Lactarius salmonicolor usually has a smooth salmon-orange to peach-orange appearance. It is associated particularly with fir.

    The cap can be less strongly zoned than in classic L. deliciosus. Green staining may also be less pronounced or slower.

    Main Identification Clue

    Fir association is one of the most useful clues. A salmon-orange milkcap under fir deserves comparison with L. salmonicolor before other saffron milk cap names are applied.

    Lactarius sanguifluus — Bloody Milk Cap

    Identification

    Lactarius sanguifluus produces latex that becomes reddish to wine-red rather than remaining simply carrot-orange. The cap can be orange-brown, reddish, or dull salmon.

    Green staining may still occur with age or damage. The deeper latex color is the most memorable feature.

    Main Identification Clue

    Wine-red or blood-red latex separates this species from many classic orange-latex relatives. Host and regional distribution should still be checked.

    Lactarius semisanguifluus

    Identification

    This species can begin with orange latex that gradually turns wine-red after exposure. The transition may be especially useful when observed on fresh damaged gills.

    The cap is usually orange to gray-orange and can develop green staining. It can be difficult to separate from other members of the group from photographs alone.

    Main Identification Clue

    The key is not merely the initial latex color but the change from orange toward reddish or wine tones. Watching the reaction over time is therefore essential.

    Orange Milkcap Comparison

    Species Latex Typical Host Green Staining Useful Clue
    Lactarius deliciosus Orange Pine Common Zoned cap + pine
    L. deterrimus Orange, changing Spruce Often strong Spruce association
    L. salmonicolor Orange Fir Usually less dramatic Salmon color + fir
    L. sanguifluus Red to wine-red Conifers Possible Dark reddish latex
    L. semisanguifluus Orange → wine-red Conifers Common Latex changes color

    This table is most useful in Europe. Similar North American mushrooms may belong to different regional taxa.

    North American Saffron Milk Caps

    North America has several orange and reddish milkcaps that resemble European Lactarius deliciosus. Older field guides and websites sometimes apply European names too broadly.

    Modern identification should account for regional species concepts. If geography is uncertain, “Lactarius deliciosus group” or “orange saffron milk cap” can be more accurate than forcing a European species name.

    Orange Latex vs White Latex

    White-latex milkcaps belong to many different ecological and taxonomic groups. A mushroom with white latex should not be placed in the saffron milk cap group simply because its cap is orange.

    Conversely, some saffron milk caps may release less visible latex when old or dry. Fresh tissue should always be tested.

    Orange Latex vs Orange Gill Color

    Orange gills do not automatically mean orange latex. Several unrelated mushrooms have orange gills but release no milk at all.

    The liquid itself must be observed from freshly damaged tissue. This is one reason a close-up sequence can be more useful than a single photograph.

    Saffron Milk Cap vs False Chanterelle

    False Chanterelle (Hygrophoropsis aurantiaca) can have a vivid orange cap and strongly forked orange gills. From above, it can superficially resemble some saffron milk caps.

    The decisive difference is latex. False Chanterelle has no orange milk and usually has thinner, softer gills.

    Saffron Milk Cap vs Jack-o’-Lantern

    Omphalotus species can be bright orange and have true decurrent gills. They often grow in clusters from wood, buried roots, or tree bases.

    They do not produce orange latex and are toxic. Wood-associated clustered growth strongly points away from a saffron milk cap.

    Saffron Milk Cap vs Orange Russula

    Some Russula species can have orange or reddish caps and brittle flesh. Their structure may look very similar to milkcaps because both groups belong to Russulaceae.

    The major distinction is latex. Russula species do not produce true milk when the gills are damaged.

    Are Saffron Milk Caps Edible?

    Several saffron milk caps are widely regarded as edible when correctly identified and properly prepared. They are traditional food mushrooms in parts of Europe and elsewhere.

    However, edibility should never be inferred from orange latex alone. Exact species, condition, regional identity, and possible look-alikes should all be considered first.

    Why Species Identification Still Matters

    Closely related milkcaps can differ in taste, texture, ecological preference, and culinary reputation. Even when several members of the group are edible, confidently separating them remains useful.

    Regional taxonomy adds another reason for caution. A European species name may not accurately describe a similar-looking North American mushroom.

    How to Identify a Saffron Milk Cap Step by Step

    Start with fresh gills and latex rather than cap color. After that, identify nearby conifers and watch for staining.

    This sequence usually provides much stronger evidence than appearance from above.

    Step 1: Cut Fresh Gills

    Look for orange, carrot-colored, reddish, or wine-colored latex. Record the exact initial color.

    Wait several minutes and check whether the liquid or damaged tissue changes.

    Step 2: Watch for Green Staining

    Observe gills, cap, stem, and cut flesh. Green or blue-green staining supports several members of the saffron milk cap group.

    Note how quickly the reaction develops and how extensive it becomes.

    Step 3: Identify the Host Tree

    Determine whether the mushroom is growing with pine, spruce, fir, or another conifer. This may be the decisive clue between very similar species.

    If several conifers grow together, avoid assuming the nearest trunk is automatically the host.

    Step 4: Check the Cap

    Look for concentric zones, orange intensity, green patches, and overall shape. Strong zoning is common in some species but weak in others.

    Cap color should support the identification rather than control it.

    Step 5: Examine the Stem

    Look for pits, spots, green stains, and overall coloration. Some species have conspicuous scrobicules while others are relatively plain.

    Photographing the stem close-up can therefore be surprisingly useful.

    How to Photograph Orange-Latex Milkcaps

    Take one photograph of the entire mushroom in habitat, including nearby conifer needles or trees. Then photograph the underside before damaging it.

    Scratch or cut several fresh gills and immediately photograph the latex. Take another image several minutes later to record any shift toward red, wine, or green staining.

    A final close-up of the stem can show pits and discoloration. Together, this sequence provides far more information than a single attractive cap photograph.

    Can AI Identify Saffron Milk Caps?

    AI can often recognize the orange milkcap group from cap shape, gills, latex, and green staining. Exact species identification is much more difficult.

    Host tree and geography are often the missing pieces. A responsible system should sometimes return “saffron milk cap group” rather than forcing Lactarius deliciosus from appearance alone.

    For a broader approach to milkcap identification, see Milkcap Mushroom Identification: How to Use Latex, Color and Habitat.

    Common Identification Mistakes

    The most common mistake is calling every orange-latex milkcap Lactarius deliciosus. Spruce, fir, and regional species can look extremely similar.

    Another mistake is observing the latex only once. A mushroom whose milk begins orange and later becomes wine-red may provide a crucial identification clue only after several minutes.

    Ignoring the host tree is equally problematic. In this group, ecology can be more diagnostic than minor differences in cap color.

    Interesting Facts About Saffron Milk Caps

    The colored latex is produced by specialized cells within the mushroom. When those cells are broken, their contents are exposed to air and can undergo visible chemical changes.

    The famous green staining is also a chemical reaction rather than evidence of spoilage. This is why even fresh, healthy saffron milk caps can develop vivid green patches where they have been bruised.

    Saffron milk caps also demonstrate how tightly fungi and trees can be linked. Two nearly identical orange mushrooms can represent different species largely because one lives with pine and another with spruce or fir.

    These mushrooms have a long culinary history in parts of Europe, where local names and traditions often distinguish species or ecological forms that casual field guides may group together. Modern DNA-based taxonomy has shown that the group is even more diverse than its outward similarity suggests.

    Frequently Asked Questions

    Can orange latex become darker without turning green?

    Yes. In some species the latex can shift toward red or wine-colored tones before other staining becomes obvious. Recording the change over several minutes is important.

    Can an old saffron milk cap stop producing visible latex?

    Yes. Dry or old fruit bodies can release very little milk. Fresh internal tissue may still show the characteristic coloration.

    Why do some specimens have huge green patches?

    Repeated bruising, age, rainfall, and insect damage can expose large areas of tissue to oxidation. Extensive green coloration is therefore common in older fruit bodies of some species.

    Can two different saffron milk cap species grow in one forest?

    Yes. Mixed forests with several conifer species may support more than one orange milkcap. Each fruit body should be evaluated together with its probable host.

    Do orange-latex milkcaps always have zoned caps?

    No. Some species show strong concentric rings, while others are only faintly zoned or nearly uniform in color.

    Can green staining appear without obvious orange latex?

    Yes, particularly in older or dry specimens where little liquid remains. Existing green damage may persist even when the latex is difficult to observe.

    Why can photographs make the latex look yellow instead of orange?

    Camera white balance, forest shade, and reflected green light can distort warm colors. Recording the observed color in notes is useful alongside photographs.

    Can a saffron milk cap grow under a tree other than a conifer?

    Classic orange-latex saffron milk caps are strongly associated with conifers, though exact ecological relationships vary by species and region. A similar mushroom in a very different habitat deserves careful reconsideration.

    Final Identification Notes

    Mushrooms with orange latex are best identified by combining latex color, latex changes, green staining, host tree, cap zoning, stem markings, and geography. The orange milk itself is a powerful clue, but it does not identify one exact species.

    In Europe, pine suggests Lactarius deliciosus, spruce strongly supports L. deterrimus, and fir can point toward L. salmonicolor, while reddish or changing latex brings species such as L. sanguifluus and L. semisanguifluus into consideration. Outside Europe, similar mushrooms may belong to different regional taxa.

    The simplest field rule is: cut the gills, watch the latex change, identify the conifer, and then compare the cap and stem. That sequence is much more reliable than calling every orange milkcap a Saffron Milk Cap.

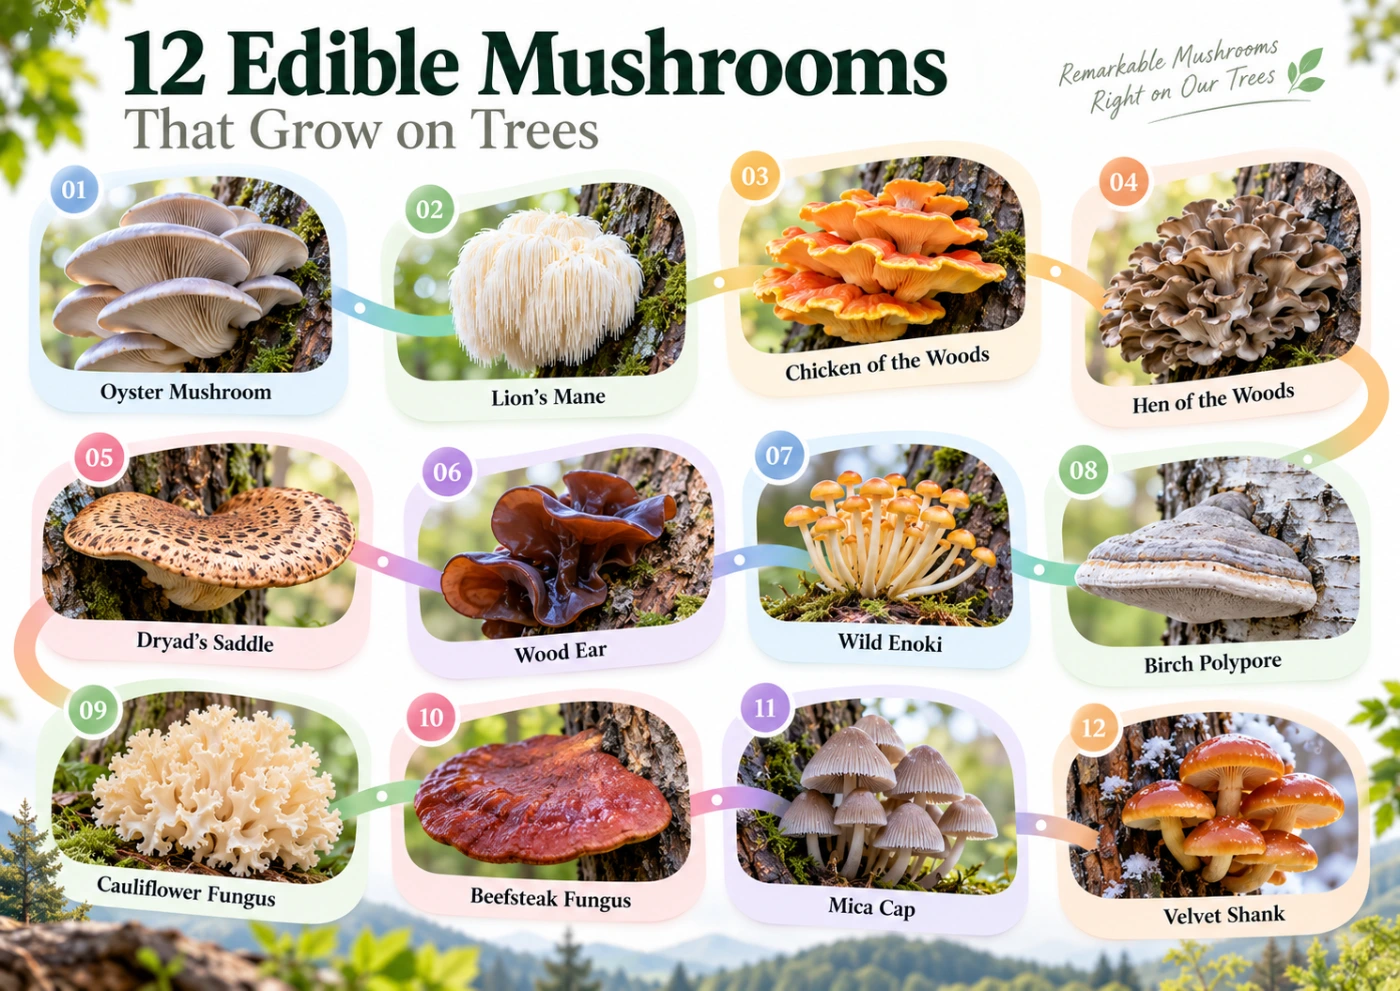
  • Edible Mushrooms That Grow on Trees: 12 Common Species to Know

    Edible Mushrooms That Grow on Trees: 12 Common Species to Know

    Many edible mushrooms grow directly on living trees, dead trunks, fallen logs, stumps, and buried wood. Some are easy to recognize because they form large brackets or clusters, while others can be confused with toxic wood-growing species.

    The most important rule is to identify the mushroom itself, not just the fact that it grows on a tree. Wood is an extremely common substrate, and edible, inedible, and deadly poisonous fungi can all fruit from the same log or stump.

    ⚠️ Important: Never eat a wild mushroom only because it grows on a tree or resembles a familiar edible species. Confirm the full set of features, including underside, stem, substrate, age, and possible look-alikes.

    Quick Guide to Edible Tree-Growing Mushrooms

    Mushroom Scientific name Typical substrate Main identification clue
    Oyster Mushroom Pleurotus ostreatus Dead hardwood Decurrent white gills
    Lion’s Mane Hericium erinaceus Hardwood Long white hanging spines
    Chicken of the Woods Laetiporus spp. Hardwood, sometimes conifers depending on species Bright orange-yellow shelves
    Hen of the Woods Grifola frondosa Base of hardwoods Large gray-brown rosette
    Dryad’s Saddle Cerioporus squamosus Hardwood trunks and logs Dark scales on pale cap
    Wood Ear Auricularia spp. Dead or weakened wood Ear-shaped gelatinous fruit bodies
    Enoki Flammulina spp. Dead hardwood Velvety dark stem base
    Birch Polypore Fomitopsis betulina Birch Thick pale bracket
    Cauliflower Fungus Sparassis spp. Conifer roots or bases Curly cauliflower-like mass
    Beefsteak Fungus Fistulina hepatica Oak and chestnut Red fleshy tongue-like bracket
    Mica Cap Coprinellus micaceus Buried wood, stumps, roots Clustered honey-brown caps
    Velvet Shank Flammulina velutipes group Dead hardwood Orange-brown cap, dark velvety stem

    Why Do So Many Edible Mushrooms Grow on Trees?

    Wood contains large amounts of cellulose and lignin, which fungi are uniquely equipped to break down. Wood-decaying mushrooms play a major ecological role by recycling nutrients from trunks, branches, and roots back into the ecosystem.

    Some edible species are saprotrophic and feed on dead wood, while others may occur on living but weakened trees. A few species fruit from buried roots and can look as though they are growing directly from soil.

    If you want a broader overview of both edible and non-edible species found on wood, see Mushrooms Growing on Trees.

    Oyster Mushroom — Pleurotus ostreatus

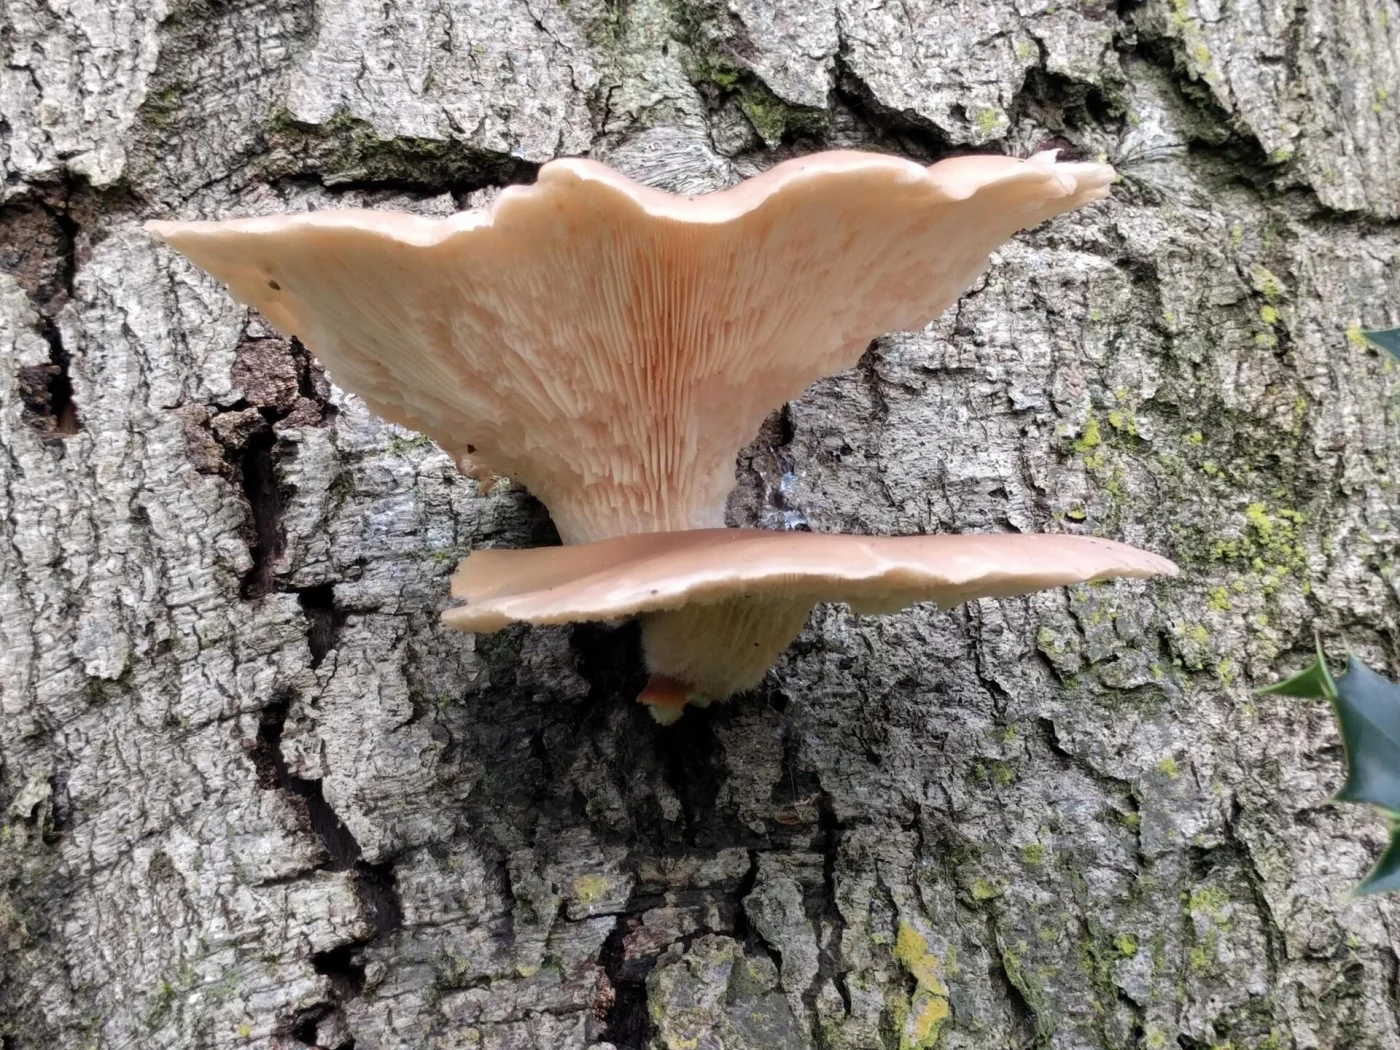
    Oyster Mushroom is one of the most familiar edible fungi growing on wood. It typically forms overlapping clusters of gray, beige, or pale brown fan-shaped caps on dead or dying hardwood.

    The underside has white to cream gills that run distinctly down the short lateral stem. This decurrent gill structure is one of the strongest identification features.

    Where It Grows

    Oyster Mushrooms commonly fruit on beech, poplar, willow, and many other hardwoods. They may appear on standing dead trees, fallen logs, or large branches.

    In cool climates, fruiting can continue into late autumn and winter. This makes Oyster Mushroom one of the more common edible tree fungi outside the main summer season.

    Main Look-Alikes

    Other Pleurotus species can be very similar and may also be edible when correctly identified. Pale wood-growing fungi with different gill structures or tougher flesh should not automatically be treated as Oyster Mushrooms.

    Lion’s Mane — Hericium erinaceus

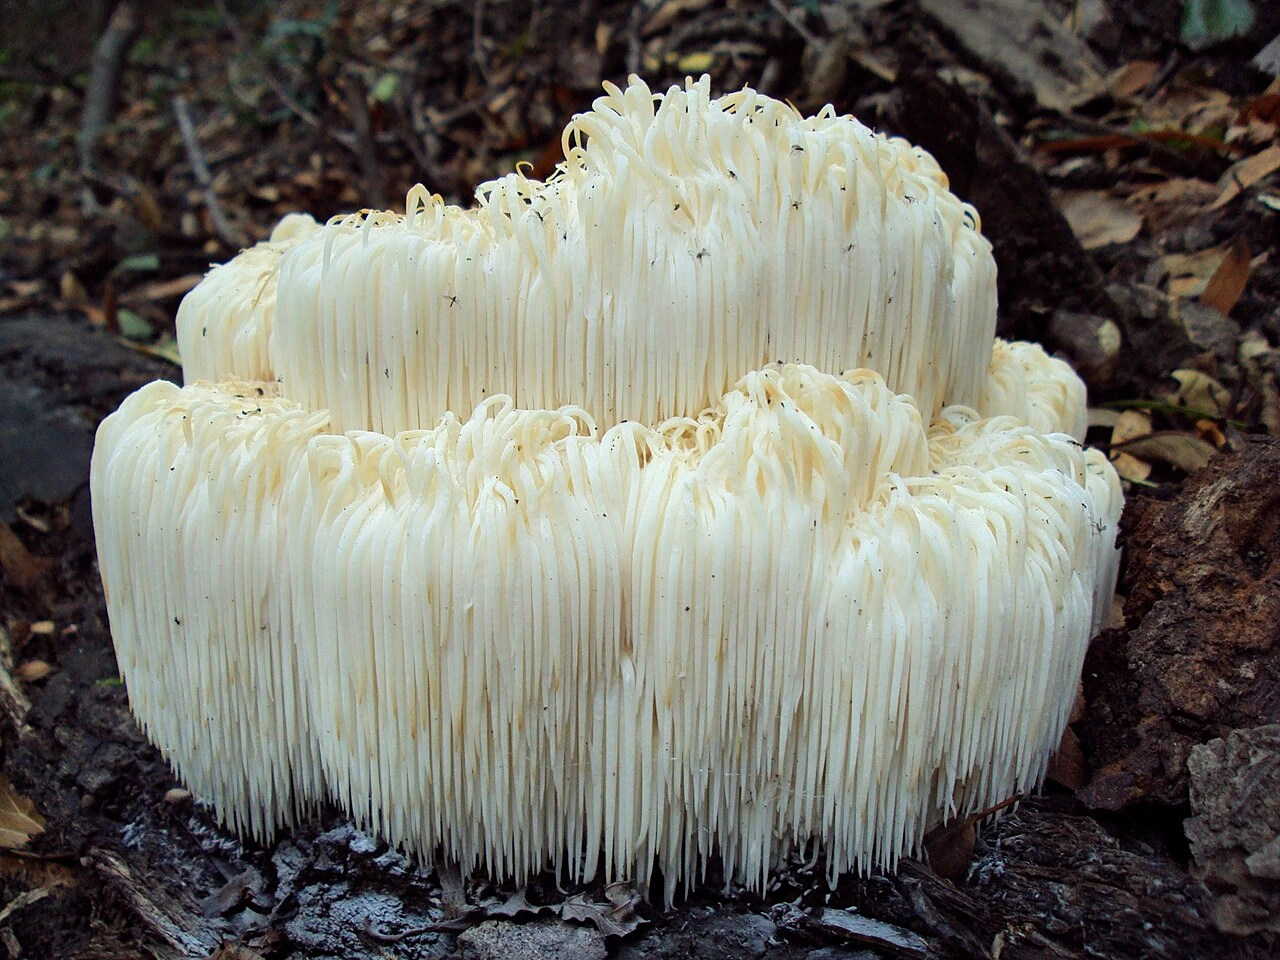
    Lion’s Mane is one of the most distinctive edible mushrooms associated with trees. Instead of a conventional cap and gills, it forms a white rounded mass covered with long hanging spines.

    Fresh specimens look soft and shaggy, while older fruit bodies become cream or yellowish. The unusual structure makes mature examples relatively easy to recognize.

    Where It Grows

    Lion’s Mane grows on hardwoods, including beech and oak, depending on region. It can fruit from dead wood as well as from wounds or cavities in living trees.

    The species may appear high on trunks, so not every fruiting body is accessible from ground level.

    Chicken of the Woods — Laetiporus Species

    Chicken of the Woods forms large overlapping brackets in vivid orange and yellow. Young fruit bodies are soft and fleshy, while older ones become tougher and paler.

    The underside has pores rather than gills. Different Laetiporus species vary by host tree and region, so exact identification should take ecology into account.

    Where It Grows

    Some species are strongly associated with hardwoods such as oak, while others can occur on conifers. Host tree can therefore matter both for identification and regional taxonomy.

    Bright orange shelves on a trunk are highly suggestive, but age and species should still be checked before any consideration of eating.

    Hen of the Woods — Grifola frondosa

    Hen of the Woods, also known as Maitake, grows as a large branching rosette composed of many gray-brown fan-shaped fronds. The entire cluster can become very large and usually arises near the base of a tree.

    The underside of each frond has tiny white pores. This separates it from gilled mushrooms and many superficially similar rosette-forming fungi.

    Where It Grows

    Maitake is especially associated with oak and other mature hardwoods. It often fruits at the same tree or root system in more than one season.

    Large clustered growth at the base of oak is one of the strongest ecological clues.

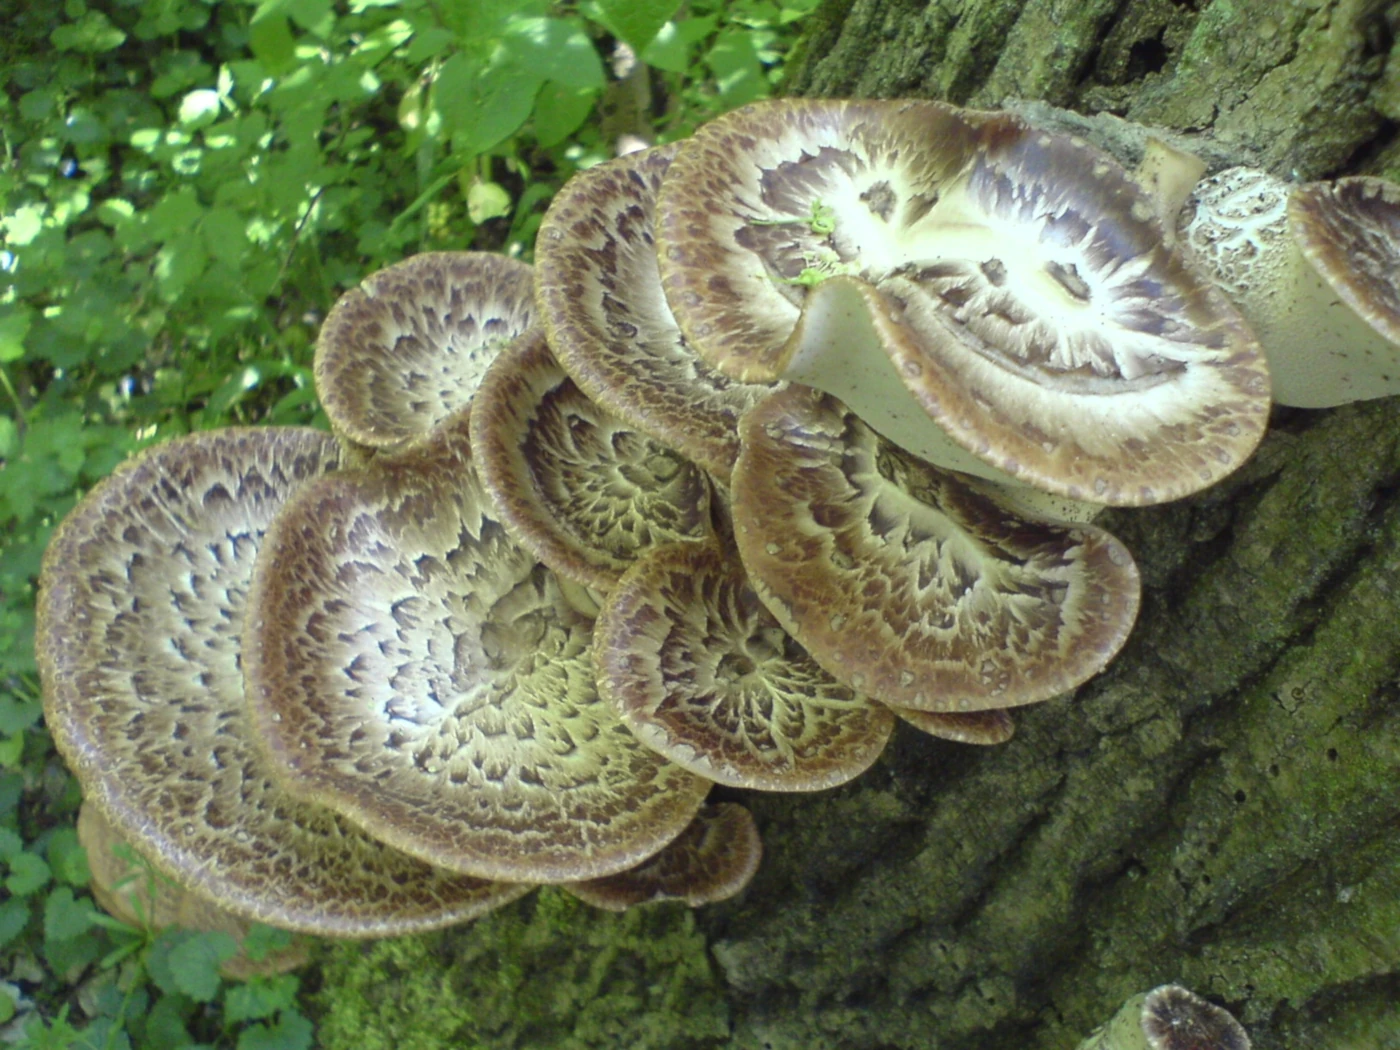
    Dryad’s Saddle — Cerioporus squamosus

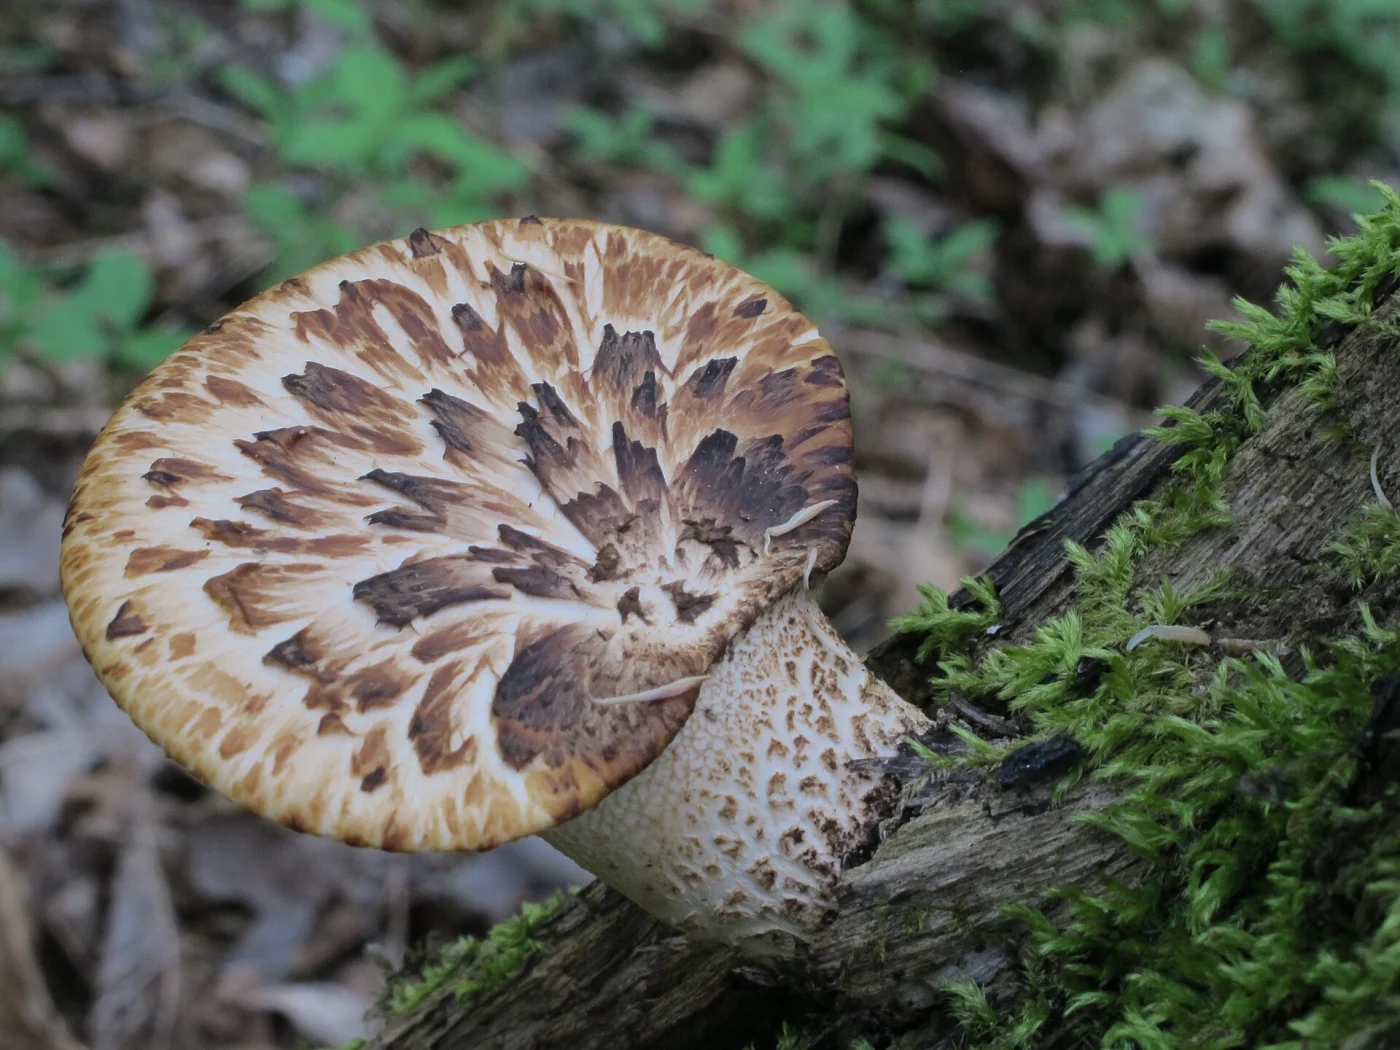
    Dryad’s Saddle is a broad pale bracket covered with distinct dark brown scales. The pattern often resembles pheasant feathers, which explains the alternative common name Pheasant Back.

    The underside has relatively large pale pores. Young fruit bodies can be fleshy, while older caps become tougher and more fibrous.

    Where It Grows

    The species commonly grows on hardwood trunks, stumps, and fallen logs. Elm, maple, beech, poplar, and several other trees can serve as hosts.

    It can fruit from the side of a trunk rather than only at ground level. This distinguishes its typical growth pattern from some large basal rosette-forming polypores.

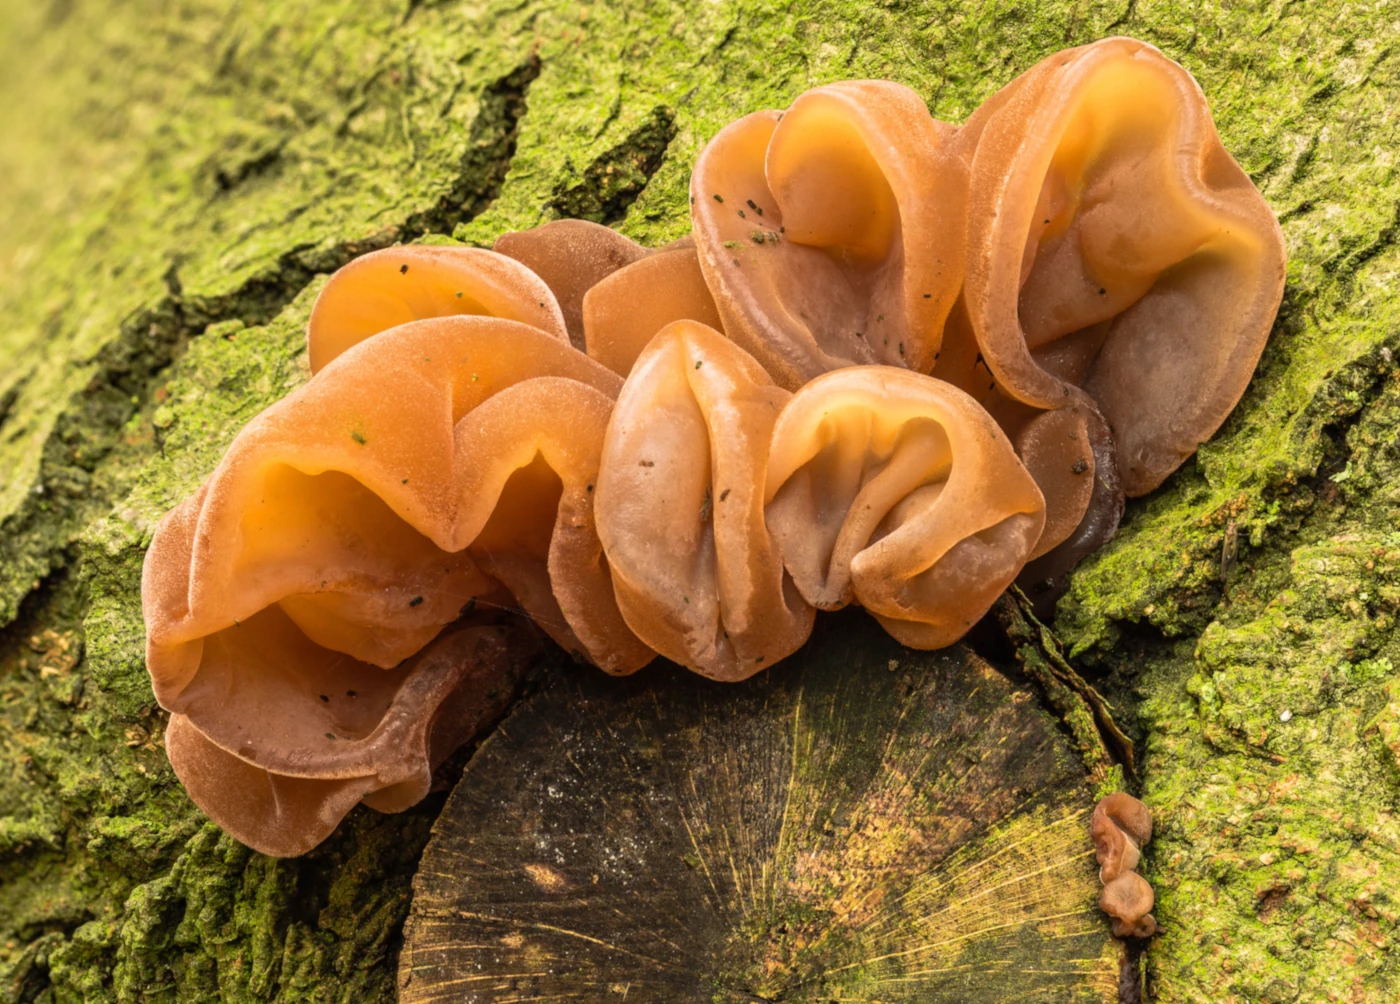
    Wood Ear — Auricularia Species

    Wood Ear mushrooms form thin, flexible, ear-shaped fruit bodies with a gelatinous texture. Their color ranges from tan and reddish brown to dark brown.

    The surface can be smooth or slightly veined, while the outer side is often more finely textured. There are no gills or pores like those of conventional capped mushrooms.

    Where It Grows

    Different Auricularia species occur on dead or weakened hardwoods around the world. Exact species names are regional, so not every Wood Ear should automatically be called Auricularia auricula-judae outside Europe.

    They often appear on fallen branches after wet weather and can dry out almost completely before rehydrating after rain.

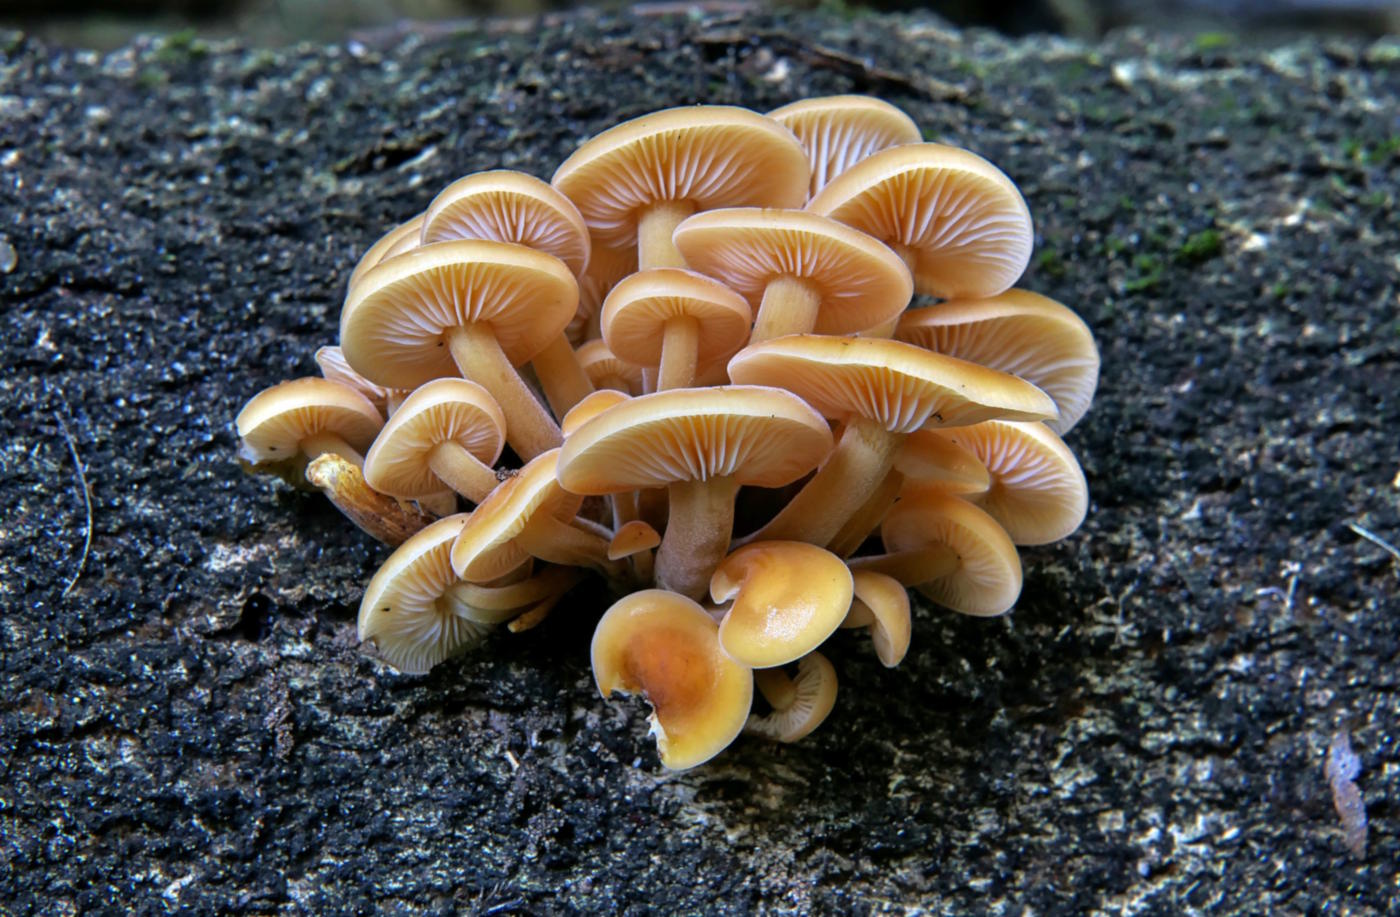
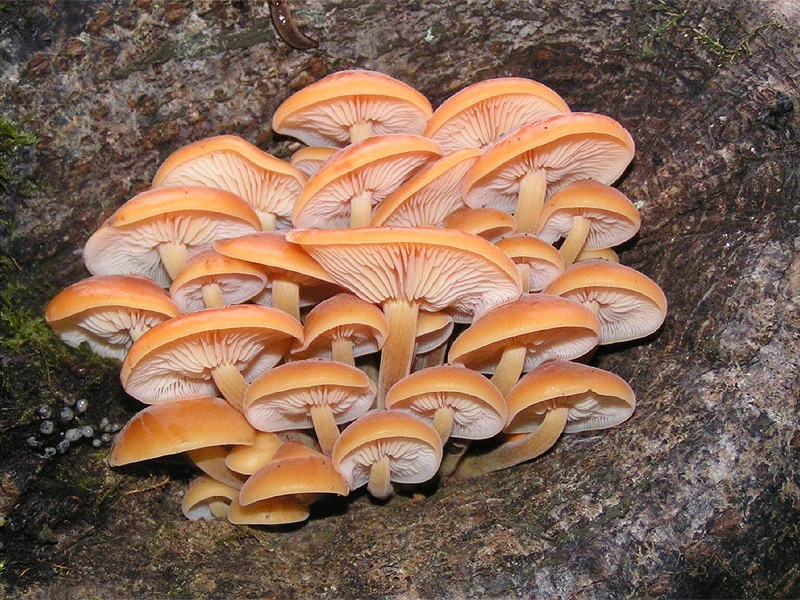
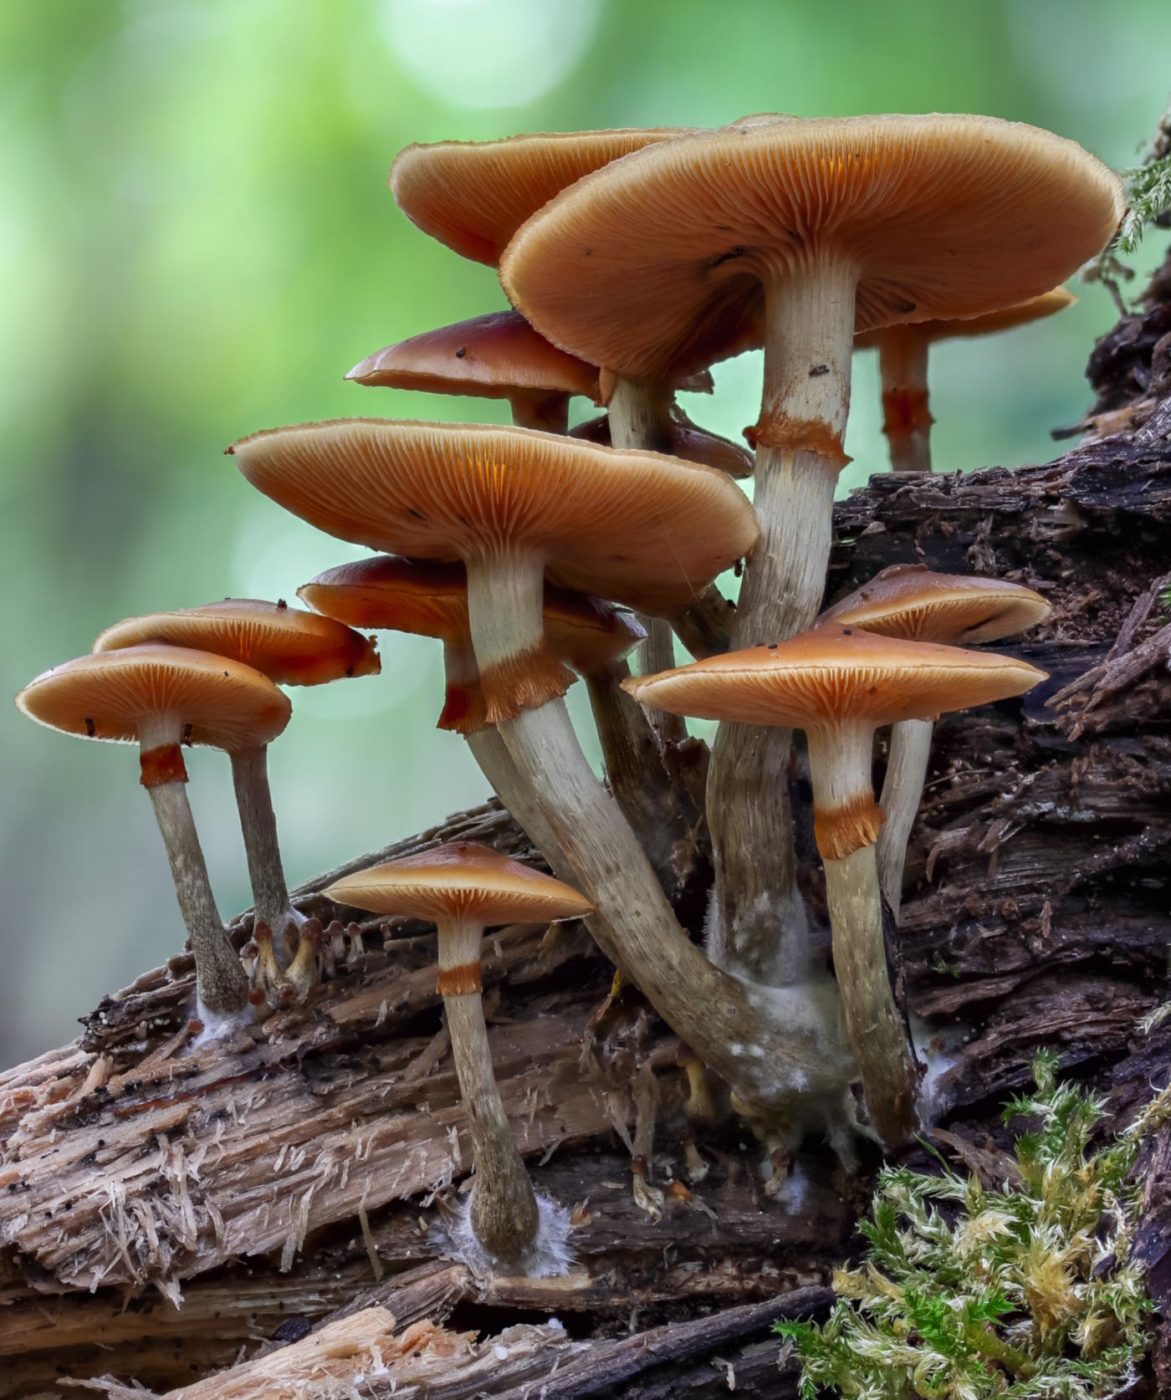
    Wild Enoki — Flammulina Species

    Wild Enoki is very different in appearance from the long white cultivated form sold in stores. Wild fruit bodies usually have orange-brown to honey-colored caps and grow in dense clusters on dead wood.

    The stems become darker toward the base and develop a distinctive velvety texture. This dark velvety lower stem is one of the most useful field characters.

    Where It Grows

    Wild Enoki commonly fruits on dead hardwood during cool weather. It can appear in late autumn, winter, or early spring depending on climate.

    The species complex varies geographically, so exact identification should consider region.

    Dangerous Look-Alike

    Deadly Galerina (Galerina marginata) can grow on similar wood and sometimes in similar weather. Galerina has rusty-brown spores, while Flammulina has a white spore print.

    This is one of the most important wood-mushroom comparisons for foragers.

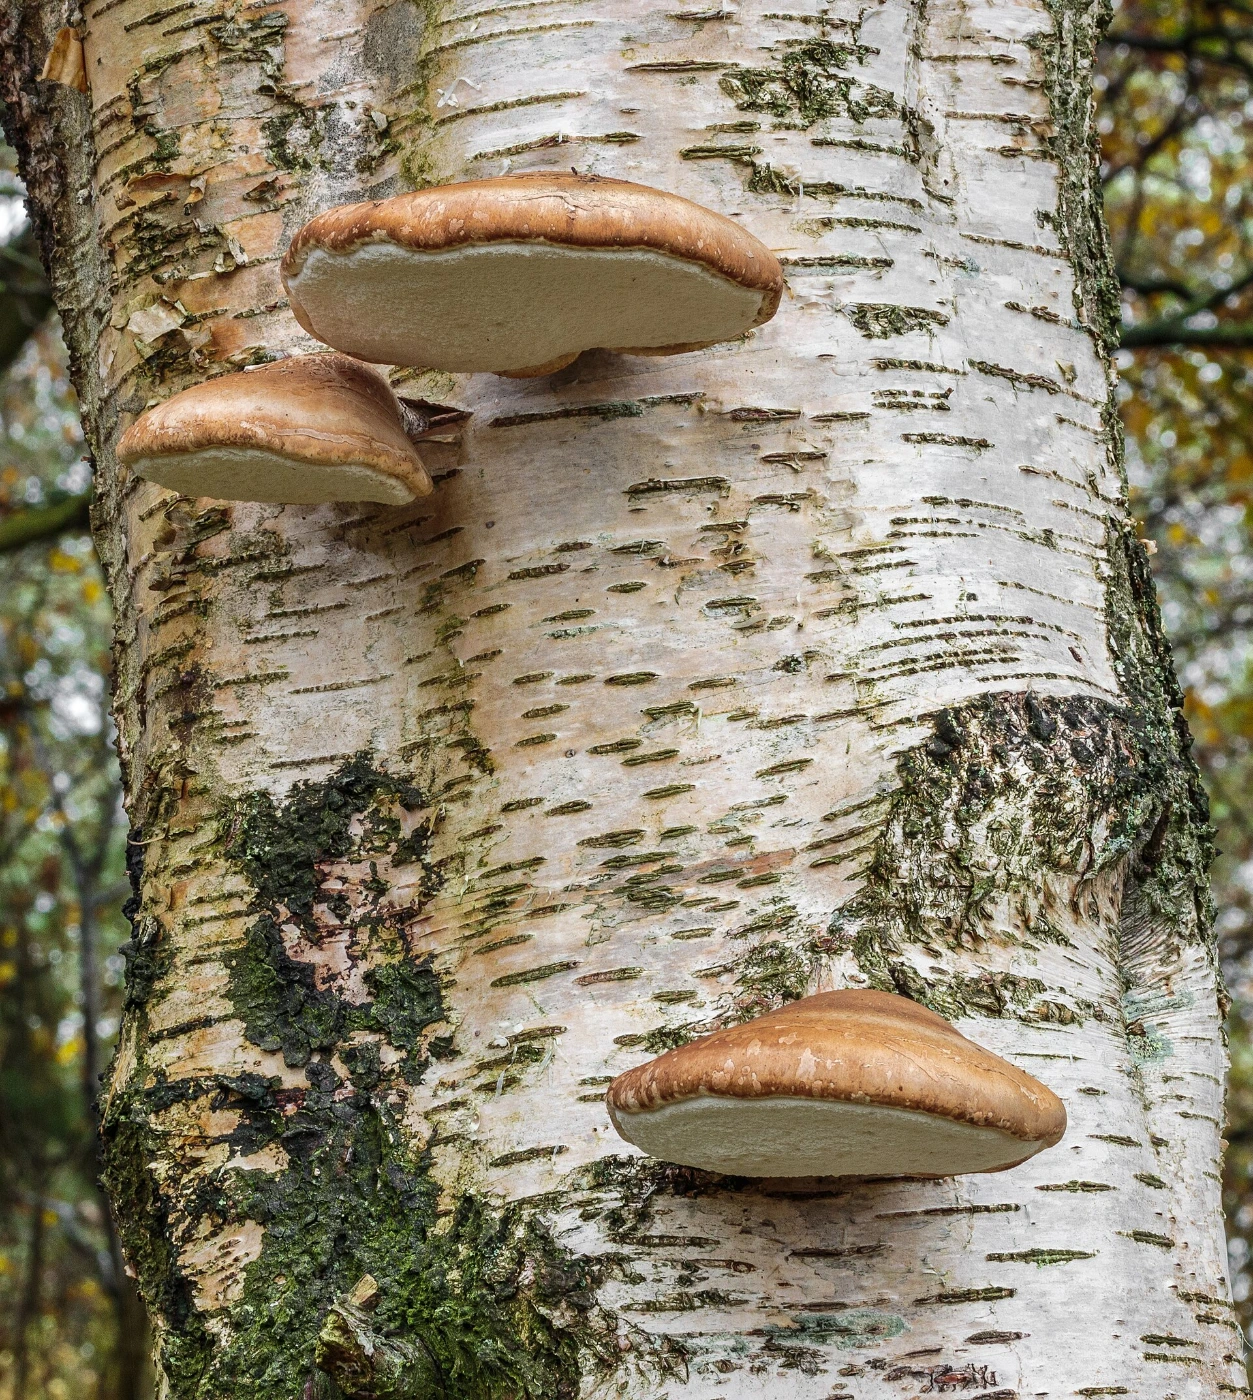
    Birch Polypore — Fomitopsis betulina

    Birch Polypore forms thick, pale, rounded brackets on birch. Young specimens can be soft and white to cream, while older fruit bodies become firmer and more brownish.

    The underside is covered with tiny white pores. It has no true stem and attaches directly to the wood.

    Where It Grows

    This species is very strongly associated with birch, making host identification unusually useful. It commonly occurs on dead, dying, or weakened birch trunks.

    The fruiting bodies are annual but can persist after they stop actively growing.

    Cauliflower Fungus — Sparassis Species

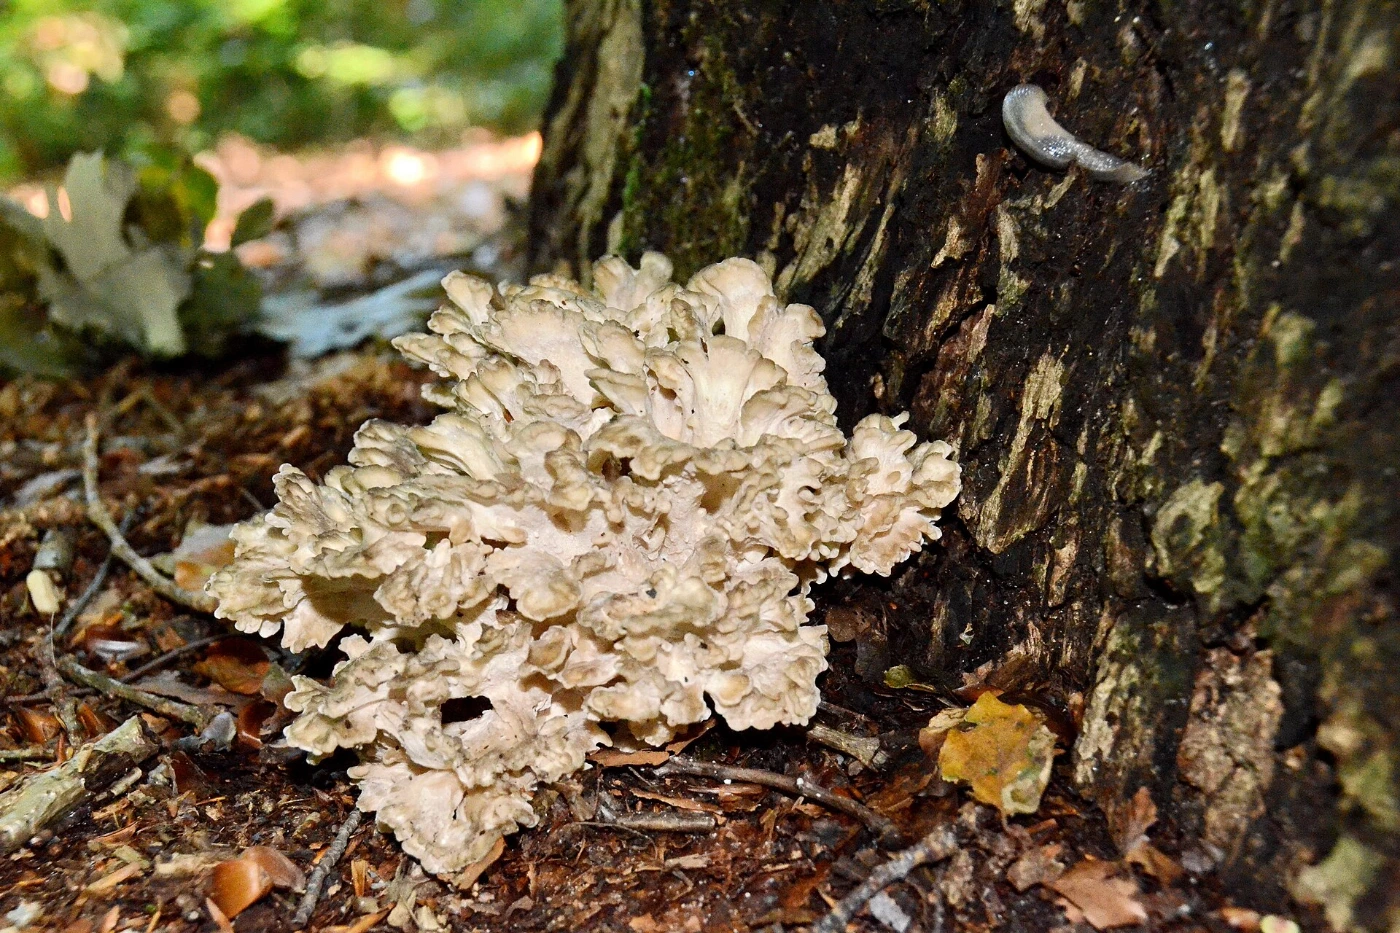
    Cauliflower fungi produce large tangled masses of thin, wavy, cream-colored lobes. The structure resembles a head of cauliflower or a pile of curled ribbons.

    The fruiting body can become surprisingly large. Its unusual shape makes mature examples difficult to confuse with most ordinary gilled mushrooms.

    Where It Grows

    Different Sparassis species are associated with conifers or occasionally other trees, depending on region. They often appear near the base of trees or from buried roots.

    Because the attachment may be underground, they can look as though they are growing directly from soil.

    Beefsteak Fungus — Fistulina hepatica

    Beefsteak Fungus is a thick reddish bracket with a fleshy texture that can resemble raw meat. Young specimens may exude reddish liquid when cut or damaged.

    The underside consists of closely packed individual tubes rather than ordinary gills. This tube structure is unusual and worth examining closely.

    Where It Grows

    The species is strongly associated with oak and sweet chestnut in Europe. It usually fruits from trunks, stumps, or damaged wood.

    Its reddish coloration and fleshy consistency make it quite different from most pale woody polypores.

    Mica Cap — Coprinellus micaceus

    Mica Caps grow in dense clusters around stumps, buried roots, and decaying hardwood. Their honey-brown caps may be covered with tiny glittering veil particles when young.

    The gills begin pale and gradually darken toward black as the spores mature. Old caps can partially dissolve or collapse in the typical inkcap manner.

    Where It Grows

    Because much of the wood may be buried underground, Mica Caps can appear to grow from ordinary lawn or soil. Checking for old roots or buried timber can reveal the true substrate.

    This species illustrates why “growing from the ground” does not always mean a mushroom is soil-dwelling.

    Velvet Shank — Flammulina velutipes Group

    Velvet Shank is another common name used for wild Flammulina species. The caps are orange to reddish brown, often shiny or sticky in damp weather.

    The lower stem becomes dark brown to almost black and distinctly velvety. Pale gills and a white spore print provide additional confirmation.

    Why It Matters

    This is a useful winter mushroom identification group because relatively few fleshy gilled mushrooms fruit during cold periods. Unfortunately, dangerous wood-growing mushrooms can overlap in habitat, so careful identification remains essential.

    Which Edible Mushrooms Grow on Living Trees?

    Some edible tree mushrooms can fruit from living hosts, especially where the tree is wounded, weakened, or internally decayed. Lion’s Mane, Chicken of the Woods, Beefsteak Fungus, and some large polypores may all appear on apparently living trees.

    The presence of a mushroom does not necessarily mean the entire tree is dead. Fungi can colonize heartwood, damaged tissue, roots, or individual branches while the canopy remains alive.

    Which Edible Mushrooms Grow on Dead Trees?

    Oyster Mushrooms, Wood Ears, Wild Enoki, and many other edible species frequently grow on dead trunks and fallen logs. These fungi are important decomposers of woody material.

    Dead wood is also home to many inedible and poisonous mushrooms. Substrate therefore helps with identification but never determines edibility by itself.

    Edible Mushrooms Growing on Stumps

    Stumps are particularly productive because they retain large amounts of wood close to moist soil. Oyster Mushrooms, Mica Caps, Hen of the Woods, and other fungi can appear around them.

    Buried stump roots can continue producing mushrooms several feet from the original trunk. A cluster that seems to emerge from soil may still be feeding on underground wood.

    Edible Mushrooms Growing at the Base of Trees

    Large rosette-forming mushrooms are especially common around tree bases. Hen of the Woods is a classic example, while Cauliflower Fungus can emerge near the base of conifers.

    The overall growth form is important here. Large clusters should be photographed from a distance as well as close up because architecture can be more diagnostic than individual caps.

    How to Identify an Edible Mushroom Growing on a Tree

    Begin by identifying the type of mushroom rather than asking whether it is edible. Determine whether it has gills, pores, teeth, a smooth underside, or another spore-producing structure.

    Then examine growth form and host tree. A single bracket, dense cluster of gilled caps, coral-like mass, and large basal rosette belong to very different identification pathways.

    Step 1: Check the Underside

    Look for gills, pores, teeth, or a smooth surface. This is often the fastest way to separate major groups.

    For example, Oyster Mushrooms have gills, Chicken of the Woods has pores, and Lion’s Mane has hanging spines.

    Step 2: Identify the Host Tree

    Determine whether the wood is hardwood or conifer and, if possible, identify the tree species. Some fungi have strong host preferences.

    Host information is especially useful with Birch Polypore, Beefsteak Fungus, and regional Laetiporus species.

    Step 3: Examine Growth Form

    Note whether mushrooms grow individually, in overlapping shelves, dense clusters, or one large rosette. Take photographs that show the entire colony.

    Growth architecture often provides more information than cap color alone.

    Step 4: Check Age and Texture

    Young and old polypores can look dramatically different. Young fruit bodies may be soft and brightly colored, while older ones become tough, pale, or darkened.

    Texture can also determine whether an otherwise edible species is still suitable for normal culinary use.

    Dangerous Tree-Growing Mushrooms to Know

    Tree growth is not a safety indicator. Some highly toxic fungi also grow directly from dead wood. One of the most important is Galerina marginata, which can occur on logs, stumps, and buried wood and contains amatoxins.

    Galerina marginata — Deadly Galerina

    Deadly Galerina is a small brown gilled mushroom that grows on wood. Mature specimens produce rusty-brown spores and may have a ring or ring zone on the stem.

    It is especially important because it can occur in the same general habitats as edible wood-growing mushrooms such as wild Enoki. Any small brown clustered mushroom on wood deserves careful identification.

    Can You Identify Tree Mushrooms From the Host Alone?

    No. A single tree species can host many unrelated fungi, and the same mushroom species may sometimes grow on several different hosts.

    Host tree is best treated as one part of the identification. It becomes powerful when combined with underside structure, cap texture, growth form, and geography.

    How to Photograph Mushrooms Growing on Trees

    Take one wide image showing the entire cluster and the part of the tree where it is growing. This documents whether the fungus is on the trunk, stump, roots, or fallen wood.

    Then photograph the upper and lower surfaces of an individual fruit body. For gilled mushrooms, include the full stem; for polypores, show pore size and attachment to the wood.

    Photographing the bark can also help identify the host. This is particularly valuable for fungi with strong tree associations.

    Can AI Identify Edible Tree Mushrooms?

    AI can often narrow tree-growing mushrooms effectively when several photographs are provided. Growth form, underside, host, and texture can together create a strong identification pattern.

    Problems arise when only the upper surface is visible. A brown bracket or cluster of brown caps may have many possible identities, some of which can be toxic.

    AI should therefore be used to generate possible matches rather than as an independent decision that a wild mushroom is safe to eat.

    Common Identification Mistakes

    One common mistake is assuming that large shelf fungi are all edible polypores. Many are too tough, unsuitable as food, or belong to very different species.

    Another is ignoring the host and attachment point. A mushroom growing from buried roots may look terrestrial even though it is actually wood-decaying.

    The most serious mistake is treating clustered growth on wood as a sign of edibility. Deadly Galerina demonstrates why substrate alone cannot establish safety.

    Interesting Facts About Edible Tree Mushrooms

    Wood-growing fungi are some of the most important recyclers in forests. Without them, fallen trunks and branches would decompose far more slowly and nutrients would remain locked in woody material.

    Different fungi specialize in different components of wood. White-rot fungi can break down lignin as well as cellulose, while brown-rot fungi leave behind a crumbly brown residue rich in modified lignin.

    Some tree mushrooms can produce fruit bodies repeatedly from the same trunk or root system for years. The visible mushroom is temporary, but the mycelium may remain active deep inside the wood.

    Tree fungi can also reveal hidden wood. Mushrooms appearing in lawns several feet away from a stump may be growing from roots that remain underground long after the tree itself has disappeared.

    Frequently Asked Questions

    Can an edible mushroom grow on a poisonous tree?

    Yes. Mushroom toxicity is not simply inherited from the host tree. However, exact fungal identification and host context should still be considered before any culinary use.

    Why do mushrooms sometimes appear several feet from a stump?

    They may be growing from buried roots. The underground root system can extend far beyond the visible stump and continue decomposing for years.

    Can the same tree have both edible and poisonous mushrooms?

    Yes. Multiple fungal species can colonize one trunk or stump at the same time. Every cluster should be identified independently.

    Why do tree mushrooms often appear after rain?

    The fungal mycelium is already present inside or around the wood. Moisture and suitable temperatures trigger the production and expansion of fruit bodies.

    Can old edible polypores still be eaten?

    Many become too tough or woody with age even when the species itself is edible when young. Culinary suitability and species identification are separate questions.

    Do all edible tree mushrooms grow on hardwood?

    No. Many do, but some species or species groups are associated with conifers. Host preference can vary regionally.

    Can mushrooms damage a living tree?

    Some can. Certain wood-decay fungi colonize wounds, roots, or weakened tissue and may contribute to structural decay.

    Should mushrooms be removed from a living tree?

    Removing the fruit body does not usually remove the fungus living inside the wood. If structural tree health is a concern, an arborist is more useful than simply cutting off the mushrooms.

    Final Identification Notes

    Many well-known edible mushrooms grow on trees, stumps, logs, and buried roots. Oyster Mushroom, Lion’s Mane, Chicken of the Woods, Hen of the Woods, Wood Ear, Wild Enoki, and several polypores are classic examples.

    The safest way to identify them is to combine underside structure + growth form + host tree + texture + geography. Tree growth itself never proves that a mushroom is edible.

    The simplest field rule is: first identify how the mushroom is built, then identify what wood it is growing on, and only after that consider the species and edibility.

  • Mushrooms With a Bulbous Stem Base: What It Means

    Mushrooms With a Bulbous Stem Base: What It Means

    A bulbous stem base is an important identification feature in many gilled mushrooms. Instead of ending in a straight or evenly tapered stem, the lower part becomes swollen, club-shaped, rounded, or distinctly bulb-like.

    This feature can be very useful, but it does not point to one single genus or toxicity level. Some deadly Amanitas have bulbous bases, while many harmless or unrelated mushrooms can also develop enlarged stem bases, so the exact shape and surrounding structures matter.

    ⚠️ Important: A swollen stem base should always be examined together with the presence or absence of a volva, ring, gill color, cap features, habitat, and bruising reactions. Never use a bulbous base alone to decide whether a mushroom is edible.

    Quick Identification

    Feature What to Check
    Location Very bottom of the stem
    Possible shapes Rounded bulb, club-shaped base, marginate bulb, rooting base
    Volva present? Sometimes
    Ring present? Sometimes
    Most important genus Amanita
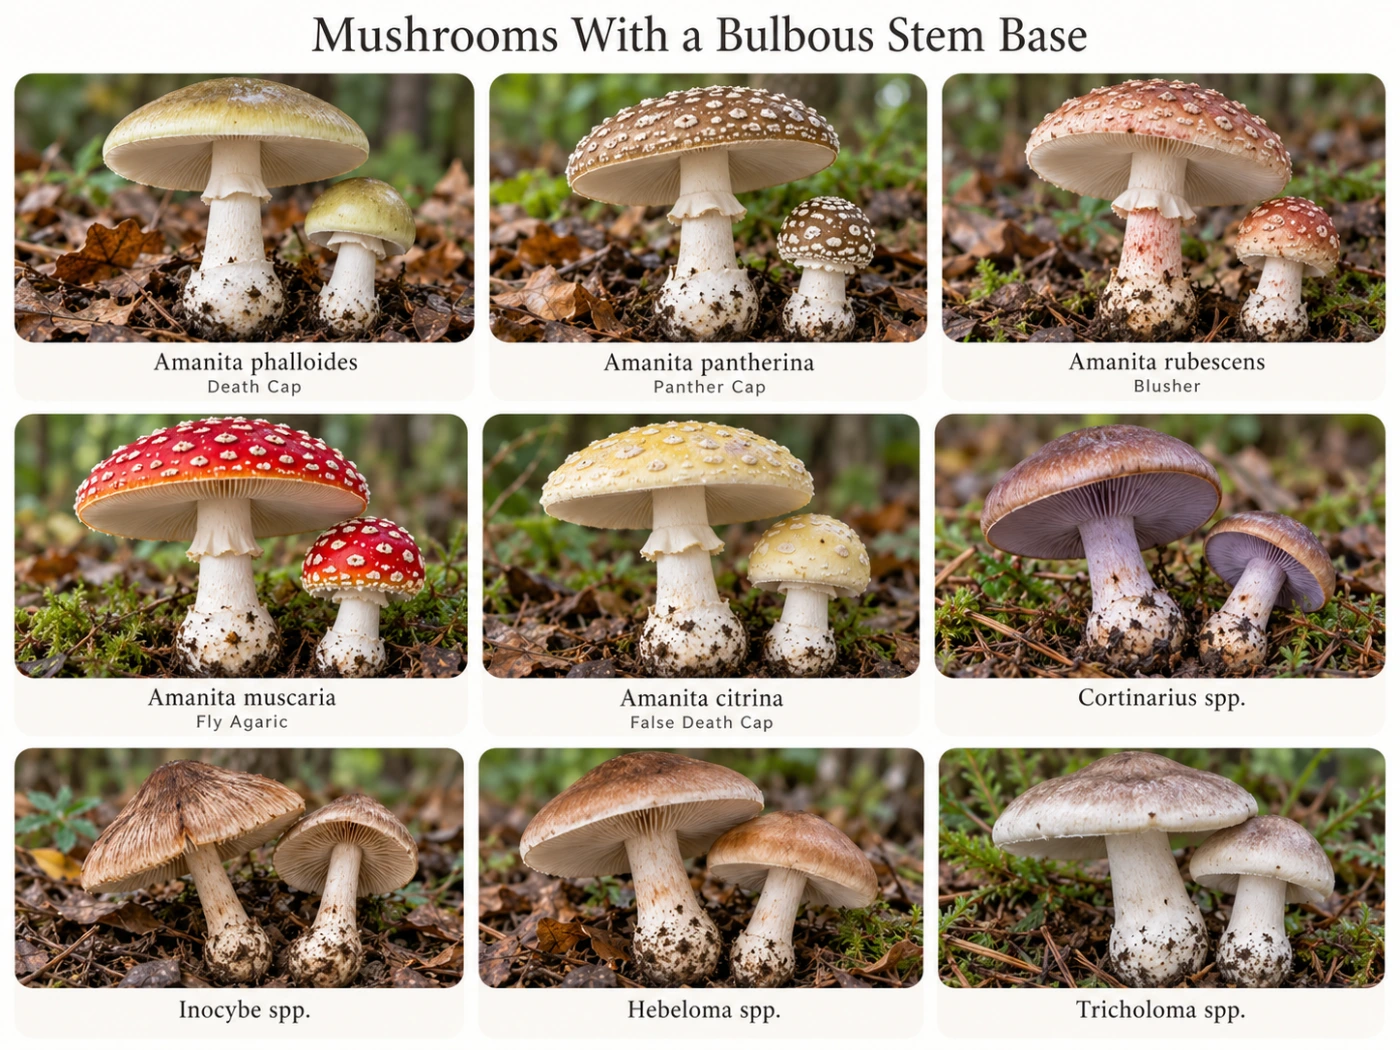
    Other groups Cortinarius, Hebeloma, Inocybe, Tricholoma and others
    Best comparison Bulb vs volva vs rooting stem
    Safety importance High
    Main mistake Assuming every bulb is an Amanita volva
    Best practice Remove the complete stem base intact

    What Is a Bulbous Stem Base?

    A bulbous base is simply a swelling at the bottom of the stem. It can be subtle and gradual, or sharply defined and much wider than the rest of the stem.

    The swelling may be part of the stem itself or associated with veil remnants around the base. This distinction is especially important in Amanita identification.

    Why the Stem Base Matters

    The lower stem can contain some of the most diagnostic features on the entire mushroom. A cap may fade or lose surface remnants, but the structure of the base can remain highly informative.

    This is especially useful when comparing similar brown or white mushrooms. A bulb, volva, rim, concentric bands, or rooting extension can immediately change the identification.

    Bulbous Base vs Volva

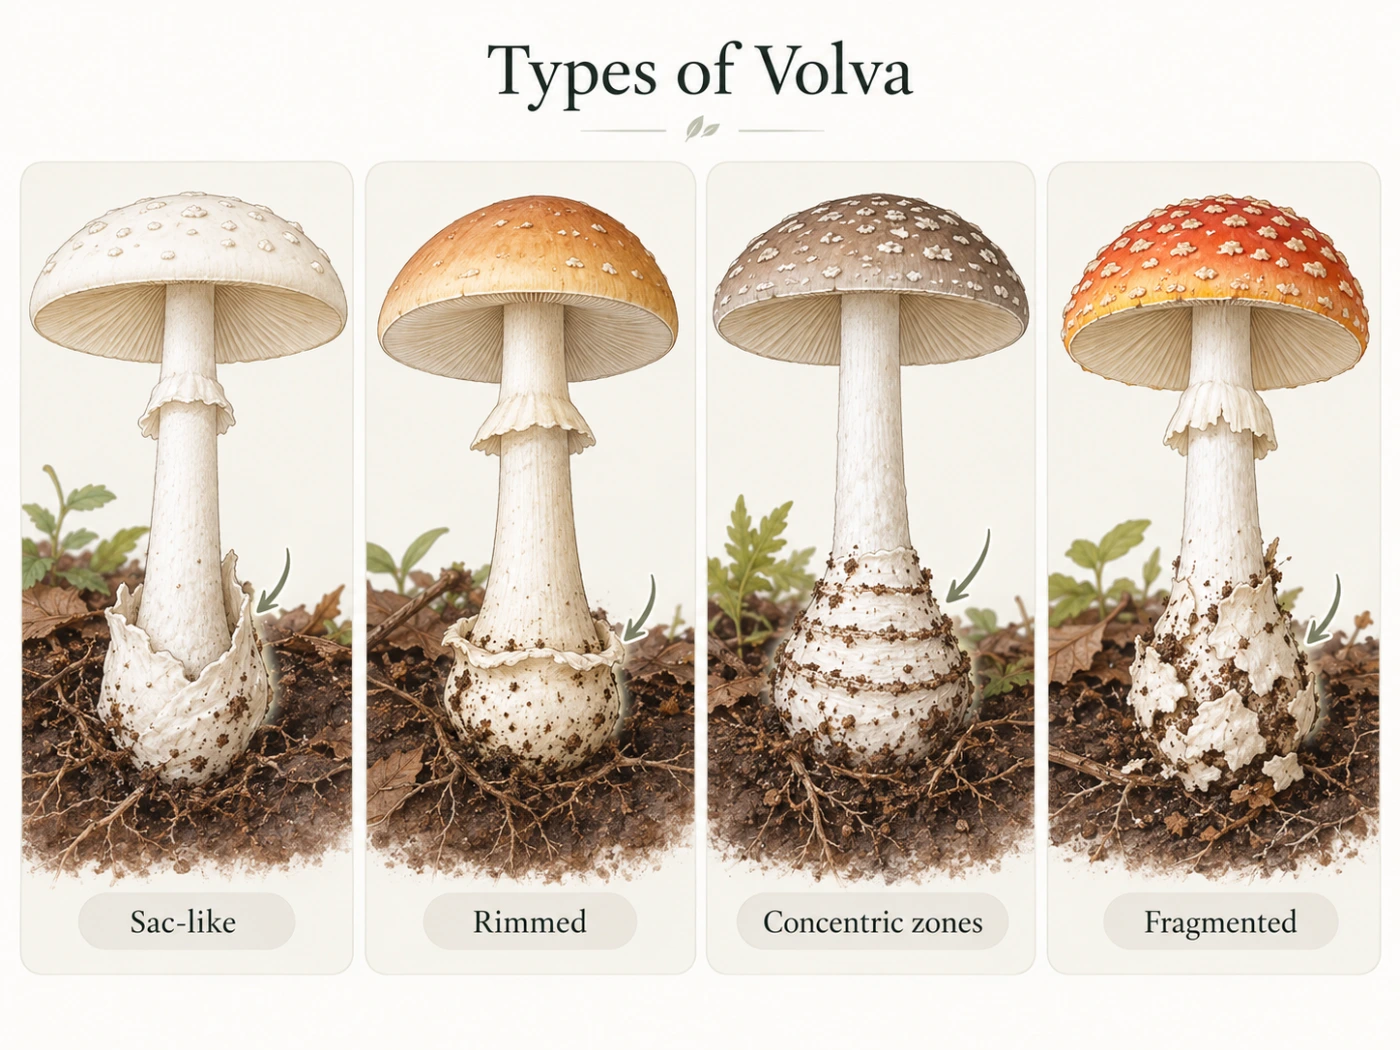
    A bulb and a volva are not the same thing. A bulb is a shape of the stem, while a volva is actual veil tissue left from the universal veil.

    Some Amanitas have both. The stem may be swollen into a bulb while a sac, rim, or band of veil material surrounds it.

    What Does a Bulbous Base Look Like?

    Bulbous bases vary widely in form. Some are smoothly rounded, while others have a sharply defined rim or flattened edge.

    The exact shape can be more useful than simply noting that the stem is “thick at the bottom.”

    Rounded Bulb

    A rounded bulb gradually expands at the base without a sharp edge. It can look like a small onion attached to the bottom of the stem.

    This type occurs in several genera and is not diagnostic by itself.

    Marginate Bulb

    A marginate bulb has a clear rim or edge around the top of the swelling. The transition from normal stem to bulb is therefore more abrupt.

    This can be an important feature in some Amanitas and Cortinarius species.

    Club-Shaped Base

    Some mushrooms have stems that simply widen gradually toward the bottom. This is better described as clavate or club-shaped rather than truly bulbous.

    The difference is useful because a gradual club shape is generally less diagnostic than a sharply defined bulb.

    Rooting or Tapered Base

    A stem that narrows into a long underground extension is not a bulb. Some mushrooms appear swollen above the soil but then continue downward as a rooting structure.

    The full base must therefore be excavated before deciding what kind of structure is present.

    Amanita and Bulbous Stem Bases

    Amanita is the most important genus to consider when a gilled mushroom has a swollen base. Several toxic and deadly species have very distinctive basal structures.

    The exact combination of bulb, volva, ring, and cap remnants is often more useful than cap color.

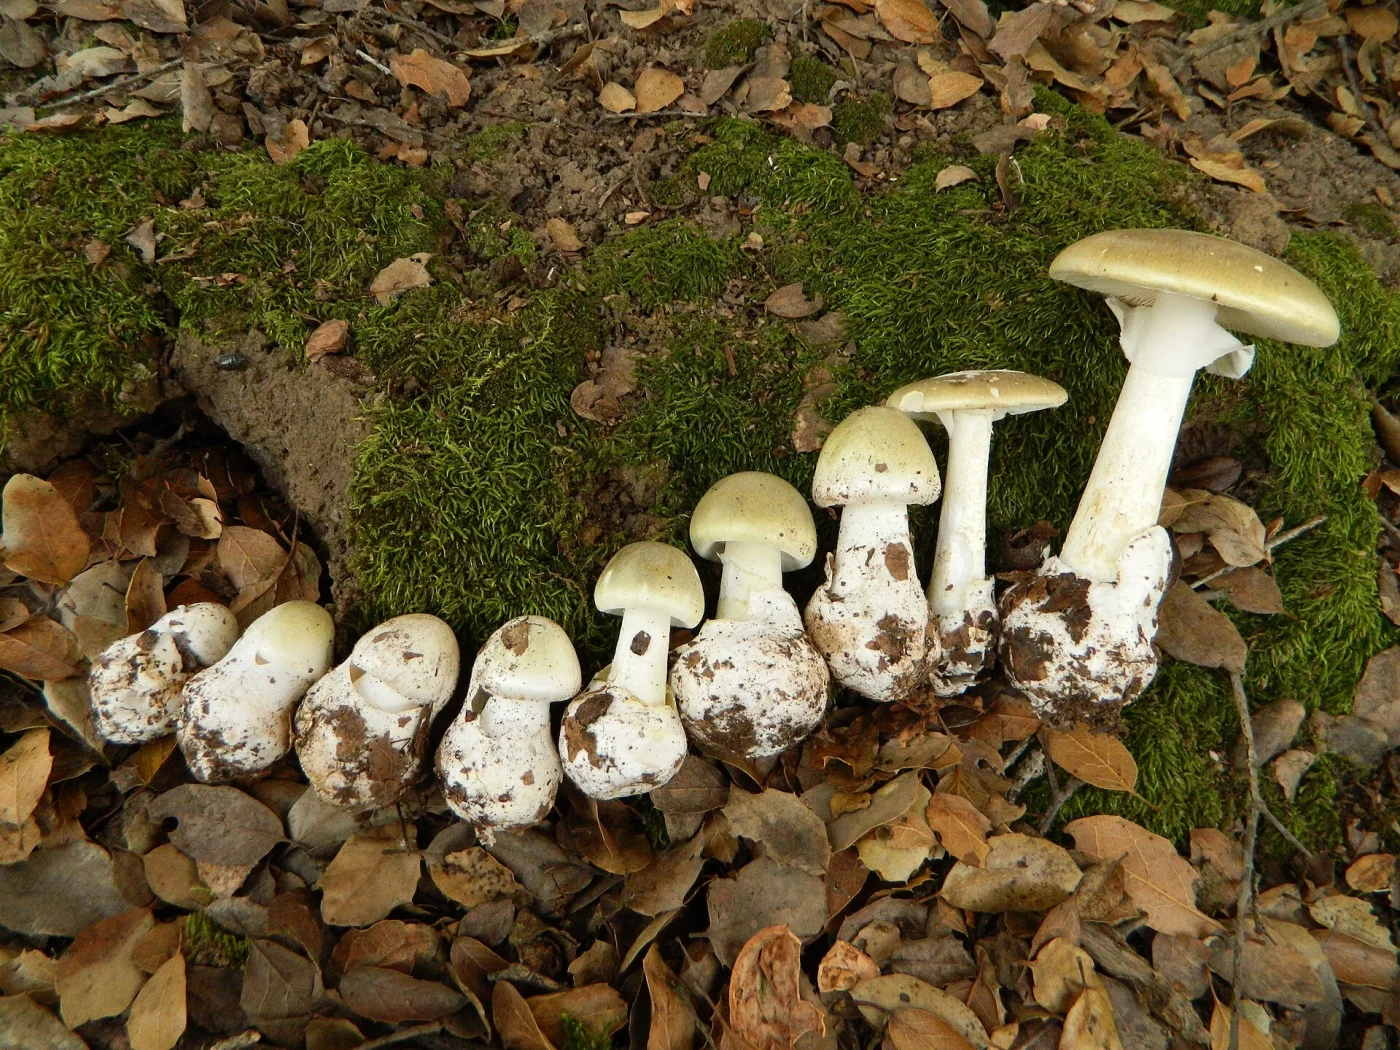
    Amanita phalloides — Death Cap

    Identification

    Death Cap usually has a swollen stem base enclosed in a loose sac-like volva. The gills are white, and a ring is usually present on the upper stem.

    The cap may be olive, greenish, yellowish, brownish, or pale. Because cap color is variable, the stem base becomes especially important.

    Main Difference

    A bulb inside a free white sac is a major warning sign. The volva matters more than the simple fact that the stem is swollen.

    Amanita pantherina — Panther Cap

    Identification

    Panther Cap typically has a bulbous base with a distinct rim or collar and often concentric volval zones. The cap is brown to gray-brown with white veil patches.

    The flesh does not characteristically redden when damaged. This helps separate it from the Blusher.

    Main Difference

    The basal structure is usually more sharply organized than in Amanita rubescens. A clear rim and concentric zones strongly support Panther Cap.

    Amanita rubescens — Blusher

    Identification

    The Blusher has a bulbous stem base, but the basal veil remnants are usually fragmented rather than forming a neat free sac. The flesh develops pink to wine-red staining when damaged.

    A hanging ring and pale cap remnants are also typical. The combination of blushing and a less sharply rimmed base is useful.

    Main Difference

    Reddish bruising is the strongest practical clue. A brown Amanita with a bulbous base but no red staining deserves more careful comparison with Panther Cap or related species.

    Amanita muscaria — Fly Agaric

    Identification

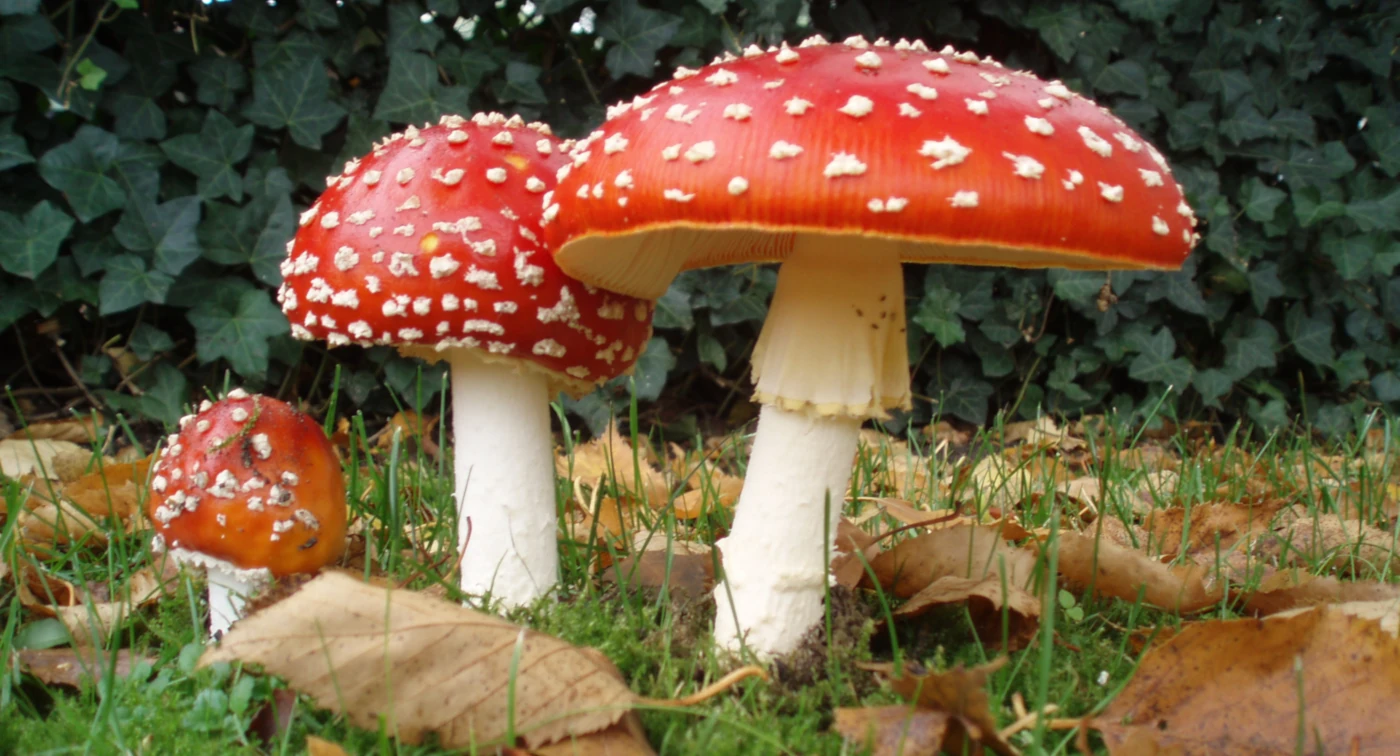
    Fly Agaric has a swollen basal bulb covered with irregular rings, scales, or patches of universal veil tissue. It usually lacks a deep loose sac.

    The red to orange-red cap with pale warts is distinctive in typical specimens. Faded examples can be less obvious.

    Main Difference

    The volval remnants appear as fragmented bands or patches rather than one continuous bag-like volva.

    Amanita citrina — False Death Cap

    Identification

    Amanita citrina often has a pale yellowish or cream cap, white gills, a ring, and a distinctly bulbous base. The bulb may have a sharp upper margin.

    It can superficially resemble paler dangerous Amanitas. Stem-base structure and other features must therefore be checked carefully.

    Main Difference

    The combination of a marginate bulb and different overall cap characters can help separate it from the Death Cap group. Exact identification should still be cautious.

    Bulbous Bases Outside Amanita

    A swollen stem base is not unique to Amanitas. Several other genera contain species with bulbs, enlarged bases, or club-shaped stems.

    This is why the base must always be interpreted together with gill color, spore color, habitat, and veil structures.

    Cortinarius Species

    Many Cortinarius species have bulbous or marginate stem bases. Young specimens may also have a cortina, a cobweb-like veil between cap and stem.

    Their gills usually become rusty brown as spores mature. This spore color separates them clearly from white-spored Amanitas.

    Inocybe Species

    Some Inocybe species have swollen or bulbous stem bases. They are often smaller, with fibrous caps and brownish mature gills.

    Many species in the genus are toxic, so a small fibrous mushroom with a bulbous base should not be dismissed as harmless.

    Hebeloma Species

    Several Hebeloma species have thickened stem bases and grow in mycorrhizal association with trees. Their caps are usually brownish, and their gills become clay-brown as spores mature.

    The combination of brown spores and lack of a true Amanita-style volva helps separate them from white-spored Amanitas.

    Tricholoma Species

    Some Tricholoma species develop strongly thickened or club-shaped stems. These mushrooms usually lack a universal veil and therefore do not form a true volva.

    White spores and mycorrhizal growth can make them superficially similar to Amanita in poor photographs, so the base and ring structures still matter.

    Bulb vs Volva vs Ring

    Feature Bulb Volva Ring
    What it is Swollen stem shape Universal veil remnant Partial veil remnant
    Location Stem base Around stem base Upper or middle stem
    Can occur alone Yes Yes Yes
    Common in Amanita Yes Yes Often
    Best use Shape clue Major structural clue Additional veil clue

    These three structures should be recorded separately rather than treated as one feature.

    Why Cutting the Stem Can Cause Problems

    If a mushroom is cut off above soil level, the most important part of the stem base may remain hidden underground. A sac-like volva, marginate bulb, or concentric bands can disappear from the specimen completely.

    For identification, it is usually better to loosen the soil and remove the whole fruit body carefully.

    How to Expose the Stem Base

    Work around the stem with fingers, a small stick, or the tip of a knife. Avoid pulling straight upward because fragile basal tissue can tear off and remain buried.

    Once exposed, photograph the entire base before cleaning it too aggressively. Soil position itself can sometimes show how deep the bulb or volva was buried.

    Bulbous Base and White Gills

    A mushroom with white gills and a bulbous base deserves careful attention. Amanita becomes an important possibility, especially if a ring or universal veil remnants are also present.

    This does not mean the mushroom is automatically dangerous, but it raises the safety significance of the identification.

    Bulbous Base and Brown Gills

    Brown or rusty mature gills usually point away from Amanita. Genera such as Cortinarius, Hebeloma, and Inocybe become more likely.

    The stem shape can still be useful, but spore color may be more informative at that stage.

    Bulbous Base Without a Ring

    The absence of a ring does not automatically exclude Amanita. Some ringless Amanitas still have swollen bases or volval structures.

    Other genera can also have bulbous ringless stems. The complete combination of structures must therefore be considered.

    Bulbous Base With a Ring

    A ring plus bulbous base is an important combination but still not diagnostic. Amanita, some Tricholoma, and other groups can share this appearance.

    The next step should be checking the volva, gills, cap remnants, and spore color.

    How to Identify a Mushroom With a Bulbous Base Step by Step

    Start by removing the entire stem base intact. Then decide whether the swelling is simply part of the stem or surrounded by veil tissue.

    After that, check gills, ring, cap remnants, and habitat.

    Step 1: Determine the Shape

    Decide whether the base is rounded, club-shaped, marginate, or rooting. A sharply rimmed bulb is more informative than a gradual widening.

    Take a side photograph before cutting the specimen.

    Step 2: Look for a Volva

    Check for a sac, rim, collar, rings, or loose patches around the bulb. These structures may indicate universal veil remnants.

    A free sac should immediately raise strong suspicion for Amanita.

    Step 3: Check the Gills

    White gills, rusty gills, pink gills, and brown gills lead toward very different groups. Mature gill color is often one of the fastest ways to narrow the possibilities.

    Do not rely on young pale gills alone because many species darken as spores mature.

    Step 4: Look for a Ring

    Inspect the stem for a ring or ring zone. Note whether it is thick, membranous, fragile, or absent.

    Ring structure is especially useful when combined with the base.

    Step 5: Check Bruising and Flesh

    Cut the mushroom and observe any color change. Reddening, yellowing, blueing, or no reaction can all provide additional information.

    For example, reddish bruising strongly supports Amanita rubescens among brown Amanitas.

    How to Photograph a Bulbous Stem Base

    Take one photograph before removing the mushroom so the natural depth in the soil is visible. Then carefully expose the entire base and photograph it from the side.

    A close-up should show whether there is a rim, sac, band, or simple swelling. Include the ring and gills in separate photographs so the basal feature can be interpreted in context.

    Can AI Identify a Bulbous Stem Base?

    AI can often recognize a clearly exposed bulb, but it cannot reliably infer structures that remain underground. A cropped photograph of the cap and upper stem removes exactly the information needed for many Amanita comparisons.

    For potentially dangerous mushrooms, the absence of a visible stem base should reduce confidence substantially. A cautious system should ask for or recommend a complete basal photograph rather than guessing.

    Common Identification Mistakes

    One common mistake is calling every swollen base a volva. A volva is veil tissue, while a bulb is simply a shape of the stem.

    Another mistake is assuming a bulb automatically means Amanita. Several unrelated genera can produce very similar stem shapes.

    The most serious mistake is cutting the base off before photographing it. This can remove the decisive difference between two otherwise similar mushrooms.

    Interesting Facts About Bulbous Stem Bases

    Bulb shape is often connected with the developmental anatomy of the fruit body. Some species naturally build a swollen basal structure before the cap fully expands.

    In Amanita, the bulb interacts with remnants of the universal veil, producing a wide variety of shapes. One species may have a loose sack, another a rim, and another only fragmented rings.

    A bulbous base can also be partly hidden by soil, moss, or leaf litter. This means that the visible stem shape above ground can be misleading until the mushroom is fully excavated.

    The feature is a good example of why mushroom identification is three-dimensional. Looking only at the cap from above can completely miss one of the most important characters on the specimen.

    Frequently Asked Questions

    Can a bulbous base be completely underground?

    Yes. In many mushrooms the swelling is partly or entirely buried, so the stem may look normal until the soil is removed.

    Can a mushroom have both a bulb and a volva?

    Yes. This is common in several Amanitas, where the stem itself is swollen and universal veil remnants surround the swelling.

    Can rain damage basal veil remnants?

    Yes. Fragile tissue can weather or tear, especially in older specimens. The overall bulb shape may remain even when the veil becomes less obvious.

    Does a larger bulb mean a more dangerous mushroom?

    No. Bulb size has no direct relationship with toxicity. Toxicity depends on species, not on how swollen the stem appears.

    Can insects change the appearance of the stem base?

    Yes. Larvae and physical damage can distort tissue, especially in older fruit bodies. Fresh young specimens usually show the structure more clearly.

    Can the bulb become elongated with age?

    Yes. As the mushroom matures, a rounded young base can look less dramatic compared with the lengthening stem.

    Can two mushrooms of the same species have different-looking bulbs?

    Yes. Soil pressure, age, moisture, and individual variation can all affect the apparent shape.

    Is a bulbous base useful without knowing the gill color?

    Only to a limited extent. It narrows the possibilities, but gill and spore color are usually necessary for meaningful identification.

    Final Identification Notes

    A bulbous stem base is an important structural feature, but it should never be treated as a species name by itself. The key is to determine what kind of bulb is present and whether veil tissue surrounds it.

    In Amanita, the combination of bulb shape, volva, ring, gills, and bruising can be critical for separating dangerous and non-dangerous species. In other genera, spore color and cap structure often become more important.

    The simplest field rule is: expose the whole base first, then decide whether you are seeing a simple bulb, a true volva, or both.

  • Pfifferling oder Falscher Pfifferling? So erkennst du den Unterschied

    Pfifferling oder Falscher Pfifferling? So erkennst du den Unterschied

    Pfifferling und Falscher Pfifferling können auf den ersten Blick ähnlich aussehen. Beide sind gelb bis orange gefärbt, wachsen im Wald und können einen trichterförmigen Hut entwickeln.

    Der wichtigste Unterschied liegt jedoch auf der Unterseite. Der echte Pfifferling besitzt dicke, stumpfe Leisten, während der Falsche Pfifferling dünne, echte Lamellen hat.

    ⚠️ Wichtig: Eine Bestimmung über Farbe allein ist unsicher. Für eine zuverlässige Unterscheidung sollten Unterseite, Fleisch, Wuchsform und Standort gemeinsam beurteilt werden.

    Schnellvergleich

    Merkmal Pfifferling Falscher Pfifferling
    Wissenschaftliche Gruppe Cantharellus cibarius Gruppe Hygrophoropsis aurantiaca
    Farbe Gelb bis goldgelb Orange bis orangebraun
    Unterseite Dicke Leisten Dünne echte Lamellen
    Leisten/Lamellen Stumpf, fest, gegabelt Fein, weich, stark gegabelt
    Stiel Fest, meist gleichfarbig Häufig schlanker und weicher
    Fleisch Fest, hell Dünner, weicher
    Geruch Oft fruchtig Eher mild
    Wachstum Auf Boden Auf Boden, oft auf holzreichem Substrat
    Essbarkeit Essbar bei sicherer Bestimmung Nicht als gleichwertiger Speisepilz behandeln
    Wichtigster Unterschied Leisten Echte Lamellen

    Der wichtigste Unterschied: Leisten oder Lamellen?

    Beim echten Pfifferling befinden sich auf der Unterseite keine klassischen Lamellen. Stattdessen besitzt er dicke, stumpfe Falten oder Leisten, die fest mit dem Fruchtkörper verbunden sind.

    Beim Falschen Pfifferling sind die Strukturen dagegen dünn, blattartig und deutlich flexibler. Sie wirken viel stärker wie typische Pilzlamellen.

    Wie sehen die Leisten des Pfifferlings aus?

    Die Leisten sind breit, niedrig und stumpf. Sie verlaufen häufig vom Hut weit am Stiel hinunter und verzweigen sich dabei.

    Wenn man mit dem Finger darüberstreicht, fühlen sie sich fest an. Sie lassen sich nicht so leicht voneinander trennen wie echte Lamellen.

    Gegabelte Leisten

    Viele Pfifferlinge zeigen deutlich gegabelte Leisten. Die Verzweigungen können mehrfach auftreten und bilden ein unregelmäßiges Netzwerk.

    Gabelung allein reicht aber nicht zur Bestimmung. Auch die Lamellen des Falschen Pfifferlings können sich stark verzweigen.

    Wie sehen die Lamellen des Falschen Pfifferlings aus?

    Der Falsche Pfifferling besitzt echte Lamellen. Sie sind dünn, weich und dichter angeordnet als die Leisten des Pfifferlings.

    Die Lamellen sind häufig kräftig orange und können mehrfach gegabelt sein. Dadurch wirkt die Unterseite oft sehr fein strukturiert.

    Farbe des Pfifferlings

    Pfifferlinge sind meist gelb bis goldgelb. Manche Exemplare sind eher blass, andere deutlich kräftiger gefärbt.

    Farbe kann sich durch Alter, Trockenheit und Licht verändern. Deshalb sollte ein kräftig orangefarbener oder sehr heller Pilz nicht allein wegen seiner Farbe bestimmt werden.

    Farbe des Falschen Pfifferlings

    Der Falsche Pfifferling ist oft intensiver orange gefärbt. Besonders die Mitte des Hutes kann deutlich dunkler und kräftiger orangebraun erscheinen.

    Die Lamellen sind häufig ebenfalls orange. Diese einheitlich warme Färbung kann im Feld auffallen, ist aber kein sicheres Einzelmerkmal.

    Hutform

    Beide Arten können im Alter einen trichterförmigen Hut entwickeln. Beim Pfifferling wird der Rand häufig unregelmäßig wellig und gelappt.

    Der Falsche Pfifferling wirkt oft regelmäßiger rund und kann eine stärker vertiefte Hutmitte entwickeln. Die Form überschneidet sich jedoch stark.

    Hutoberfläche

    Der Pfifferling besitzt meist eine glatte bis leicht unregelmäßige Oberfläche. Sie wirkt eher trocken und matt als stark faserig.

    Beim Falschen Pfifferling kann die Oberfläche feiner filzig oder samtig wirken. Besonders junge Exemplare zeigen manchmal eine deutlich weichere Struktur.

    Stiel des Pfifferlings

    Der Stiel ist fest und voll. Er hat häufig eine ähnliche Farbe wie der Hut und geht ohne scharfe Grenze in diesen über.

    Die gesamte Fruchtkörperstruktur wirkt kompakt. Ein klar abgesetzter, dünner Stiel ist weniger typisch.

    Stiel des Falschen Pfifferlings

    Der Stiel kann schlanker und weicher wirken. Bei älteren Exemplaren kann er im Verhältnis zum Hut deutlich schmaler erscheinen.

    Die Farbe reicht von gelblich bis orangebraun. Insgesamt ist die Struktur meist weniger fest als beim echten Pfifferling.

    Fleisch

    Das Fleisch des Pfifferlings ist fest und relativ kompakt. Im Inneren ist es oft deutlich heller als die gelbe Außenseite.

    Beim Falschen Pfifferling ist das Fleisch meist dünner und weicher. Besonders im Hut ist der Unterschied bei frischen Exemplaren häufig gut zu erkennen.

    Geruch

    Frische Pfifferlinge haben oft einen angenehm fruchtigen Geruch, der häufig mit Aprikosen verglichen wird. Dieser Geruch kann bei manchen Funden sehr deutlich sein.

    Der Falsche Pfifferling riecht meist schwächer und weniger charakteristisch. Geruch sollte jedoch nie das einzige Bestimmungsmerkmal sein.

    Wo wächst der echte Pfifferling?

    Pfifferlinge sind Mykorrhizapilze und leben in Verbindung mit Baumwurzeln. Sie wachsen deshalb typischerweise auf dem Boden in Laub-, Misch- oder Nadelwäldern.

    Je nach Region können Buche, Eiche, Fichte, Kiefer und andere Bäume wichtige Partner sein. Das Wachstum direkt aus Holz passt nicht zum klassischen Pfifferling.

    Wo wächst der Falsche Pfifferling?

    Der Falsche Pfifferling lebt saprotroph und ist stärker an organisch reiches, holzhaltiges Material gebunden. Er wächst häufig auf saurem Waldboden, zwischen Nadeln, auf stark zersetztem Holz oder über vergrabenen Holzresten.

    Dadurch kann es so aussehen, als würde er direkt aus dem Boden wachsen. Tatsächlich kann sich darunter stark zersetztes Holz befinden.

    Pfifferling und Falscher Pfifferling im gleichen Wald

    Beide können im gleichen Wald vorkommen, besonders in Nadel- und Mischwäldern. Deshalb ist der Standort allein nicht ausreichend.

    Selbst wenn an einem bekannten Pfifferlingsplatz bereits echte Pfifferlinge gefunden wurden, sollte jeder neue Fruchtkörper separat überprüft werden.

    Wann wachsen beide Arten?

    Beide Arten erscheinen vor allem vom Sommer bis in den Herbst. Feuchte Perioden fördern das Wachstum deutlich.

    Dadurch können sie zur gleichen Zeit und in derselben Region auftreten. Saison ist deshalb nur ein unterstützendes Merkmal.

    Ist der Falsche Pfifferling giftig?

    Der Falsche Pfifferling gilt nicht als klassisch stark giftiger Pilz, wird aber nicht als gleichwertiger Speisepilz zum echten Pfifferling empfohlen. In manchen Fällen werden Magen-Darm-Beschwerden beschrieben.

    Für die Praxis sollte die Art deshalb nicht als Ersatz für Pfifferlinge gesammelt werden. Die sichere Unterscheidung bleibt wichtig.

    Ist der echte Pfifferling essbar?

    Der Pfifferling gehört bei sicherer Bestimmung zu den bekanntesten Speisepilzen Europas. Er wird wegen seiner festen Struktur und seines aromatischen Geschmacks geschätzt.

    Vor dem Verzehr sollten jedoch Falscher Pfifferling und andere orangefarbene Verwechslungspartner ausgeschlossen werden. Eine Übersicht weiterer Arten findest du unter Essbare Pilze in Deutschland: 20 häufige Arten erkennen.

    Pfifferling oder Falscher Pfifferling Schritt für Schritt bestimmen

    Die beste Reihenfolge beginnt mit der Unterseite. Farbe und Hutform sollten erst danach berücksichtigt werden.

    So vermeidest du den häufigsten Fehler: einen orangegelben Pilz allein aufgrund seines Aussehens von oben zu bestimmen.

    Schritt 1: Unterseite ansehen

    Prüfe zuerst, ob dicke Leisten oder dünne Lamellen vorhanden sind. Das ist der wichtigste Unterschied.

    Dicke stumpfe Leisten sprechen für den Pfifferling, dünne echte Lamellen für den Falschen Pfifferling.

    Schritt 2: Struktur prüfen

    Fasse den Fruchtkörper vorsichtig an. Ein echter Pfifferling wirkt meist fest und kompakt.

    Der Falsche Pfifferling ist oft weicher und etwas flexibler.

    Schritt 3: Stiel ansehen

    Beim Pfifferling geht der Stiel häufig fließend in den Hut über. Beim Falschen Pfifferling wirkt die Trennung oft deutlicher.

    Dieser Unterschied ist nicht immer eindeutig, kann aber die Bestimmung unterstützen.

    Schritt 4: Habitat prüfen

    Wächst der Pilz klar aus Waldboden in Verbindung mit Bäumen, passt das gut zum Pfifferling. Stark holzhaltiges Substrat spricht eher für den Falschen Pfifferling.

    Vergrabenes Holz kann allerdings leicht übersehen werden.

    Schritt 5: Geruch vergleichen

    Ein fruchtig-aprikosenartiger Geruch unterstützt die Bestimmung als Pfifferling. Ein schwacher oder wenig charakteristischer Geruch ist beim Falschen Pfifferling häufiger.

    Geruch bleibt ein Zusatzmerkmal und sollte nie die Unterseite ersetzen.

    Andere orangefarbene Verwechslungspartner

    Neben dem Falschen Pfifferling gibt es weitere orangefarbene Pilze, die oberflächlich ähnlich wirken können. Besonders gefährlich ist es, alle orangefarbenen trichterförmigen Pilze automatisch als Pfifferlinge einzuordnen.

    Einige Arten unterscheiden sich klar in Wachstum, Größe und Lamellenstruktur.

    Omphalotus-Arten

    Omphalotus-Arten können kräftig orange sein und besitzen echte Lamellen. Sie wachsen häufig in dichten Büscheln direkt an Holz, Wurzeln oder Baumstümpfen.

    Diese Arten sind giftig. Wachstum in großen Büscheln und echte Lamellen sprechen deutlich gegen einen Pfifferling.

    Kleine orange Trichterpilze

    Verschiedene kleinere orangefarbene Pilze können aus der Entfernung ebenfalls ähnlich wirken. Viele besitzen jedoch dünne Lamellen statt Leisten.

    Bei kleinen Exemplaren ist die Unterseite besonders wichtig. Ein Foto nur von oben reicht für eine sichere Bestimmung kaum aus.

    Wie fotografiert man Pfifferling und Falschen Pfifferling?

    Fotografiere zuerst den kompletten Pilz am Fundort. Danach sollte unbedingt ein scharfes Bild der Unterseite folgen.

    Ein Foto von der Seite ist ebenfalls hilfreich, weil es zeigt, wie weit Leisten oder Lamellen am Stiel hinablaufen. Die Umgebung sollte mit aufgenommen werden, damit Substrat und Waldtyp erkennbar bleiben.

    Kann KI Pfifferling und Falschen Pfifferling unterscheiden?

    Bei guten Fotos der Unterseite funktioniert die Unterscheidung oft deutlich besser als bei reinen Hutbildern. Die Struktur von Leisten und echten Lamellen ist ein starkes visuelles Merkmal.

    Schwierig wird es bei unscharfen Bildern oder sehr jungen Pilzen. Eine verantwortungsvolle Bilderkennung sollte in solchen Fällen beide Arten als Möglichkeit nennen, statt eine sichere Bestimmung zu erzwingen.

    Wenn du die grundlegenden Merkmale systematisch prüfen möchtest, findest du weitere Hinweise unter Pilze bestimmen: So erkennst du Pilzarten richtig.

    Häufige Fehler bei der Bestimmung

    Der häufigste Fehler ist, einen gelben oder orangefarbenen Pilz automatisch als Pfifferling anzusehen. Farbe ist deutlich weniger zuverlässig als die Struktur der Unterseite.

    Ein weiterer Fehler besteht darin, nur nach Gabelungen zu suchen. Sowohl Leisten als auch echte Lamellen können verzweigt sein.

    Auch der Standort kann falsch interpretiert werden. Ein scheinbar auf Erde wachsender Falscher Pfifferling kann tatsächlich auf stark verrottetem und kaum sichtbarem Holz stehen.

    Interessante Fakten über Pfifferling und Falschen Pfifferling

    Echter und Falscher Pfifferling sehen ähnlich aus, gehören aber zu biologisch unterschiedlichen Gruppen. Der Pfifferling lebt mykorrhizal mit Bäumen, während der Falsche Pfifferling organisches Material abbaut.

    Auch die Unterseite zeigt einen grundlegenden Unterschied im Aufbau. Die Leisten des Pfifferlings sind Falten des Fruchtkörpers, während der Falsche Pfifferling echte Lamellen besitzt.

    Der Name „Falscher Pfifferling“ beschreibt deshalb nur die äußere Ähnlichkeit. Er bedeutet nicht, dass beide Arten besonders eng miteinander verwandt sind.

    Die Gegenüberstellung zeigt außerdem, warum Struktur in der Pilzbestimmung wichtiger sein kann als Farbe. Zwei Pilze können fast dieselbe Farbe besitzen und dennoch völlig unterschiedlich aufgebaut sein.

    Häufig gestellte Fragen

    Kann ein echter Pfifferling sehr orange sein?

    Ja. Manche Exemplare sind deutlich kräftiger gefärbt als andere. Farbe allein reicht deshalb nicht zur Unterscheidung.

    Kann der Falsche Pfifferling gelb statt orange sein?

    Ja. Die Farbintensität variiert mit Alter, Feuchtigkeit und Licht. Auch blassere Fruchtkörper kommen vor.

    Warum sehen junge Exemplare besonders ähnlich aus?

    Junge Hüte sind bei beiden Arten oft kompakter und noch nicht stark trichterförmig. Auch die Unterseite kann weniger deutlich entwickelt sein.

    Können beide direkt nebeneinander wachsen?

    Ja. Besonders in Nadelwäldern können ihre Habitate räumlich überlappen. Jeder Pilz sollte einzeln überprüft werden.

    Sind die Lamellen des Falschen Pfifferlings immer sehr dünn?

    Typischerweise sind sie deutlich dünner als Pfifferlingsleisten. Bei alten oder beschädigten Exemplaren kann der Unterschied jedoch weniger offensichtlich wirken.

    Warum wirken manche Pfifferlingsleisten fast wie Lamellen?

    Bei stark ausgeprägten Leisten können die Falten relativ schmal erscheinen. Sie bleiben aber stumpfer, dicker und stärker mit dem Fruchtkörper verwachsen als echte Lamellen.

    Kann Regen die Unterschiede schwerer erkennbar machen?

    Ja. Nasse Oberflächen verändern Farbe und Struktur, und beschädigte Fruchtkörper können weniger typisch aussehen.

    Ist ein aprikosenartiger Geruch immer vorhanden?

    Nein. Manche Pfifferlinge riechen deutlich fruchtig, andere nur schwach. Geruch ist deshalb kein notwendiges Einzelmerkmal.

    Fazit: Pfifferling oder Falscher Pfifferling?

    Der wichtigste Unterschied befindet sich unter dem Hut. Der echte Pfifferling besitzt dicke, stumpfe Leisten, während der Falsche Pfifferling dünne echte Lamellen hat.

    Farbe, Geruch, Festigkeit und Habitat können die Bestimmung zusätzlich unterstützen. Besonders hilfreich ist die Kombination aus Leisten + festem Fleisch + bodengebundenem Mykorrhiza-Wachstum beim echten Pfifferling.

    Die einfachste Merkhilfe lautet daher: Pfifferling = dicke Leisten; Falscher Pfifferling = dünne Lamellen.

  • Dryad’s Saddle vs Giant Polypore: How to Tell Them Apart

    Dryad’s Saddle vs Giant Polypore: How to Tell Them Apart

    Dryad’s Saddle (Cerioporus squamosus) and Giant Polypore (Meripilus giganteus) are both large bracket fungi that grow on hardwoods and can form impressive clusters around trunks, stumps, and roots. From a distance, both may look like broad brown shelves with pale undersides, especially when the fruit bodies are young.

    The easiest way to separate them is to compare cap pattern, growth form, and bruising behavior. Dryad’s Saddle usually has bold dark scales arranged across a tan cap, while Giant Polypore forms larger overlapping rosettes and typically darkens strongly when bruised or cut.

    ⚠️ Important: Large bracket fungi should not be identified for eating from a single photograph. Age, host tree, texture, bruising, and the pore surface all matter, and older fruit bodies can look very different from young ones.

    Quick Comparison

    Feature Dryad’s Saddle Giant Polypore
    Scientific name Cerioporus squamosus Meripilus giganteus
    Common name Dryad’s Saddle / Pheasant Back Giant Polypore
    Growth form Individual shelves, often overlapping Massive rosettes of many broad fronds
    Cap color Cream to tan with dark scales Pale brown to ochre, usually less boldly patterned
    Cap pattern Strong dark radial scales Broad zoning, streaks, or mottling
    Underside White to cream pores White to cream pores
    Bruising Usually weak or limited darkening Often darkens brown to black
    Texture Fleshy when young, tougher with age Soft-fleshy when young, then tougher
    Typical host Hardwood, especially elm, maple, beech, poplar Hardwood, especially beech, oak and other broadleaf trees
    Growth position Trunks, stumps, logs Base of trees, stumps, buried roots
    Main clue Scaly cap pattern Strong blackening after damage

    The Fastest Way to Tell Them Apart

    Look at the upper surface first. Dryad’s Saddle usually has a very obvious pattern of dark brown scales or patches across a pale background, often arranged in broad radial zones.

    Then test a fresh area for bruising. Giant Polypore often becomes noticeably dark brown to black where the flesh or pores are pressed or damaged, while Dryad’s Saddle usually does not show the same strong blackening reaction.

    Dryad’s Saddle — Cerioporus squamosus

    Dryad’s Saddle is a large annual polypore that grows on hardwoods, both living and dead. It often appears in spring and early summer, although fruiting can continue later depending on climate and weather.

    The brackets are broad, fan-shaped to kidney-shaped, and usually attach laterally to wood. Several can overlap, but individual caps are often clearly distinguishable.

    Cap

    The cap is pale cream, beige, tan, or yellowish brown and covered with darker brown scales. These scales are usually arranged in a striking pattern that can resemble the feathering on a pheasant’s back.

    Young caps may be thick and fleshy, while older ones become flatter and tougher. The margin is usually paler and smoother than the center.

    Cap Pattern

    The dark scales are one of the strongest field marks. They are usually well defined and contrast clearly with the lighter cap surface.

    This patterned surface gives rise to the common name Pheasant Back. Giant Polypore can show zoning or mottling, but usually lacks the same bold, regular scaly pattern.

    Underside

    The underside has a pale pore surface, usually white to cream. The pores are relatively large and can become elongated or angular, especially toward the stem or attachment point.

    This is different from many finer-pored polypores. A close-up of the underside can be useful when the cap pattern is weathered or damaged.

    Stem and Attachment

    Dryad’s Saddle often has a short lateral or off-center stem-like attachment. In some specimens this is obvious, while others appear nearly sessile.

    The attachment is usually darkened or blackish at the base. Giant Polypore tends to form many fronds arising from a common basal mass rather than separate saddle-like caps with obvious lateral attachment.

    Flesh

    The flesh is white to cream and can be quite thick in young specimens. Young caps may feel succulent or firm-fleshy, but they become tough and fibrous with age.

    This age-related change is important because mature Dryad’s Saddle can become much harder and less distinctive in texture.

    Smell

    Fresh Dryad’s Saddle often has a distinctive smell that is frequently described as cucumber-like, watermelon-rind-like, or floury. This can be a useful supporting feature when the mushroom is fresh.

    Smell is subjective, so it should not be used as the main distinction. Cap scales and overall growth form are much more reliable.

    Giant Polypore — Meripilus giganteus

    Giant Polypore is a very large annual polypore that can produce enormous rosettes at the base of living or dead broadleaf trees. A single fruiting body can consist of many broad overlapping fronds and reach impressive overall dimensions.

    It is especially associated with the lower trunk, root flare, stumps, or buried roots. From a distance, a mature cluster can look like a huge layered fan spreading outward from the tree base.

    Cap

    Individual fronds are broad and fan-shaped, usually pale brown, ochre, tan, or gray-brown. They may show concentric zoning or uneven streaks, but the pattern is generally less sharply scaly than in Dryad’s Saddle.

    Young margins are often paler. With age, the upper surface can darken and become less visually uniform.

    Growth Form

    The rosette structure is one of the best clues. Many broad fronds arise from a common base and overlap densely.

    Dryad’s Saddle can also occur in groups, but the brackets are usually more individually defined and often arranged along trunks or logs rather than forming one massive basal rosette.

    Underside

    The pore surface is white to cream when fresh. The pores are small to moderately sized and can become darker with age or damage.

    The underside is especially useful because Giant Polypore often shows a strong bruising reaction.

    Blackening Reaction

    Fresh tissue typically darkens where it is pressed, cut, or bruised. The reaction may begin brown and then progress toward very dark brown or black.

    This is one of the strongest differences from Dryad’s Saddle. If a large pale polypore at the base of a hardwood turns strongly black after damage, Giant Polypore becomes much more likely.

    Flesh

    Young flesh is soft to firm and pale. It becomes tougher as the fruit body ages, especially in the thicker central parts of the rosette.

    Damage can trigger the characteristic darkening reaction. This can be seen both on the pore surface and in cut flesh.

    Where Does Dryad’s Saddle Grow?

    Dryad’s Saddle grows on hardwood trunks, stumps, logs, and wounded living trees. It can occur well above ground level as well as near the base.

    Elm is a classic host, but the species can also occur on maple, beech, poplar, willow, and other broadleaf trees.

    Where Does Giant Polypore Grow?

    Giant Polypore is strongly associated with the base of broadleaf trees and their roots. It commonly fruits from soil around the trunk where buried roots or decayed woody tissue are present.

    Beech is a particularly well-known host in Europe, but oak and other broadleaf trees can also support it. Its position near the root zone is often an important clue.

    Dryad’s Saddle vs Giant Polypore: Cap Pattern

    The upper surface is usually the quickest visual difference. Dryad’s Saddle has distinct dark scales on a pale background, creating a patterned appearance.

    Giant Polypore tends to be more broadly zoned or mottled. The surface may still have darker markings, but they usually do not form the same clear pheasant-back pattern.

    Dryad’s Saddle vs Giant Polypore: Growth Form

    Dryad’s Saddle often produces separate fan-shaped brackets, even when several overlap. These may emerge from the side of a trunk, stump, or log.

    Giant Polypore more often forms a huge basal rosette. Many broad fronds spread outward from a shared central base near roots or the lower trunk.

    Dryad’s Saddle vs Giant Polypore: Bruising

    Bruising is one of the most practical tests when the specimen is fresh. Giant Polypore typically darkens strongly after pressure or cutting.

    Dryad’s Saddle may discolor somewhat with age or damage, but it usually does not produce the same rapid, pronounced blackening.

    Dryad’s Saddle vs Giant Polypore: Pores

    Both have pores rather than gills. The pore surface is pale when young, so the underside can initially look similar.

    In Dryad’s Saddle, the pores are often relatively large and can become angular or elongated. In Giant Polypore, the stronger bruising response of the pore layer is usually more useful than pore shape alone.

    Dryad’s Saddle vs Giant Polypore: Habitat

    Both are hardwood-associated decomposers, so host tree alone rarely solves the identification. The position on the tree is often more informative.

    A scaly bracket growing from the side of a trunk fits Dryad’s Saddle well. A huge darkening rosette growing around the base of a beech or oak fits Giant Polypore much better.

    Is Dryad’s Saddle Edible?

    Young Dryad’s Saddle is considered edible when correctly identified and still tender. Older specimens become tough and fibrous and are generally unsuitable for ordinary culinary use.

    Edibility should only be considered after confident identification. Large polypores can change appearance significantly with age, and several different species may grow on the same tree.

    Is Giant Polypore Edible?

    Young Giant Polypore is sometimes described as edible in some sources, but it becomes tough quickly and is not generally treated as a beginner food mushroom. Identification confidence is especially important because large basal polypores can be difficult to separate when weathered.

    For MushroomID purposes, it is safer to treat Giant Polypore primarily as an identification species rather than a culinary target.

    Other Look-Alikes

    Several other large hardwood polypores can resemble one or both species. The most useful comparisons involve growth form, cap texture, pore reaction, and host position.

    A large bracket with no obvious scales and no strong blackening reaction should not automatically be forced into either of these two species.

    Berkeley’s Polypore — Bondarzewia berkeleyi

    Identification

    Berkeley’s Polypore forms large pale rosettes at the base of hardwood trees. The caps are often thick, cream to tan, and relatively smooth.

    Its overall growth form can resemble Giant Polypore, especially when the fruiting body is young.

    Main Difference

    Berkeley’s Polypore generally lacks the dramatic blackening reaction of Giant Polypore. Its fronds are often thicker and paler as well.

    Black-Staining Polypore — Meripilus sumstinei

    Identification

    In North America, Meripilus sumstinei is an important black-staining polypore associated with hardwood roots and stumps. It forms large overlapping rosettes and darkens strongly when bruised.

    This species occupies the same general identification role that Meripilus giganteus does in Europe.

    Main Difference

    Geography matters. A black-staining basal polypore in North America should not automatically be called Meripilus giganteus.

    Dryad’s Saddle vs Berkeley’s Polypore

    Dryad’s Saddle is usually more strongly patterned, with obvious dark scales across a pale cap. Berkeley’s Polypore is generally smoother, thicker, and more rosette-like.

    The location also helps. Dryad’s Saddle commonly grows from trunks and logs, while Berkeley’s Polypore is more often found as a large basal rosette.

    How to Identify Dryad’s Saddle Step by Step

    Start with the cap surface. Look for the characteristic pale background with large dark scales arranged across the cap.

    Then examine the underside, attachment, smell, and growth position before deciding on the species.

    Step 1: Check the Cap Pattern

    Distinct dark scales on a pale tan background strongly support Dryad’s Saddle. A mostly smooth or broadly zoned surface points elsewhere.

    Weathered specimens may lose some contrast, so young caps are the easiest to assess.

    Step 2: Examine the Pores

    Look for pale, relatively large pores. They may appear angular or stretched near the point of attachment.

    Very fine pores combined with a massive basal rosette suggest another polypore.

    Step 3: Check the Growth Position

    Growth from the side of a trunk, stump, or log is common. Several separate brackets may overlap but remain individually recognizable.

    A huge basal rosette around roots should make you consider Giant Polypore or another rosette-forming species.

    How to Identify Giant Polypore Step by Step

    Begin with the overall architecture. A very large cluster of overlapping fronds around the base of a hardwood is a strong first clue.

    Then test fresh tissue for the blackening reaction.

    Step 1: Look for a Basal Rosette

    Many broad fronds should arise from a common base. The fruiting body can become much larger than a typical cluster of Dryad’s Saddle.

    This massive layered structure is one of the most characteristic features.

    Step 2: Test for Darkening

    Press or cut a fresh pore surface and wait. Strong brown-to-black staining strongly supports Meripilus.

    The reaction may become clearer after a short delay rather than appearing instantly.

    Step 3: Check the Host Position

    Look for growth from the root flare, stump base, or buried roots. Fruiting some distance from the trunk can still occur if roots extend through the soil.

    This root-zone association is much more typical of Giant Polypore than of many ordinary shelf fungi.

    How to Photograph These Polypores for Identification

    Take one wide photo showing the entire fruiting body and its relationship to the tree. This is especially important for distinguishing separate shelves from a basal rosette.

    Then photograph the upper surface, underside, and any bruised area. For Giant Polypore, a before-and-after bruise photo can be particularly useful.

    A close-up of the cap scales is valuable for Dryad’s Saddle. For either species, include the host tree and the exact growth position whenever possible.

    Can AI Tell Dryad’s Saddle From Giant Polypore?

    AI can often distinguish typical mature specimens because the overall architecture is quite different. Dryad’s Saddle has a stronger scaly cap pattern, while Giant Polypore often forms a massive basal rosette.

    The difficult cases are young or damaged fruit bodies. Including bruising behavior, underside photos, and growth position significantly improves the identification.

    A top-only image of one isolated frond can be misleading. The full cluster and substrate context are much more informative.

    Common Identification Mistakes

    One common mistake is identifying every large tan polypore with broad caps as Dryad’s Saddle. The bold scaly pattern should be present before that identification is considered strong.

    Another mistake is overlooking bruising. A Giant Polypore that blackens strongly after handling may initially look much paler before it is touched.

    A third mistake is ignoring the overall growth form. One close-up photograph can hide whether the fungus is a single shelf or part of an enormous rosette.

    Interesting Facts About Dryad’s Saddle and Giant Polypore

    Dryad’s Saddle gets its English name from the idea that the broad cap could serve as a saddle for a woodland dryad. The alternative name Pheasant Back refers to the dark patterned scales that resemble feathers.

    Giant Polypore can produce some of the largest annual fungal fruiting structures found on hardwoods. A single rosette may contain dozens of overlapping fronds and spread widely around the base of a tree.

    Both species are wood decomposers, but their position can reveal something about where decay is occurring. Giant Polypore fruiting around the root zone can indicate extensive fungal activity in roots and lower wood.

    The strong blackening reaction in Meripilus is also chemically useful for identification. It provides a dynamic character that is often much more reliable than subtle differences in brown cap color.

    Frequently Asked Questions

    Can Dryad’s Saddle grow at the base of a tree?

    Yes. It is not restricted to high trunks and can fruit from stumps or lower wood. The scaly cap pattern remains more important than height above ground.

    Can Giant Polypore grow away from the visible trunk?

    Yes. Fruiting can emerge from buried roots some distance from the tree. The apparent soil growth may still be connected to woody roots underneath.

    Why does Giant Polypore sometimes look almost white when young?

    Young fronds can be very pale before the upper surface darkens. The blackening reaction and rosette structure become more informative in these pale specimens.

    Can Dryad’s Saddle lose its scales with age?

    The pattern can become less distinct as the cap weathers, cracks, or becomes dirty. Young or middle-aged fruit bodies usually show the markings best.

    Do both species return to the same tree each year?

    They can fruit repeatedly from the same colonized wood when conditions are suitable. The visible fruiting bodies are annual, but the fungal mycelium persists in the substrate.

    Can insects damage the pore surface enough to confuse identification?

    Yes. Older brackets can be heavily damaged, especially around the underside. Fresh outer margins are usually the best areas to inspect.

    Does black staining always mean Giant Polypore?

    No. Other polypores can darken after damage, and in North America Meripilus sumstinei is especially important. Geography and the full set of features still matter.

    Can both species occur on the same tree?

    It is possible for more than one wood-decay fungus to fruit on the same tree. Each cluster should therefore be examined independently rather than assuming all brackets belong to one species.

    Final Identification Notes

    Dryad’s Saddle and Giant Polypore are both large hardwood-associated polypores, but they differ strongly in cap pattern, growth form, and bruising behavior.

    Dryad’s Saddle usually has bold dark scales on a pale cap, relatively distinct shelf-like brackets, and no dramatic blackening reaction. Giant Polypore forms large basal rosettes of overlapping fronds and typically darkens strongly brown to black when bruised or cut.

  • Milkcap Mushroom Identification: How to Use Latex, Color and Habitat

    Milkcap Mushroom Identification: How to Use Latex, Color and Habitat

    Milkcaps are among the most distinctive gilled mushrooms once you know what to look for. Their defining feature is the latex, or “milk,” that appears when the gills or flesh are damaged, although the amount, color, and behavior of that latex vary greatly between species.

    For identification, latex should never be used alone. The most reliable approach combines latex color, color changes after exposure, cap pattern, gill color, smell, taste characteristics, nearby trees, and habitat.

    ⚠️ Important: Some milkcaps are edible when correctly identified and properly prepared, while others are acrid, irritating, or unsuitable for food. Never decide edibility from latex color, cap color, photographs, or AI identification alone.

    Quick Identification

    Feature What to Check
    Main groups Lactarius and Lactifluus
    Key feature Latex released from damaged tissue
    Latex colors White, orange, red, yellowing, watery, or scarce
    Gills Usually attached to decurrent
    Cap Often depressed with age
    Surface Dry, velvety, sticky, or zoned depending on species
    Stem Usually central and without a ring
    Spore print Usually white to cream or pale ochre
    Ecology Mostly mycorrhizal
    Important hosts Pine, spruce, birch, beech, oak and others
    Best clues Latex + host tree + gills + cap pattern
    Edibility Varies strongly by species

    What Is a Milkcap Mushroom?

    Milkcaps are mushrooms that release a liquid from damaged gills or flesh. This latex can be obvious and abundant, or it can be so sparse that only a small drop appears after the gills are cut.

    Many milkcaps were traditionally placed in the genus Lactarius, while modern taxonomy separates some related species into Lactifluus. For field identification, both groups share the familiar idea of “milk-producing” mushrooms.

    Why Latex Is So Important

    Latex provides several useful identification characters at once. You can observe its initial color, whether it changes after exposure to air, whether it stains the gills, and how quickly that reaction happens.

    A white latex that remains white is very different from orange latex that turns greenish, or white latex that gradually becomes yellow. These differences can help narrow a specimen to a much smaller group.

    How to Test the Latex

    The easiest method is to gently cut or scratch a few fresh gills. If the mushroom is producing latex actively, small droplets should appear along the damaged edges.

    Very dry, old, or weathered mushrooms may release almost none. In that case, cutting into fresh flesh closer to the cap center may produce a better reaction.

    White Latex

    White is one of the most common starting colors. It occurs in many unrelated milkcap species, so the initial white color alone is not enough.

    The important question is what happens next. The latex may remain white, become yellow, stain brownish, or interact with the gills in a characteristic way.

    Orange or Red Latex

    Orange, carrot-colored, or reddish latex is especially important in the Lactarius deliciosus group and related orange milkcaps. These species often develop green stains where the tissue is damaged or aged.

    Host tree becomes essential here because superficially similar orange milkcaps can associate with different conifers. A mushroom under pine should not automatically be given the same name as a similar specimen under spruce.

    Yellowing Latex

    Some milkcaps release white latex that slowly changes to yellow. The speed and intensity of this change can be useful in distinguishing closely related species.

    Always observe the latex for a little while rather than recording only its first appearance. A reaction that develops after several seconds or minutes can be more informative than the initial color.

    Watery or Scarce Latex

    Not every milkcap produces thick white milk. Some species release watery, nearly transparent, or very limited latex.

    Dry weather can also reduce latex production. A suspected milkcap with no visible milk should therefore be checked using fresh tissue before the group is ruled out.

    Cap Shape

    Many milkcaps begin with convex caps and later develop a depressed or funnel-shaped center. The margin may stay rolled inward for some time, especially in young fruit bodies.

    Cap shape is useful, but it is rarely unique. Russulas and several unrelated mushrooms can develop a similar depressed form.

    Cap Color

    Milkcaps occur in a wide range of colors, including orange, brown, cream, white, pinkish, gray-green, yellow, and reddish tones. Some have strongly zoned caps, while others are almost uniformly colored.

    Color should be recorded carefully but interpreted cautiously. Weather, age, moisture, and sun exposure can change it dramatically.

    Concentric Zones

    Some milkcaps show obvious rings of darker and lighter color across the cap. These concentric zones are especially familiar in several orange and brown species.

    Zoning can be highly useful when combined with latex behavior and host tree. It should not be treated as a universal milkcap feature because many species lack it.

    Cap Surface

    The cap may be dry, smooth, velvety, hairy, sticky, or strongly slimy depending on species. Texture is therefore an important part of identification.

    Some species have particularly hairy margins when young. Others develop a glossy or viscid surface after rain, which can change their appearance substantially.

    Gills

    Milkcap gills are often relatively close and usually attach to the stem or run slightly downward along it. Their color may be white, cream, yellowish, orange, pinkish, or brownish depending on the species.

    Damage to the gills is especially informative because it reveals latex and may also trigger staining. Orange milkcaps, for example, can develop green discoloration around injured areas.

    Stem

    The stem is usually central and lacks a ring or volva. It may be smooth, pitted, spotted, hollow with age, or similar in color to the cap.

    Some orange milkcaps develop shallow depressions or darker spots on the stem. These can help distinguish them from other orange woodland mushrooms.

    Flesh

    Milkcap flesh is usually relatively brittle compared with strongly fibrous mushrooms. This reflects their close relationship to the Russulaceae, which also includes the brittlegills or Russula species.

    When cut, the flesh may release additional latex and sometimes changes color. The internal reaction can be more obvious than what happens on the gills alone.

    Smell

    Some milkcaps have distinctive odors, while others smell only mildly mushroom-like. Depending on species, descriptions may include coconut, fishy, fruity, spicy, or unpleasant notes.

    Smell should always be treated as supporting evidence. Perception differs between people, and weathered specimens may lose much of their characteristic odor.

    Spore Print

    Milkcap spore prints are generally pale, ranging from white through cream to pale yellowish or ochre shades. The exact tone can sometimes help separate similar species.

    For many field identifications, the spore print is less immediately useful than latex behavior and habitat. It becomes more valuable when several similar species remain possible.

    Habitat Is One of the Best Identification Tools

    Most milkcaps are mycorrhizal and form close relationships with living trees. This means that the surrounding tree species can be as important as the mushroom’s color.

    A milkcap under pine may belong to a very different species from a nearly identical mushroom under birch. Recording nearby trees should therefore be standard practice.

    Milkcaps Under Pine

    Pine-associated milkcaps include several orange species in the Lactarius deliciosus group. These mushrooms often have orange latex, zoned caps, and green staining after damage.

    The exact species depends on region and host. European names should not automatically be transferred to similar North American orange milkcaps.

    Milkcaps Under Spruce

    Spruce supports its own characteristic milkcap communities. Some orange species associated with spruce can look extremely similar to pine-associated relatives.

    Tree identification is especially useful in these cases because cap and latex colors may overlap strongly.

    Milkcaps Under Birch

    Birch is associated with several distinctive milkcaps, including pinkish, pale, and white species. Some have woolly or hairy cap margins, especially when young.

    Species such as Lactarius torminosus are strongly linked with birch. Finding the correct host tree can immediately make certain identifications much more plausible.

    Milkcaps Under Beech and Oak

    Broadleaf forests with beech and oak support many brown, cream, and reddish milkcaps. Some are difficult to identify without a combination of smell, latex reaction, cap texture, and host.

    This is one of the groups where broad ecological context becomes particularly important. A generic “brown milkcap” label may be safer than forcing a species name from one photograph.

    Lactarius deliciosus Group — Saffron Milk Caps

    Identification

    Orange milkcaps in the Lactarius deliciosus group are among the best-known members of the family. They typically have orange to carrot-colored caps, orange latex, and green staining after damage or age.

    Many also show concentric zones on the cap. Their association with conifers, especially pine or related hosts depending on species, is a key identification feature.

    Main Identification Clue

    Orange latex is a powerful clue, but it does not identify the species by itself. Host tree, geography, stem markings, cap zoning, and the pattern of green staining should all be considered together.

    Lactarius torminosus — Woolly Milkcap

    Identification

    Lactarius torminosus usually has a pinkish to salmon cap with clear concentric zones and a distinctly woolly or hairy margin when young. It is strongly associated with birch.

    The latex is white and does not provide the orange reaction seen in saffron milkcaps. The combination of birch habitat and hairy margin is particularly useful.

    Main Identification Clue

    The woolly cap edge and birch association distinguish it from many smoother milkcaps. Young specimens usually show the hairy margin most clearly.

    Lactarius pubescens — Bearded Milkcap

    Identification

    This species is also associated with birch and can have a pale cream to pinkish cap with a hairy margin. It is generally paler than Lactarius torminosus.

    Because the two share habitat and some structural characters, color intensity and cap zoning can help. Exact identification may still require careful comparison.

    Lactarius quietus — Oak Milkcap

    Identification

    Oak Milkcap is typically brownish and associated with oak. It may show subtle zoning and has pale latex.

    Its odor can be useful once familiar, though habitat is often the strongest initial clue. A brown milkcap under oak should bring this species group into consideration.

    Lactarius deterrimus and Related Orange Milkcaps

    Identification

    Several orange milkcaps resemble Lactarius deliciosus but differ in host association and staining behavior. Some are linked especially with spruce and may develop more extensive green coloration.

    These species demonstrate why “orange milkcap” should not automatically be converted into one exact name. Ecology and regional taxonomy matter as much as color.

    Lactifluus vellereus — Fleecy Milkcap

    Identification

    Lactifluus vellereus is a large pale milkcap with a white to cream cap, widely spaced gills, and a substantial fruit body. The surface can look finely felted or velvety.

    Its size and pale appearance make it very different from the small colorful milkcaps many people first notice. White latex alone is still not enough for exact identification.

    Milkcap vs Russula

    Milkcaps and Russula species are close relatives and can share brittle flesh, similar cap shapes, and pale spores. The major field distinction is the presence of latex.

    A Russula does not produce true milk when the gills are cut. If a brittle mushroom releases obvious latex, a milkcap becomes much more likely.

    Milkcap vs Funnel-Shaped Mushrooms

    Many unrelated gilled mushrooms can develop depressed or funnel-shaped caps. Some may even have pale gills running down the stem.

    The presence of latex immediately changes the identification pathway. Without latex, genera such as Clitocybe and other funnel-shaped mushrooms should be considered instead.

    Milkcap vs Orange Chanterelle-Like Mushrooms

    Orange milkcaps can sometimes be confused at a glance with chanterelles or False Chanterelles. The underside solves much of the problem.

    Milkcaps have true gills and produce latex when damaged. Chanterelles have blunt false gills or ridges, while False Chanterelles have true forked gills but do not produce milk.

    How to Identify a Milkcap Step by Step

    The best approach is to start with fresh tissue and habitat rather than cap color alone. Once latex is confirmed, its behavior can be combined with host tree and structural features.

    This method works better than trying to memorize every milkcap by appearance.

    Step 1: Confirm Latex

    Scratch or cut fresh gills and watch for liquid. Record both the initial color and any change after exposure.

    If no latex appears, try fresher tissue before ruling out the group.

    Step 2: Check the Gill Color

    Observe whether the gills are white, cream, orange, yellowish, or darker. Then note whether damage causes staining.

    Gill color combined with latex behavior often separates major milkcap groups.

    Step 3: Examine the Cap

    Record color, zoning, hairiness, stickiness, and whether the center is depressed. The margin can be especially informative in young specimens.

    Do not rely on color alone because several species fade dramatically.

    Step 4: Identify Nearby Trees

    Check pine, spruce, birch, beech, oak, or other possible hosts. This can eliminate many otherwise plausible species.

    If more than one tree species is present, avoid assuming the nearest trunk is automatically the partner.

    Step 5: Look for Staining

    Observe the gills, stem, and flesh for several minutes after damage. Green, yellow, brown, or other stains may develop gradually.

    Timing matters because some reactions are not immediate.

    How to Photograph Milkcaps for Identification

    Photograph the complete mushroom in habitat before handling it. Include nearby trees or at least enough surroundings to document whether the mushroom is in coniferous or broadleaf woodland.

    Then take a close-up of the gills immediately after cutting them. A second image a few minutes later can capture changes in latex or staining that a single photograph would miss.

    A stem photograph and a view of the cap surface are also useful. For orange milkcaps, make sure green bruising and any stem pits are clearly visible.

    Can AI Identify Milkcaps?

    AI can often recognize a mushroom as a milkcap when latex, gill structure, and habitat are shown clearly. Exact species identification is much harder because many milkcaps differ in ecological or chemical characters that may not be visible in one image.

    A photograph of the cap alone is particularly weak evidence. Including fresh latex, host tree, staining reaction, and underside can improve the result substantially.

    For difficult species, a result such as “orange milkcap group” or “birch-associated milkcap” can be more accurate than forcing a precise species.

    Common Identification Mistakes

    A common mistake is assuming all orange milkcaps are Lactarius deliciosus. Several similar species occur with different conifers and in different regions.

    Another mistake is recording only the initial latex color. White latex that later turns yellow can carry much more information than simply writing “latex white.”

    Habitat is also frequently ignored. A photograph without nearby trees removes one of the strongest clues available for milkcap identification.

    Interesting Facts About Milkcaps

    The “milk” of milkcaps is not sap in the botanical sense. It is latex produced by specialized fungal cells and contains a mixture of compounds that can change after exposure to air.

    Some of the dramatic color changes are chemical reactions triggered by tissue damage. Orange latex turning green in certain saffron milkcaps is therefore not just discoloration from age but part of the mushroom’s chemistry.

    Milkcaps also demonstrate how closely fungal identification can depend on trees. Two mushrooms that appear nearly identical may represent different species because one associates with pine and another with spruce or birch.

    Modern DNA studies have significantly changed the classification of milkcaps. Species once grouped together in Lactarius are now divided between Lactarius, Lactifluus, and related lineages, showing that outward similarity does not always reflect close evolutionary relationships.

    Frequently Asked Questions

    Can a milkcap stop producing latex when it gets old?

    Yes. Old, dry, or weathered fruit bodies can produce very little liquid even when the species normally has abundant latex. Fresh gills or inner flesh are usually better places to test.

    Why does latex sometimes look different on a photograph than in the field?

    Lighting and camera processing can shift white, yellow, orange, and red tones. It is useful to record the color in words at the time of observation rather than relying only on the photograph.

    Can two milkcap species grow under the same tree?

    Yes. A single woodland can support several milkcaps associated with the same tree genus, so habitat narrows the possibilities but does not usually prove the species.

    Does freezing weather affect latex?

    Yes. Frost can damage tissue and alter how much latex is released or how the mushroom stains. Recently frozen specimens are often harder to interpret.

    Can latex appear only after cutting deeply into the cap?

    Yes. Some species produce little visible milk from superficial scratches, especially in dry conditions. Cutting fresher tissue can reveal a reaction that was initially missed.

    Why are some milkcaps hollow inside the stem?

    The stems of some species become hollow or chambered as they mature. This is a normal age-related feature in certain milkcaps and can sometimes support identification.

    Can insects change the color of the latex or flesh?

    Damage from larvae can expose tissue long before the mushroom is examined. Old damaged areas may therefore show stains that look different from a fresh reaction.

    Is every mushroom that releases white liquid a milkcap?

    No. Other fungi can exude moisture or droplets, and damaged mushrooms may contain clear liquid for different reasons. True milkcap latex should be interpreted together with brittle flesh, gill structure, spores, and habitat.

    Final Identification Notes

    Milkcap identification works best when latex, color, staining, gills, and habitat are treated as one system. No single feature, including the presence of milk itself, is sufficient for reliable species-level identification.

    Start by observing the latex and then watch what happens to it. Combine that reaction with cap structure, gill color, nearby trees, geography, and season before narrowing the identification.

    The simplest field rule is: cut the gills, watch the latex, identify the nearby trees, and wait for color changes. That sequence usually provides far more information than the cap color alone.

  • Mushrooms With a Volva: Why the Stem Base Matters

    Mushrooms With a Volva: Why the Stem Base Matters

    A volva is one of the most important structures in mushroom identification. It is a cup, sac, rim, or series of loose patches at the very base of the stem, formed from tissue that enclosed the young mushroom before it expanded.

    The presence of a volva can immediately narrow an identification to a smaller set of groups, and in some cases it is a critical safety feature. Several highly toxic Amanita species have a volva, so cutting the stem above ground and leaving the base buried can remove one of the most important clues.

    ⚠️ Important: Never identify a mushroom for eating from cap color alone. If a volva may be present, the entire stem base should be exposed and examined before any edibility decision is considered.

    Quick Identification

    Feature What to Look For
    Volva location At the very base of the stem
    Appearance Cup, sac, collar, rim, loose patches, concentric zones
    Origin Remnant of the universal veil
    Most important group Amanita
    Other genera Volvopluteus, Volvariella and others
    Ring present? Sometimes, but not always
    Gills Often white in Amanita, pink in Volvopluteus/Volvariella
    Safety importance Very high
    Main mistake Cutting the mushroom off above the soil
    Best practice Remove the whole base intact

    What Is a Volva?

    A volva is a remnant of the universal veil, a protective tissue that surrounds the very young fruit body. As the mushroom expands, this veil breaks apart and may remain around the stem base, on the cap, or in both places.

    The exact shape varies dramatically between species. Some volvas form a deep bag-like sac, while others appear as a low rim, several rings of tissue, or irregular patches around a bulbous base.

    Why the Stem Base Matters So Much

    The stem base often carries identification features that do not appear anywhere else on the mushroom. A cap may fade, lose veil remnants in rain, or vary greatly in color, but the structure at the base can remain much more diagnostic.

    This is especially important in Amanita. Several dangerous species can look superficially similar to edible mushrooms when the base is missing from the specimen.

    The Universal Veil

    The universal veil surrounds the entire young mushroom during early development. When the fruit body grows, that tissue tears apart in species-specific ways.

    Part may remain as a volva around the stem base, while other fragments can stay on the cap as warts or patches. This is why cap decorations and basal structures are often related.

    Volva vs Ring

    A volva and a ring are not the same structure. The volva comes from the universal veil, while the ring usually comes from a partial veil that originally protected the developing gills.

    A mushroom may have both structures, only one, or neither. In Amanita phalloides, for example, a ring and a sac-like volva can both be present.

    What Does a Volva Look Like?

    There is no single universal shape. Some are obvious and bag-like, while others are subtle enough to be missed unless the soil is carefully removed. The main forms include sacs, cups, collars, rims, concentric bands, and fragmented patches.

    Sac-Like Volva

    A sac-like volva forms a distinct loose cup around the stem base. It can look as though the mushroom is growing from a white bag. This form is especially important in dangerous Amanita species such as the Death Cap group and Destroying Angel groups.

    Rimmed or Collar-Like Volva

    Some species have a lower, tighter structure around the bulbous base rather than a deep sac. This may appear as a sharp rim or collar. Such forms are easy to damage during collection. If the mushroom is pulled roughly from compact soil, the rim may remain underground.

    Concentric Volval Zones

    Some Amanitas show several rings or belts of veil material around the bulbous stem base. These zones can be very useful for separating otherwise similar species. The Panther Cap is a classic example where the basal structure can be more informative than cap color alone.

    Fragmented Volva

    In other species, the universal veil breaks into irregular patches rather than a clean cup. These remnants may cling to the base or appear as loose scales. Because the fragments are less dramatic, they are easier for beginners to overlook.

    Mushrooms Commonly Associated With a Volva

    The most important genus is Amanita, but a volva is not exclusive to Amanitas. Several other gilled mushrooms also develop a volva-like structure from a universal veil.

    The context of gill color, ring presence, spore print, habitat, and overall structure is therefore still essential.

    Amanita phalloides — Death Cap

    Identification

    The Death Cap usually has a greenish, olive, yellowish, or brownish cap, white gills, a pale stem, a ring, and a distinct sac-like volva at the base.

    Cap color is highly variable, which makes the stem base especially important.

    Why the Volva Matters

    A specimen with the base cut off can resemble several edible mushrooms. The white sac-like volva is one of the strongest clues pointing toward a deadly Amanita.

    Death Cap contains amatoxins and can cause severe liver failure after a delayed symptom-free period.

    Amanita virosa and Related Destroying Angels

    Identification

    Destroying Angel species are usually white overall, with white gills, a white stem, a ring, and a sac-like volva.

    Their clean white appearance can seem harmless, which is one reason they are dangerous.

    Why the Volva Matters

    White gilled mushrooms occur in many genera. A white sac at the base is a critical sign that the mushroom may belong to a deadly Amanita group.

    Amanita muscaria — Fly Agaric

    Identification

    Fly Agaric is famous for its red to orange-red cap with pale warts, white gills, a ring, and a bulbous stem base.

    The volva is not usually a deep loose sac. Instead, it often appears as irregular rings, scales, or bands around the basal bulb.

    Why the Volva Matters

    The basal remnants help distinguish Fly Agaric from other red-capped mushrooms. They also show how variable a volva can look between different Amanita sections.

    Amanita pantherina — Panther Cap

    Identification

    Panther Cap typically has a brown to gray-brown cap with white veil patches, white gills, a ring, and a bulbous base.

    The base often shows a distinct rim and concentric volval zones.

    Why the Volva Matters

    The basal structure is one of the most useful features separating Panther Cap from similar brown Amanitas. Cap color and white warts alone are not reliable enough.

    Amanita fulva — Tawny Grisette

    Identification

    Amanita fulva has a tawny brown to orange-brown cap, strongly striate margin, white gills, and a prominent sac-like volva.

    Unlike many familiar Amanitas, it normally lacks a persistent ring.

    Why the Volva Matters

    This is a good reminder that volva does not always mean ring. Amanitas in the grisette group can have a very obvious volva while lacking a ring completely.

    Volvopluteus gloiocephalus — Stubble Rosegill

    Identification

    This species has a pale grayish to whitish cap, free gills that become pink as spores mature, and a volva around the stem base.

    Unlike typical Amanitas, the mature gills are pink rather than white.

    Main Difference

    Pink mature gills and a pink spore print point away from Amanita. The volva remains important, but it must be interpreted together with spore color.

    Volvariella Species

    Identification

    Members of Volvariella also have a volva and free gills that become pink with maturity.

    They can occur on wood, plant debris, compost, or other organic substrates depending on species.

    Main Difference

    Again, pink spores separate them from the white-spored Amanitas. A volva alone therefore identifies a structural group, not a species.

    Volva vs Bulbous Stem

    A swollen stem base is not automatically a volva. Many mushrooms have bulbs without any universal veil.

    The key question is whether there is actual veil tissue forming a sac, rim, collar, patches, or zones around the swelling.

    Volva vs Mycelium

    White mycelial threads around the base can also be mistaken for a volva. Mycelium usually looks fibrous or cottony rather than forming a defined membrane or cup.

    A true volva has a more organized structure. Careful cleaning of the stem base helps reveal the difference.

    Volva vs Soil Sticking to the Base

    Wet soil and leaf litter often adhere to the bottom of a mushroom and can hide or mimic structures. This is why the base should be gently cleaned rather than aggressively scraped.

    Photographing the base before cleaning can also preserve useful context.

    Why Cutting Mushrooms at Ground Level Can Be a Problem

    Cutting a mushroom across the stem may leave the entire volva underground. This can remove exactly the feature needed to distinguish a dangerous Amanita from another gilled mushroom.

    For identification purposes, it is usually better to carefully loosen the soil and extract the complete stem base intact.

    How to Remove the Whole Stem Base

    Use a finger, knife tip, or small stick to loosen the soil around the stem rather than pulling straight upward. Work around the mushroom until the basal bulb or sac becomes visible.

    The goal is not to damage the underground mycelium unnecessarily, but to recover the complete fruit body needed for identification.

    White Gills Plus a Volva

    White gills combined with a volva deserve special caution. This feature combination is strongly associated with Amanita, including some of the most dangerous mushrooms in the world.

    A ring may or may not be present. The absence of a ring does not automatically make the mushroom safe.

    Pink Gills Plus a Volva

    Pink mature gills point toward groups such as Volvopluteus or Volvariella rather than classic Amanita.

    Young specimens can still have pale gills before the spores mature, so age should always be considered.

    Volva and Cap Warts

    Cap warts can represent additional remnants of the universal veil. In species such as Fly Agaric, part of the veil stays around the base while other fragments remain scattered across the cap.

    Rain can wash cap warts away, which makes the volva and basal bulb even more important.

    Volva and Habitat

    Habitat can help refine identification once a volva has been found. Some species are mycorrhizal and occur in woodland, while others are decomposers growing in compost, straw, wood debris, or disturbed ground.

    Substrate should therefore be recorded along with cap, gills, stem, and base.

    Mushrooms With a Volva vs Mushrooms With a Ring

    Feature Volva Ring
    Position Stem base Upper or middle stem
    Origin Universal veil Partial veil
    Common in Amanita Yes Often
    Can occur alone Yes Yes
    Safety importance Very high High
    Main risk Often left underground May disappear with age

    The two structures should always be checked independently.

    How to Identify a Mushroom With a Volva Step by Step

    Start by exposing the entire base before focusing on cap color. Once a volva is confirmed, the next steps are gill color, ring presence, cap surface, spore color, and habitat.

    This sequence is much safer than starting with superficial resemblance.

    Step 1: Expose the Base

    Carefully remove the mushroom with the entire stem base attached. Do not cut the stem at soil level if identification is the goal.

    Look for a sac, cup, rim, bands, or loose veil fragments.

    Step 2: Check the Gills

    Determine whether the gills are white, cream, pink, brown, or another color.

    White free gills plus a volva strongly suggest Amanita, while pink mature gills point toward other genera.

    Step 3: Look for a Ring

    Check the upper and middle stem for a ring or ring zone. A ring can be large and hanging, fragile and disappearing, or absent from the beginning.

    Its presence helps narrow the group, but absence does not exclude Amanita.

    Step 4: Examine the Cap

    Look for veil patches, warts, striations, color, and surface texture. These features can help distinguish Amanita sections and other volva-bearing genera.

    Do not depend on color alone because several dangerous species vary substantially.

    Step 5: Consider Habitat and Geography

    Record nearby trees, substrate, region, and season. Closely related species can have different host preferences and geographic distributions.

    Regional taxonomy is especially important with Amanita.

    How to Photograph a Volva for Identification

    Take a side photograph of the entire mushroom before disturbing it. Then carefully expose the stem base and photograph it from several angles.

    A close-up should show whether the structure is a loose sac, a sharp rim, concentric belts, or fragmented veil tissue.

    The Most Important Photo

    For a suspected Amanita, the stem base may be more important than a second cap photograph. Make sure the base is fully visible and in focus.

    A mushroom photographed with the bottom of the stem cut off may remain impossible to identify safely.

    Can AI Recognize a Volva?

    AI can often detect an obvious sac or bulb when it is clearly visible. The main limitation is that users frequently photograph only the cap and upper stem.

    If the base is buried, cropped out, or cut off, the model cannot recover the missing information. A cautious identification should therefore remain uncertain when a potentially important volva is not visible.

    Common Identification Mistakes

    One common mistake is assuming that all volvas look like large white bags. In reality, some are reduced to rims, bands, or patches.

    Another mistake is confusing a bulbous stem with a true volva. A bulb is a stem shape, while a volva is veil tissue around or attached to the base.

    A third mistake is trusting cap color too strongly. Death Caps can be green, olive, yellowish, brownish, or quite pale, so the stem base often carries more stable information.

    Interesting Facts About Volvas

    The volva is essentially a visible record of how the mushroom developed. Its form reflects the way the universal veil tore apart as the fruit body expanded.

    Different Amanita groups break their universal veils in different ways, which is why one species may have a bag-like sac while another has concentric rings around a bulb.

    The universal veil can also leave remnants on the cap. This explains why structures that seem unrelated — a cup at the base and white patches on the cap — can come from the same original tissue.

    Volvas also show why mushroom identification sometimes depends on collecting technique. A perfectly photographed cap can still be less useful than an intact, carefully excavated stem base.

    Frequently Asked Questions

    Can a volva be completely buried underground?

    Yes. In some mushrooms, most of the volva remains below the soil or leaf litter, especially when the fruit body grows deeply.

    Can rain destroy a volva?

    Heavy weather can damage delicate veil tissue, but basal remnants often persist better than cap patches. Very old specimens can still become difficult to interpret.

    Can a mushroom have a volva but no ring?

    Yes. Grisettes and some other Amanitas commonly have a volva without a persistent ring.

    Can a mushroom have a ring but no volva?

    Yes. Many gilled mushrooms produce rings from a partial veil without having any universal veil or volva.

    Can young pink-spored mushrooms have white-looking gills?

    Yes. Before spores mature, the gills may remain pale, which can make young Volvariella or Volvopluteus more confusing.

    Why does the volva sometimes stay in the ground when the mushroom is pulled?

    The membrane may be fragile or tightly embedded in soil. Pulling vertically can tear the stem free while leaving the sac behind.

    Can a volva disappear completely with age?

    It can become damaged or less obvious, but some remnants often remain. Identification becomes harder when the base is old, broken, or poorly collected.

    Should every mushroom with a volva be considered poisonous?

    No. A volva is not itself a toxicity marker, and several non-Amanita genera have one. It is important because some extremely dangerous species also possess this structure.

    Final Identification Notes

    A volva is one of the most valuable structural clues in mushroom identification. It forms from the universal veil and may appear as a sac, cup, rim, collar, concentric bands, or fragmented patches around the stem base.

    Its safety importance is particularly high in Amanita. White gills, a ring, and a volva should always trigger careful consideration of dangerous Amanita species, while a volva combined with mature pink gills points toward different genera.

    The simplest field rule is: never discard the stem base before identification. A mushroom that looks ordinary from above can become immediately recognizable once the complete base is exposed.

  • Turkey Tail vs False Turkey Tail: Trametes versicolor vs Stereum

    Turkey Tail vs False Turkey Tail: Trametes versicolor vs Stereum

    Turkey Tail (Trametes versicolor) and the fungi commonly called False Turkey Tail (Stereum species) can look remarkably similar from above. Both form thin, fan-shaped brackets with concentric bands of brown, gray, cream, orange, or bluish tones, and both often grow in overlapping layers on dead hardwood.

    The most reliable difference is found on the underside. True Turkey Tail has a pale surface covered with tiny pores, while False Turkey Tail has a smooth or slightly wrinkled underside with no pores at all. Once this feature is checked, the comparison becomes much easier.

    ⚠️ Important: A colorful upper surface alone is not enough to identify Turkey Tail. Always inspect the underside before deciding that a bracket fungus is Trametes versicolor.

    Quick Comparison

    Feature Turkey Tail False Turkey Tail
    Scientific name Trametes versicolor Stereum species
    Growth form Thin fan-shaped brackets Thin fan-shaped brackets
    Upper surface Strongly zoned, usually velvety Zoned, often hairy or velvety
    Underside Tiny pores Smooth or slightly wrinkled
    Pore density Usually about 3–6 pores per mm No pores
    Underside color White to cream when fresh Cream, tan, yellowish, grayish
    Thickness Thin and leathery Thin and leathery
    Substrate Dead wood Dead wood
    Growth pattern Overlapping shelves or rosettes Shelves, crusts, or mixed forms
    Spore print White Pale
    Food use Too tough for normal culinary use Inedible / too tough
    Best field clue Porous underside Smooth underside

    The Fastest Way to Tell Them Apart

    The simplest method is to turn the bracket over and look closely at the fertile surface. Turkey Tail produces spores through thousands of tiny tubes, so the underside should show a dense field of small pore openings.

    False Turkey Tail does not have those tubes. Its underside is smooth, slightly wrinkled, or uneven, but it lacks the regular pore pattern seen in Trametes versicolor.

    Turkey Tail — Trametes versicolor

    Trametes versicolor is one of the most familiar bracket fungi in temperate forests. It grows on dead wood and often forms large groups of thin overlapping shelves that resemble the spread tail feathers of a turkey.

    The species name versicolor reflects its highly variable coloration. One cluster may combine gray, brown, cream, black, rusty orange, and blue-gray bands, while another may be much more muted.

    Upper Surface

    The upper surface is divided into distinct concentric zones that differ in color and texture. These bands usually remain visible even when the overall color palette is rather dull.

    Fresh Turkey Tail also tends to have a finely velvety or hairy surface. In good side lighting, the tiny hairs can make the zones appear even more clearly separated.

    Color Variation

    Turkey Tail is extremely variable, so color is helpful only as a supporting feature. Some fruit bodies are dominated by brown and gray, while others show strong orange, cream, or almost black bands.

    Weather also changes the appearance considerably. Rain can darken the surface, while sun and age can bleach older brackets until they look much paler than fresh growth.

    Underside

    The underside is usually white to cream when fresh and contains many tiny pores. These pores may be difficult to see from a distance because they are only a fraction of a millimeter across.

    A macro photograph or hand lens is often useful. When the underside is clean and young, the pore pattern should become obvious on close inspection.

    How Small Are the Pores?

    Turkey Tail usually has approximately 3–6 pores per millimeter. The exact appearance varies with age and the condition of the fruit body, but the surface should still look clearly porous when examined closely.

    Old brackets can become dirty, stained, or colonized by algae and other organisms. In that case, the youngest outer edge often provides the best place to inspect the pore layer.

    Shape and Thickness

    Individual brackets are usually semicircular, fan-shaped, or irregularly lobed. They grow directly from wood and frequently overlap in dense horizontal tiers.

    The brackets are thin and leathery rather than thick and fleshy. This helps separate Turkey Tail from larger polypores such as Birch Polypore or Chicken of the Woods.

    Flesh

    The internal tissue is pale, thin, and fibrous. There is very little fleshy material between the upper surface and pore layer.

    That construction gives Turkey Tail its flexible but tough texture. Fresh brackets may bend slightly, while dried specimens become much stiffer.

    False Turkey Tail — Stereum Species

    “False Turkey Tail” usually refers to one or more Stereum species that mimic the zoned appearance of Trametes versicolor. From above, some examples can be so convincing that even experienced mushroom hunters need to examine the underside.

    The important difference is anatomical rather than cosmetic. Stereum does not produce a layer of tubes and pores underneath the bracket.

    Upper Surface

    Many Stereum species have concentric bands of brown, tan, orange, gray, or cream. The upper surface can also be hairy or velvety, making the resemblance to Turkey Tail even stronger.

    This overlap is why upper-surface color should never be the deciding feature. A very colorful Stereum can look more “Turkey Tail-like” than a faded true Turkey Tail.

    Underside

    The fertile surface of Stereum is smooth to slightly wrinkled. It may be cream, buff, tan, yellowish, grayish, or orange-brown depending on the species and age.

    Most importantly, there are no true pores. Even under magnification, you will not see the regular pattern of small openings characteristic of Trametes versicolor.

    Texture

    The underside may feel smooth or slightly leathery. Some species can develop subtle folds or uneven areas, but these should not be mistaken for pores.

    If there is any doubt, inspect several young brackets from the same cluster. Fresh growth usually shows the structure most clearly.

    Growth Form

    Some Stereum species form neat shelf-like brackets, while others grow partly as crusts pressed against the wood. The outer edge may then curve outward and form small fan-shaped projections.

    This mixed crust-and-bracket growth is often more characteristic of Stereum than of typical Turkey Tail. However, it should still be treated as a supporting clue rather than the primary test.

    Turkey Tail vs False Turkey Tail: Key Differences

    The upper surfaces of these fungi overlap too much for reliable identification. The underside should always be the first structural feature you compare.
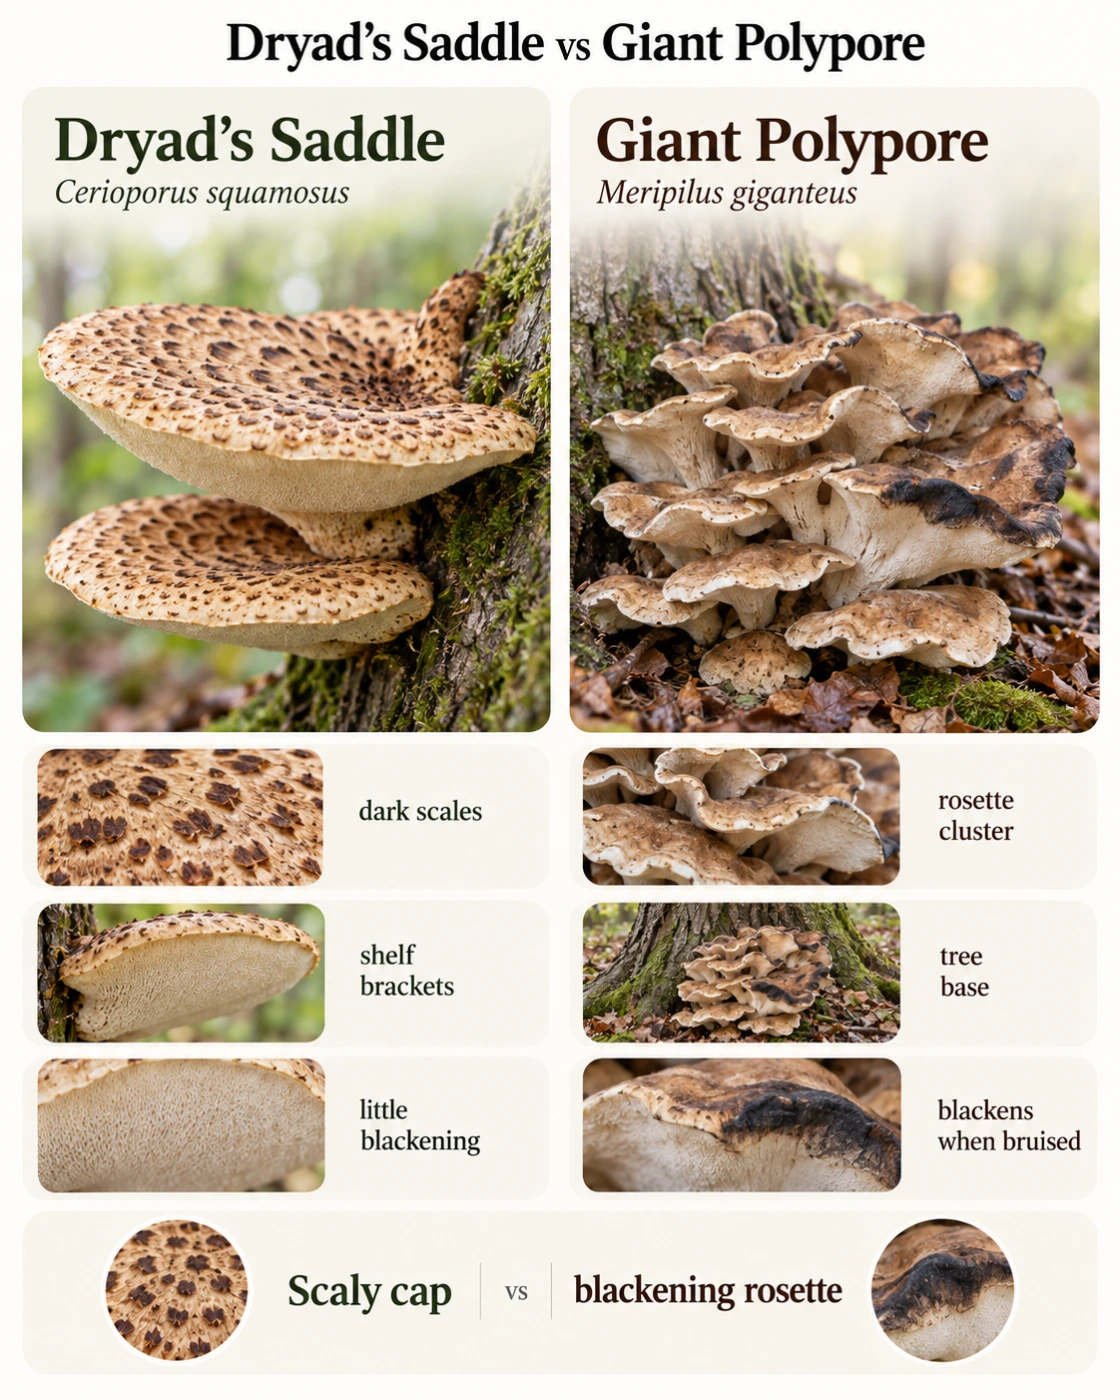
    Feature Trametes versicolor Stereum spp.
    Concentric color bands Yes Yes
    Velvety or hairy upper surface Usually Often
    White or pale underside Usually Often possible
    Pores underneath Yes No
    Smooth fertile surface No Yes
    Thin shelf-like growth Yes Yes
    Crust-like growth Less typical Common in some species
    Best clue Tiny pores Smooth underside

    Pores vs Smooth Underside

    This is the most important part of the comparison. Turkey Tail is a polypore, meaning its spores are produced inside tiny tubes that open as visible pores on the underside.

    Stereum uses a different reproductive surface. Its spores develop on a smooth exposed layer rather than inside tubes, so the underside lacks pores completely.

    Why This Difference Is So Reliable

    Color can fade, surface hairs can wear away, and brackets can become distorted by weather. The basic reproductive structure, however, remains fundamentally different.

    That makes the pore test much more useful than comparing shades of brown or counting color bands.

    What if the Underside Looks Smooth?

    A Turkey Tail underside can appear almost smooth if the pores are very small or the photograph lacks enough detail. This is especially common when the image is taken from too far away.

    Use a close-up or macro photo and inspect the freshest area of the bracket. If no pores can be found even under close examination, true Turkey Tail becomes unlikely.

    Does True Turkey Tail Always Have Strong Color Bands?

    Most fruit bodies show clear concentric zoning, but the contrast varies. Some brackets have spectacular alternating bands, while others are dominated by subtle gray-brown tones.

    Very old specimens can become faded or partially covered by algae. For that reason, attractive multicolored bands should be treated as supportive rather than decisive evidence.

    Turkey Tail Look-Alikes Beyond Stereum

    Several other bracket fungi can resemble Turkey Tail and still have pores underneath. Once pores are found, the identification process is therefore not automatically finished.

    Other Trametes species and some related polypores differ in cap texture, color pattern, pore size, and thickness. These features become important after the smooth-versus-porous comparison has been resolved.

    Trametes ochracea — Ochre Bracket

    Trametes ochracea forms thin, zoned brackets with a pale porous underside. The upper surface tends to emphasize ochre, tan, cream, and brown rather than the more varied palette often seen in Turkey Tail.

    The bands can still be very distinct, so color alone is not enough. Texture and the overall zoning pattern should be considered together with pore characters.

    Trametes hirsuta — Hairy Bracket

    Hairy Bracket usually has a coarser, more obviously hairy upper surface. Its colors are often pale gray, cream, or brown with broader, less delicate bands.

    The underside contains pores, so it cannot be separated from Turkey Tail using the simple pore test. The stronger coarse hairs and more subdued pattern become useful at that stage.

    Trametes pubescens — Downy Bracket

    This species is generally much paler and less strongly zoned. Cream, white, and buff tones often dominate the upper surface.

    Its underside is also porous, but the overall appearance is usually softer and more uniform than classic Turkey Tail.

    Trichaptum Species

    Some Trichaptum species form thin brackets that can resemble Turkey Tail from above. Their fertile surface may develop violet or purple coloration, particularly in fresh specimens.

    That underside color is an important clue. Purple or violet tones strongly suggest another polypore rather than Trametes versicolor.

    Where Does Turkey Tail Grow?

    Turkey Tail grows directly from dead wood and is an active decomposer. Fallen logs, branches, stumps, and standing dead trees are all common substrates.

    It is especially frequent on hardwood, including oak, beech, maple, birch, and many other broadleaf trees. Host species can support the identification, but the underside remains far more important.

    Where Does False Turkey Tail Grow?

    Stereum species also occur on dead wood, particularly hardwood branches and logs. Their habitats therefore overlap strongly with those of Turkey Tail.

    That ecological overlap explains why location alone is not useful for separating them. Two almost identical-looking bracket fungi can grow on the same type of wood in the same forest.

    Can Turkey Tail and Stereum Grow on the Same Log?

    Yes. A fallen tree can support several wood-decaying fungi at the same time, and different species may fruit only centimeters apart.

    This can create a misleading impression that every colorful bracket on one log belongs to the same species. Each cluster should therefore be checked separately.

    Is Turkey Tail Edible?

    Turkey Tail is too thin, tough, and leathery to be considered a normal culinary mushroom. It is not eaten in the same way as oyster mushrooms, chanterelles, or young polypores with fleshy tissue.

    The species is well known because compounds and standardized preparations derived from Trametes versicolor have been studied scientifically. That research should not be confused with the idea that eating an unidentified wild bracket provides medical benefits.

    Is False Turkey Tail Edible?

    Stereum species are also tough and leathery and are not considered ordinary food mushrooms. Their thin structure provides little edible tissue even aside from identification concerns.

    They should not be treated as culinary substitutes for Turkey Tail. Exact species identification within Stereum can also be difficult from photographs alone.

    How to Identify Turkey Tail Step by Step

    A reliable identification starts with the substrate and underside rather than the colors on top. After pores are confirmed, the upper surface and overall structure can be used to strengthen the identification.
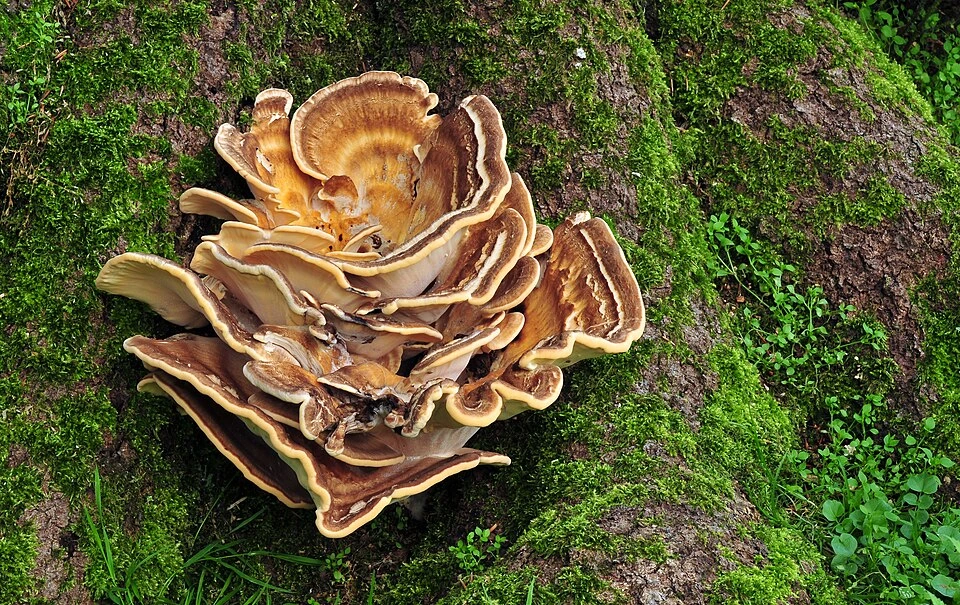
    Step 1: Confirm Growth on Wood

    Turkey Tail should grow directly from woody material. Fallen logs, dead branches, and stumps are especially typical.

    A similarly colored fungus growing from soil should be approached as a different identification problem.

    Step 2: Turn the Bracket Over

    Look for a pale underside and inspect it closely. The presence of many tiny pores strongly supports a polypore such as Turkey Tail.

    A completely smooth underside points instead toward Stereum or another non-poroid fungus.

    Step 3: Check the Upper Surface

    Look for strong concentric zones with alternating colors. The surface should usually be finely velvety rather than completely smooth.

    Muted specimens are still possible, so the upper surface should confirm rather than determine the identification.
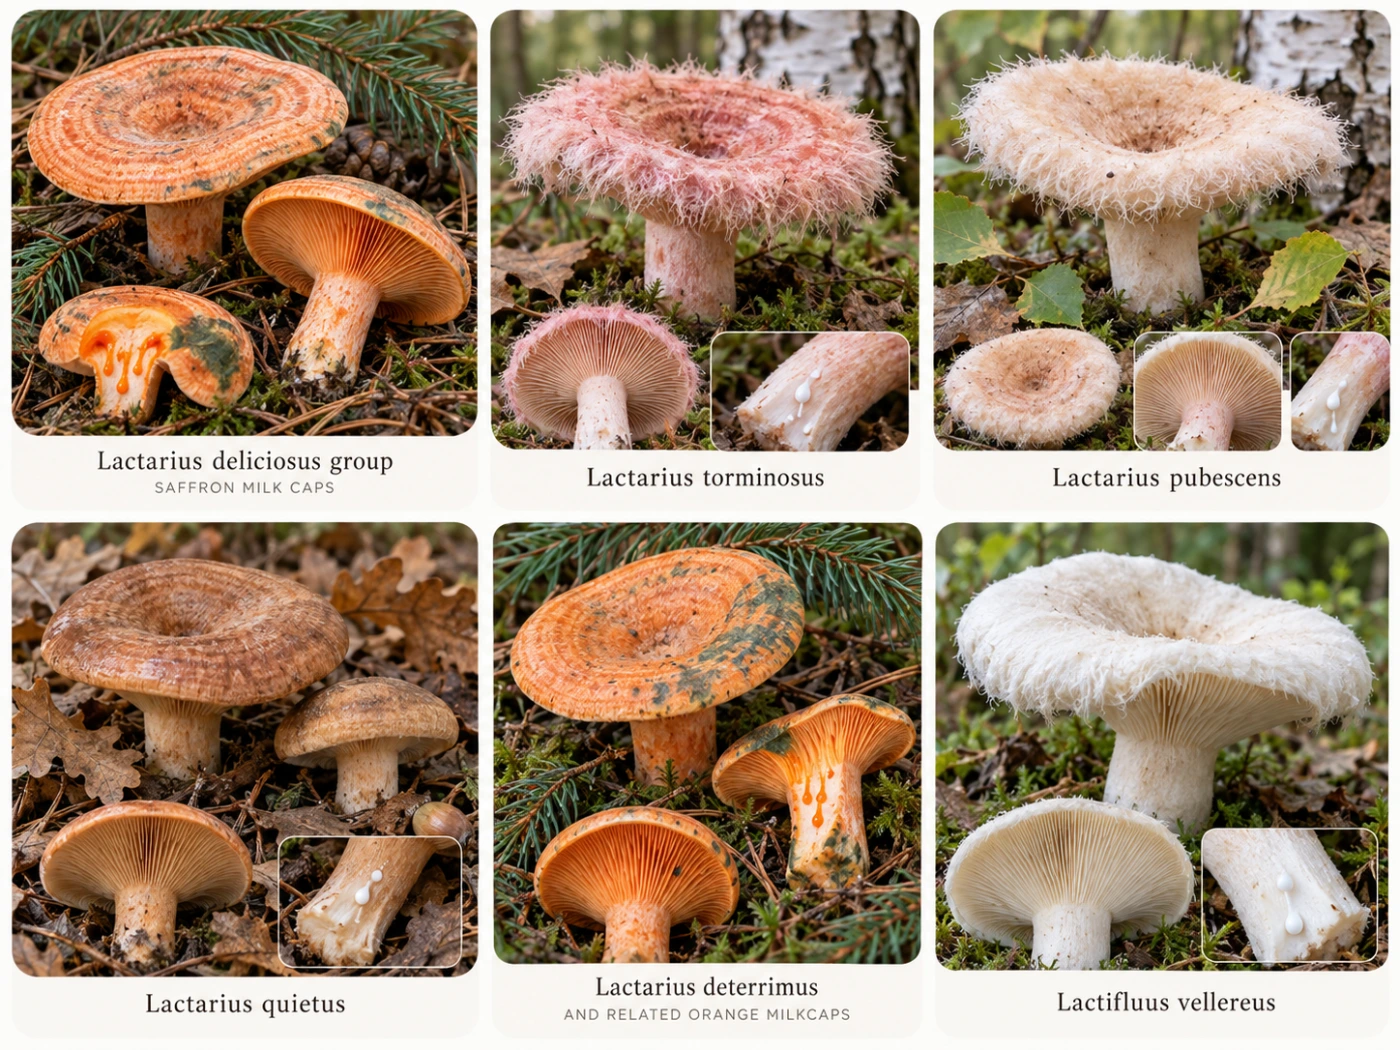
    Step 4: Check Thickness

    Turkey Tail brackets should be thin and leathery. A thick, woody, or fleshy bracket suggests another species.

    Examining the side of the fruit body often makes this difference easier to judge than looking straight down from above.

    Step 5: Compare Several Fruit Bodies

    Use both young and old brackets if several are available. Young edges often preserve white pores and fine surface hairs better than weathered centers.

    Comparing multiple fruit bodies also helps reveal the natural variability of the species.

    How to Photograph Turkey Tail for Identification

    Start with a wide image showing the brackets growing on the log or branch. This documents the growth pattern and substrate.

    Then photograph both surfaces separately. A top image should show the concentric zones, while the underside image should be close enough to resolve individual pores.

    The Most Important Photograph

    For this comparison, the underside photograph is the critical one. A beautiful image of the upper bands may still leave Turkey Tail and False Turkey Tail impossible to separate.

    Use natural light and focus closely on the fertile surface. If possible, include a macro shot of the pore structure.

    Can AI Tell Turkey Tail From False Turkey Tail?

    AI can often recognize the general Turkey Tail appearance from the colorful zoned cap, but a photograph from above alone creates substantial uncertainty. Stereum can mimic that appearance extremely well.

    Accuracy improves dramatically when the underside is included. Visible pores support Trametes, while a smooth fertile surface points away from true Turkey Tail.

    For poor or incomplete photographs, a cautious result such as “Turkey Tail or Stereum-like bracket fungus” can be more accurate than forcing an exact species.

    Common Identification Mistakes

    The most common mistake is identifying Turkey Tail solely from colorful concentric bands. Those bands are shared by several other bracket fungi.

    Another mistake is assuming that every white underside is porous. A pale Stereum underside can look very similar from a distance, so the surface must be examined closely.

    Old brackets create another source of error because algae, dirt, fading, and physical damage can hide the normal appearance. Fresh growth at the margin is usually more informative.

    Interesting Facts About Turkey Tail and False Turkey Tail

    The name versicolor means approximately “of many colors,” which fits Turkey Tail particularly well. Even brackets produced by the same fungal colony can vary significantly in their combination of brown, gray, orange, cream, and dark bands.

    The concentric zones form as the fruit body expands outward. Changes in growth rate, pigmentation, and surface hairs contribute to the layered appearance that makes these fungi so visually distinctive.

    Turkey Tail and Stereum are also excellent examples of convergent appearance. They can look almost identical from above even though their spore-producing surfaces are built in fundamentally different ways.

    Both groups are important decomposers in forest ecosystems. By breaking down dead wood, they help recycle nutrients and gradually return material locked in trunks and branches to the soil.

    Frequently Asked Questions

    Can Turkey Tail pores disappear with age?

    The tube structure does not simply disappear, but old surfaces can become damaged, clogged with dirt, or difficult to see. A clean young edge is usually much easier to examine than an old central area.

    Why does my Turkey Tail have green areas?

    Algae can colonize old or persistently damp fruit bodies and create green patches. This coloration may therefore come from another organism growing on the fungus rather than from Turkey Tail itself.

    Can False Turkey Tail have a white underside?

    Yes. Some Stereum species can have very pale fertile surfaces, so color alone is not enough to separate them.

    The important question is whether the surface contains actual pores. A smooth white underside still points away from Turkey Tail.

    Why are some Turkey Tails almost black?

    Some growth bands naturally become very dark brown or nearly black. Moisture, genetics, age, and lighting can make those dark zones even more pronounced.

    Can Turkey Tail be found during winter?

    Yes, older fruit bodies may persist through winter, especially in cool damp climates. They may no longer be actively growing, but their brackets can remain attached to wood for a long time.

    Do all Stereum species resemble Turkey Tail?

    No. The genus contains a variety of forms and colors, and only some create the strongly zoned fan-shaped brackets commonly called False Turkey Tail.

    This is why “False Turkey Tail” is better understood as a practical look-alike category rather than one exact species in every case.

    Can different bracket species grow mixed together?

    Yes. One log can host several fungi simultaneously, and their brackets can overlap visually.

    Never assume that every bracket on the same piece of wood belongs to the same species.

    Does a velvety cap prove Turkey Tail?

    No. Both Turkey Tail and some Stereum species can have hairy or velvety upper surfaces.

    The underside remains the much stronger feature.

    Final Identification Notes

    Turkey Tail and False Turkey Tail are easiest to separate by ignoring the attractive upper surface at first. Instead, turn the bracket over and inspect how the spores are produced.

    True Turkey Tail, Trametes versicolor, has a white to cream underside covered with tiny pores. False Turkey Tail in the Stereum group has a smooth or slightly wrinkled fertile surface without pores.

    The simplest rule is therefore easy to remember: pores underneath = Turkey Tail candidate; smooth underside = Stereum candidate. Color bands, velvety texture, thin growth, and dead-wood habitat can then be used to confirm the identification.
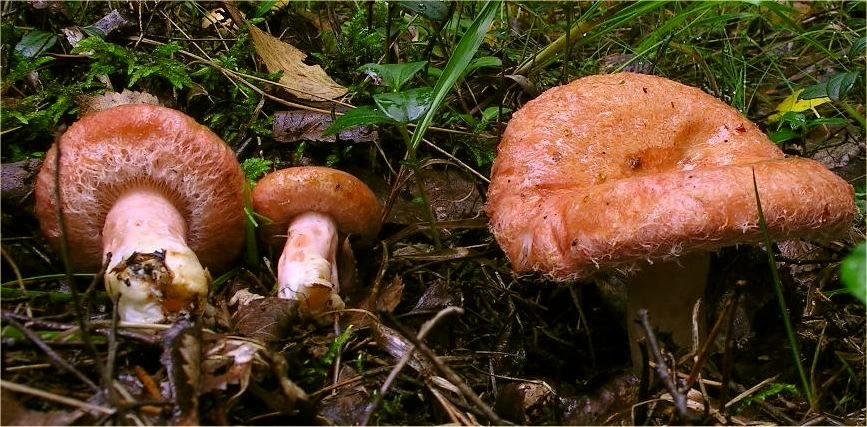
  • Steinpilz oder Gallenröhrling? So erkennst du den Unterschied

    Steinpilz oder Gallenröhrling? So erkennst du den Unterschied

    Steinpilz und Gallenröhrling können sich auf den ersten Blick erstaunlich ähnlich sehen. Beide besitzen einen braunen Hut, eine helle bis bräunliche kräftige Statur und auf der Unterseite keine Lamellen, sondern eine Röhrenschicht.

    Für Pilzsammler ist die Unterscheidung besonders wichtig, weil der Steinpilz (Boletus edulis) ein geschätzter Speisepilz ist, während der Gallenröhrling (Tylopilus felleus) extrem bitter schmeckt und als Speisepilz ungeeignet ist. Glücklicherweise gibt es mehrere gut sichtbare Merkmale, mit denen sich beide Arten meist zuverlässig auseinanderhalten lassen.

    ⚠️ Wichtig: Bestimme einen Wildpilz niemals nur anhand eines einzelnen Merkmals, Fotos oder einer KI-Erkennung als essbar. Vor dem Verzehr sollte die Bestimmung unabhängig und zuverlässig bestätigt werden.

    Steinpilz und Gallenröhrling im direkten Vergleich

    Merkmal Steinpilz Gallenröhrling
    Wissenschaftlicher Name Boletus edulis Tylopilus felleus
    Hut Braun bis kastanienbraun Braun bis graubraun
    Junge Poren Weiß Weißlich
    Reife Poren Gelb bis olivgrün Rosa bis rosabraun
    Stielnetz Hell, weißlich Meist deutlich dunkelbraun
    Fleisch Weiß Weiß
    Blaufärbung Normalerweise keine Normalerweise keine
    Geschmack Mild Extrem bitter
    Sporenpulver Olivbraun Rosa bis rosabraun
    Habitat Laub- und Nadelwald Laub- und Nadelwald
    Essbarkeit Essbar bei sicherer Bestimmung Ungenießbar wegen starker Bitterkeit

    Der wichtigste Unterschied: die Farbe der Poren

    Die Unterseite des Hutes gehört zu den zuverlässigsten Merkmalen bei dieser Verwechslung. Junge Exemplare beider Arten können noch sehr ähnlich aussehen, weil die Poren zunächst fast weiß sind.

    Mit zunehmendem Alter entwickelt sich jedoch ein deutlicher Unterschied. Beim Steinpilz werden die Poren zuerst gelb und später olivgrün, während sie beim Gallenröhrling einen rosa bis rosabraunen Ton annehmen.

    Steinpilz: weiß zu gelb zu oliv

    Bei einem jungen Steinpilz kann die Röhrenschicht nahezu rein weiß wirken. Während die Sporen heranreifen, wird sie gelblicher und schließlich olivgrün.

    Ein älterer Steinpilz mit deutlich olivfarbener Unterseite sieht deshalb ganz anders aus als ein junger, kompakter Fruchtkörper. Das ist eine normale Altersveränderung und kein Hinweis auf eine andere Art.

    Gallenröhrling: weißlich zu rosa

    Beim Gallenröhrling beginnt die Porenschicht ebenfalls sehr hell. Später entwickelt sie jedoch einen charakteristischen rosa oder schmutzig rosabraunen Farbton.

    Gerade bei ausgewachsenen Exemplaren ist dieser Unterschied oft sehr deutlich. Rosa Poren sind eines der stärksten Warnzeichen dafür, dass es sich nicht um einen Steinpilz handelt.

    Das Stielnetz: hell oder dunkel?

    Der zweite besonders wichtige Unterschied befindet sich auf dem Stiel. Beide Pilze können eine netzartige Zeichnung besitzen, doch die Farbe und der Kontrast unterscheiden sich häufig deutlich.

    Beim Steinpilz ist das Netz meist hell und relativ fein. Beim Gallenröhrling erscheint es oft dunkelbraun und deutlich gegen den helleren Untergrund des Stiels abgesetzt.

    Stiel des Steinpilzes

    Der Steinpilz besitzt meist einen kräftigen, keulenförmigen bis bauchigen Stiel. Besonders im oberen Bereich ist häufig eine feine weißliche oder cremefarbene Netzzeichnung sichtbar.

    Das Netz kann bei einzelnen Exemplaren schwächer ausgeprägt sein. Deshalb sollte auch dieses Merkmal immer zusammen mit der Porenfarbe bewertet werden.

    Stiel des Gallenröhrlings

    Beim Gallenröhrling ist das Netz häufig gröber und dunkler. Es kann wie ein braunes Relief über den Stiel verlaufen und dadurch auffälliger wirken.

    Besonders bei älteren Exemplaren entsteht oft ein deutlicher Kontrast zwischen der helleren Grundfarbe des Stiels und dem dunklen Netz.

    Die einfache Merkhilfe

    Für die praktische Feldbestimmung kann man sich folgende Kombination merken:

    Steinpilz: olivgelbe Poren + helles Netz.

    Gallenröhrling: rosa Poren + dunkles Netz.

    Diese Kombination ist wesentlich zuverlässiger als der Vergleich der Hutfarbe. Brauntöne überschneiden sich bei beiden Arten stark.

    Wie sieht der Steinpilz aus?

    Der Steinpilz hat einen hell- bis dunkelbraunen Hut, dessen Oberfläche bei feuchtem Wetter leicht glänzend oder etwas klebrig wirken kann. Junge Exemplare sind kompakt und besitzen häufig einen fast kugeligen Hut.

    Mit zunehmendem Alter wird der Hut breiter und flacher. Die Farbe kann von hellbraun über nussbraun bis tief kastanienbraun reichen.

    Fleisch

    Das Fleisch ist dick, fest und weiß. Nach dem Anschneiden bleibt es normalerweise weiß und zeigt keine ausgeprägte Blaufärbung.

    Dieses stabile weiße Fleisch ist typisch für die klassische Steinpilzgruppe. Es reicht allein jedoch nicht für die Artbestimmung aus.

    Stiel

    Der Stiel ist meist kräftig und bei jungen Exemplaren oft deutlich bauchig. Das helle Netz ist besonders im oberen Bereich gut zu erkennen.

    Bei älteren Steinpilzen kann der Stiel länger und weniger massiv wirken. Die grundlegende Struktur bleibt jedoch erhalten.

    Wie sieht der Gallenröhrling aus?

    Der Gallenröhrling besitzt ebenfalls einen braunen Hut und kann in Größe und Proportionen einem Steinpilz stark ähneln. Die Oberfläche kann matt, samtig oder bei Feuchtigkeit etwas dunkler erscheinen.

    Besonders junge Exemplare sind problematisch, weil die später charakteristischen rosa Poren noch nicht entwickelt sein müssen.

    Fleisch

    Das Fleisch ist weiß und zeigt normalerweise keine starke Blaufärbung. Deshalb hilft ein Anschnitt allein bei dieser Verwechslung nur begrenzt weiter.

    Die auffälligste Eigenschaft ist der extrem bittere Geschmack, der dem Pilz seinen Namen gegeben hat.

    Stiel

    Der Stiel kann kräftig und keulig sein. Die dunkle Netzzeichnung ist häufig deutlich sichtbar und oft gröber als beim Steinpilz.

    Dieses Merkmal sollte zusammen mit der Porenfarbe überprüft werden.

    Warum sind junge Exemplare schwieriger?

    Bei jungen Steinpilzen und Gallenröhrlingen können die Poren fast gleich aussehen. Beide besitzen zunächst eine helle bis weiße Unterseite.

    Auch die Stielzeichnung kann bei sehr jungen Pilzen noch wenig ausgeprägt sein. Ein kleiner brauner Röhrling lässt sich deshalb unter Umständen schwieriger bestimmen als ein ausgewachsenes Exemplar.

    Andere Pilze in der Umgebung ansehen

    Wenn mehrere ähnliche Fruchtkörper am selben Standort wachsen, lohnt es sich, verschiedene Altersstufen zu vergleichen. Ältere Exemplare zeigen die typische Porenfarbe oft wesentlich deutlicher.

    Man sollte allerdings nicht automatisch annehmen, dass alle Pilze eines Fundortes derselben Art angehören. Verschiedene Röhrlingsarten können unmittelbar nebeneinander wachsen.

    Kann man beide an der Hutform unterscheiden?

    Nicht zuverlässig. Beide können einen rundlichen bis breit gewölbten braunen Hut entwickeln.

    Auch die Hutfarbe überschneidet sich stark. Licht, Feuchtigkeit und Alter beeinflussen den Braunton zusätzlich.

    Ein sehr dunkler oder besonders heller Hut kann zwar einen ersten Eindruck vermitteln, sollte aber nie als entscheidendes Merkmal verwendet werden.

    Blauen Steinpilz oder Gallenröhrling beim Anschneiden?

    Typische Exemplare beider Arten zeigen normalerweise keine deutliche blaue Verfärbung des Fleisches. Eine starke schnelle Blaufärbung deutet deshalb eher auf einen anderen Röhrling hin.

    Es gibt zahlreiche braune Röhrlinge mit gelben Poren, deren Fleisch oder Porenschicht nach Druck blau wird. Solche Exemplare sollten mit anderen Arten verglichen werden.

    Wo wächst der Steinpilz?

    Steinpilze sind Mykorrhizapilze und leben in enger Verbindung mit Baumwurzeln. Sie können sowohl in Nadel- als auch in Laubwäldern vorkommen.

    Fichte, Kiefer, Buche, Eiche und Birke können wichtige Partner sein. Deshalb ist der Baum allein nicht ausreichend für die Bestimmung.

    Saison

    Die Hauptsaison reicht vom Sommer bis in den Herbst. Feuchte Perioden nach warmem Wetter können besonders ergiebige Fruchtungen auslösen.

    In günstigen Jahren können Steinpilze am selben Standort mehrfach innerhalb einer Saison erscheinen.

    Wo wächst der Gallenröhrling?

    Auch der Gallenröhrling ist ein Mykorrhizapilz und kommt sowohl in Nadel- als auch in Mischwäldern vor. Er wird häufig in Verbindung mit Fichte, Kiefer und anderen Bäumen gefunden.

    Dadurch überschneidet sich sein Lebensraum stark mit dem des Steinpilzes. Die Aussage „unter Fichten gefunden“ hilft bei dieser konkreten Verwechslung also nur wenig.

    Steinpilz oder Gallenröhrling unter Fichten

    Unter Fichten können beide Arten auftreten. Ein brauner Röhrling an einem typischen Steinpilzstandort ist deshalb nicht automatisch ein Steinpilz.

    Die Unterseite und das Stielnetz bleiben entscheidend. Gerade an solchen Standorten lohnt es sich, jeden Fruchtkörper einzeln zu prüfen.

    Steinpilz oder Gallenröhrling unter Buchen und Eichen

    Auch in Laubwäldern können ähnliche braune Röhrlinge auftreten. Neben Steinpilzen und Gallenröhrlingen kommen dort außerdem weitere Arten hinzu.

    Dadurch wird eine Bestimmung allein anhand des Baumes noch unsicherer. Poren, Stiel und gegebenenfalls Sporenfarbe bleiben wichtiger.

    Ist der Gallenröhrling giftig?

    Der Gallenröhrling wird vor allem wegen seines extrem bitteren Geschmacks als ungenießbar betrachtet. Er gehört nicht zu den klassischen tödlich giftigen Röhrlingen.

    Schon ein kleiner Anteil kann jedoch ein ganzes Pilzgericht durch die Bitterkeit ungenießbar machen. Deshalb ist die Unterscheidung für Pilzsammler trotzdem sehr relevant.

    Warum schmeckt er so bitter?

    Der intensive Bittergeschmack stammt von chemischen Verbindungen im Fruchtkörper. Die Wahrnehmung kann zwischen Menschen unterschiedlich stark ausfallen, ist bei typischen Exemplaren aber sehr ausgeprägt.

    Für Anfänger ist eine Geschmacksprobe dennoch keine sinnvolle primäre Bestimmungsmethode. Sichtbare Merkmale sollten zuerst verwendet werden.

    Ist der Steinpilz essbar?

    Der Steinpilz gehört bei sicherer Bestimmung zu den bekanntesten Speisepilzen Europas. Besonders junge feste Exemplare werden kulinarisch geschätzt.

    Vor dem Verzehr sollte jedoch ausgeschlossen werden, dass es sich um einen Gallenröhrling oder einen anderen ähnlichen Röhrling handelt. Eine Übersicht weiterer Speisepilze findest du unter Essbare Pilze in Deutschland: 20 häufige Arten erkennen.

    Andere Pilze, die mit Steinpilzen verwechselt werden können

    Gallenröhrling ist nicht der einzige braune Röhrling, der einem Steinpilz ähnlich sehen kann. Auch andere Vertreter der Steinpilzgruppe sowie Maronen-Röhrlinge können oberflächlich ähnlich wirken.

    Eine genaue Bestimmung sollte deshalb nicht nur die Frage „Steinpilz oder Gallenröhrling?“ beantworten, sondern zunächst prüfen, ob die Merkmale überhaupt zu einer dieser beiden Arten passen.

    Boletus pinophilus — Kiefern-Steinpilz

    Der Kiefern-Steinpilz hat häufig einen dunkleren, rötlich- bis weinbraunen Hut. Der kräftige Stiel trägt wie beim Steinpilz eine helle Netzzeichnung.

    Die Poren entwickeln sich ebenfalls von weiß über gelb zu oliv. Das Fleisch bleibt normalerweise weiß.

    Boletus reticulatus — Sommer-Steinpilz

    Der Sommer-Steinpilz besitzt häufig einen trockeneren und helleren braunen Hut. Die helle Netzzeichnung kann sich deutlich über einen großen Teil des Stiels ziehen.

    Er kommt besonders in warmen Laubwäldern mit Eichen und Buchen vor und kann bereits früh im Jahr erscheinen.

    Imleria badia — Maronen-Röhrling

    Der Maronen-Röhrling hat einen kastanienbraunen Hut und gelbe bis olivfarbene Poren. Diese verfärben sich bei Druck häufig deutlich blau.

    Der Stiel besitzt nicht die charakteristische helle Netzzeichnung eines Steinpilzes. Die blaue Reaktion der Poren ist ein besonders nützlicher Unterschied.

    Steinpilz vs Gallenröhrling vs Maronen-Röhrling

    Merkmal Steinpilz Gallenröhrling Maronen-Röhrling
    Reife Poren Gelb bis oliv Rosa Gelb bis oliv
    Poren bei Druck Kaum Veränderung Kaum Veränderung Häufig blau
    Stielnetz Hell Dunkel Kein deutliches Netz
    Stiel Kräftig Kräftig Meist schlanker
    Geschmack Mild Sehr bitter Mild
    Typische Sicherheit Essbar bei sicherer Bestimmung Ungenießbar Essbar bei sicherer Bestimmung

    Steinpilz oder Gallenröhrling Schritt für Schritt bestimmen

    Eine systematische Reihenfolge verhindert, dass die Hutform zu stark gewichtet wird. Besonders hilfreich sind ausgewachsene, unbeschädigte Exemplare.

    Schritt 1: Unter den Hut schauen

    Prüfe zuerst die Poren. Gelb bis oliv spricht für Steinpilz, deutlich rosa für Gallenröhrling.

    Sind die Poren noch weiß, handelt es sich möglicherweise um ein junges Exemplar. Dann werden die nächsten Merkmale wichtiger.

    Schritt 2: Das Stielnetz untersuchen

    Suche nach einer netzartigen Zeichnung. Ein helles feines Netz unterstützt Steinpilz, ein dunkles kontrastreiches Netz unterstützt Gallenröhrling.

    Fotografiere den oberen und mittleren Stielbereich aus der Nähe, wenn das Netz schwer erkennbar ist.

    Schritt 3: Fleisch kontrollieren

    Schneide bei Bedarf einen bereits entnommenen Pilz längs durch. Beide Arten besitzen grundsätzlich helles Fleisch ohne typische starke Blaufärbung.

    Wenn das Fleisch schnell intensiv blau wird, sollte eine andere Röhrlingsart in Betracht gezogen werden.

    Schritt 4: Alter berücksichtigen

    Sehr junge Exemplare können schwierig sein. Suche nach älteren Pilzen in der Nähe, deren Poren bereits ihre reife Farbe zeigen.

    Eine rosa entwickelte Röhrenschicht kann die Bestimmung des Gallenröhrlings erheblich erleichtern.

    Schritt 5: Habitat als Kontrolle verwenden

    Notiere Waldtyp und Bäume in der Umgebung. Beide Arten können in Nadel- und Mischwald vorkommen, sodass dieser Punkt vor allem der Plausibilitätskontrolle dient.

    Habitat ersetzt bei dieser Gegenüberstellung nicht die Untersuchung von Poren und Stiel.

    Wie fotografiert man Steinpilz und Gallenröhrling zur Bestimmung?

    Fotografiere zunächst den vollständigen Fruchtkörper am Fundort. Danach sollte unbedingt die Unterseite des Hutes dokumentiert werden.

    Ein nahes Foto des Stiels ist ebenso wichtig, weil die Farbe der Netzzeichnung entscheidend sein kann.

    Die drei wichtigsten Fotos

    Am hilfreichsten sind eine Gesamtansicht, die Porenschicht und ein scharfes Bild des Stielnetzes. Bei einem jungen Pilz können zusätzlich ältere Exemplare aus demselben Bereich fotografiert werden.

    Eine reine Aufnahme des braunen Hutes ist für diese Unterscheidung dagegen nur begrenzt hilfreich.

    Kann KI Steinpilz und Gallenröhrling unterscheiden?

    Bei guten Bildern kann eine Bilderkennung die beiden Arten häufig gut voneinander abgrenzen. Besonders wertvoll sind Fotos von reifen Poren und der Stielzeichnung.

    Bei jungen Pilzen mit weißen Poren wird die Aufgabe wesentlich schwieriger. Eine vorsichtige Erkennung sollte in solchen Fällen beide Arten oder weitere ähnliche Röhrlinge berücksichtigen, statt einen sicheren Namen zu erzwingen.

    Wenn du unsicher bist, wie wichtige Merkmale eines Pilzes geprüft werden, hilft der allgemeine Leitfaden Pilze bestimmen: So erkennst du Pilzarten richtig.

    Häufige Fehler bei der Unterscheidung

    Ein häufiger Fehler ist die Konzentration auf den braunen Hut. Dieser überschneidet sich bei beiden Arten so stark, dass er nur wenig diagnostischen Wert besitzt.

    Ein zweiter Fehler ist die Annahme, ein Pilz an einem bekannten Steinpilzplatz müsse ebenfalls ein Steinpilz sein. Verschiedene Mykorrhizapilze können am selben Standort und sogar unter demselben Baum wachsen.

    Besonders problematisch ist außerdem die Bestimmung sehr junger Exemplare ohne Beachtung des Stielnetzes. Ihre noch weißen Poren können den wichtigsten Unterschied vorübergehend verbergen.

    Interessante Fakten über Steinpilz und Gallenröhrling

    Der wissenschaftliche Name Boletus edulis enthält bereits einen Hinweis auf die lange kulinarische Bedeutung des Steinpilzes: edulis bedeutet sinngemäß „essbar“. Der Pilz gehört in vielen europäischen Ländern zu den bekanntesten und wirtschaftlich wichtigsten Wildpilzen.

    Der Gallenröhrling verdankt sowohl seinen deutschen als auch seinen englischen Namen – Bitter Bolete – seinem extrem bitteren Geschmack. Schon wenige Stücke können geschmacklich eine wesentlich größere Menge anderer Pilze dominieren.

    Besonders interessant ist, wie ähnlich beide Arten als junge Fruchtkörper aussehen können. Erst mit der Reifung der Sporen entwickelt sich beim Gallenröhrling die charakteristische rosa Porenfarbe, während die Poren des Steinpilzes in Richtung Gelb und Oliv wechseln.

    Beide Arten zeigen außerdem, warum Baumarten allein nicht für die Pilzbestimmung ausreichen. Da sich ihre ökologischen Ansprüche teilweise überschneiden, müssen morphologische Merkmale den Ausschlag geben.

    Häufig gestellte Fragen

    Kann ein Gallenröhrling sehr hell sein?

    Ja. Hut- und Stielfarbe können durch Alter, Wetter und Licht stark variieren. Deshalb sollte ein ungewöhnlich heller Fruchtkörper nicht allein aufgrund der Farbe ausgeschlossen werden.

    Warum sind die Poren manchmal nur schwach rosa?

    Bei jungen Gallenröhrlingen ist die rosa Färbung noch nicht vollständig entwickelt. Auch Licht und Feuchtigkeit können beeinflussen, wie deutlich sie auf einem Foto erscheint.

    Kann ein alter Steinpilz ebenfalls rosafarbene Stellen bekommen?

    Verletzungen, Alter und Verfärbungen können ungewöhnliche Farbtöne verursachen. Entscheidend ist die natürliche Grundfarbe der intakten reifen Porenschicht und nicht eine einzelne beschädigte Stelle.

    Kann das dunkle Netz beim Gallenröhrling fehlen?

    Die Ausprägung kann variieren und bei manchen Exemplaren weniger deutlich sein. Deshalb sollte die Netzzeichnung immer zusammen mit der Porenfarbe und anderen Merkmalen bewertet werden.

    Warum sind manche Steinpilzstiele viel schlanker als andere?

    Alter, Boden, Moosschicht und Wachstumsbedingungen beeinflussen die Proportionen. Junge Steinpilze sind häufig besonders bauchig, während ältere Exemplare längere Stiele entwickeln können.

    Können beide Arten direkt nebeneinander wachsen?

    Ja. Ihre Lebensräume können sich überschneiden, sodass unterschiedliche Röhrlingsarten auf engem Raum vorkommen können.

    Hilft der Geruch bei der Unterscheidung?

    Nur begrenzt. Beide können relativ mild pilzartig riechen, weshalb Poren und Stielzeichnung wesentlich bessere Merkmale sind.

    Kann man einen sehr jungen Pilz sicher unterscheiden, wenn die Poren noch weiß sind?

    Manchmal, aber die Bestimmung ist schwieriger. In diesem Stadium gewinnen das Stielnetz, die gesamte Struktur und ältere Exemplare aus der Umgebung an Bedeutung.

    Fazit: Steinpilz oder Gallenröhrling?

    Der zuverlässigste Unterschied liegt nicht im braunen Hut, sondern unter dem Hut und auf dem Stiel.

    Beim Steinpilz werden die Poren mit zunehmendem Alter gelb bis olivgrün, und das Stielnetz ist meistens hell. Beim Gallenröhrling werden reife Poren dagegen rosa bis rosabraun, während das Netz am Stiel häufig dunkelbraun und stärker kontrastierend ist.

    Die einfachste Merkhilfe lautet daher:

    Steinpilz = olivfarbene Poren + helles Netz.
    Gallenröhrling = rosa Poren + dunkles Netz.

    Bei sehr jungen Exemplaren können diese Merkmale noch schwach entwickelt sein. In diesem Fall ist es besser, die Bestimmung offen zu lassen, als einen vermeintlichen Steinpilz nur aufgrund seiner Hutform zu bestimmen.